
Making an old-school game
The story
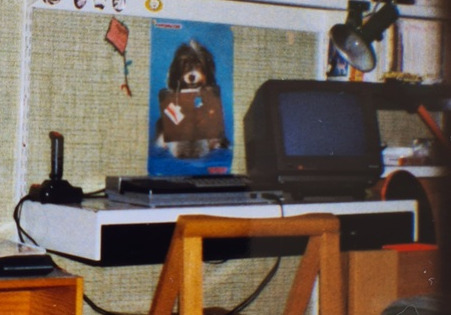
In this activity we're going to be making the prototype of a game. Meet Emilia, the main character of our game:
Emilia is a little girl. She's rather hungry today, and as it happens food is raining from the sky. Some of it is healthy, and she'll want to eat it, but some of it is unhealthy, and she'll want to avoid it.
Open boardie
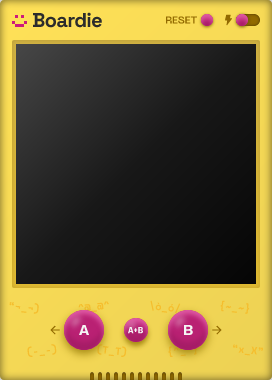
For this tutorial, I recommend that you use Boardie, our virtual board. You can open Boardie by going to the online MicroBlocks IDE, clicking on the USB icon at the top toolbar, and selecting open Boardie.
You should now see a floating retro-looking device labeled with a large screen and a bunch of buttons.
To learn more about this virtual board -that's not an emulator- you can read this blog post.
If you have a board with a TFT display, however, you can use that to follow this tutorial. Some of the boards with a built-in TFT display that I would recommend are the Citilab ED1, the Adafruit Clue and the M5Stack Core.
Color palettes and sprites
Why use palettes
The first idea that you may come up with when thinking of ways to store a image in a computer is to make a table where each cell contains the color of a pixel.
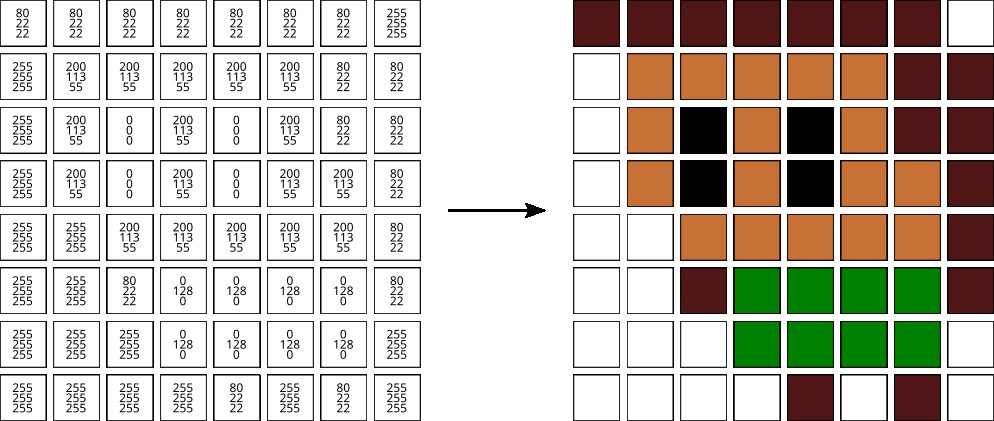
Notice how each cell contains three values, one for each color channel (red, green and blue), that range from 0 to 255. If you're wondering where that 255 comes from, that's the largest number you can represent in one byte.
Thus, at one byte per color component (red, green and blue), this representation
would weigh 64 cells × 3 bytes = 192 bytes.
This does work, but it's not very space efficient. Modern computers will not flinch at an image representation like this one, but early computers and game console systems were very limited in resources. If programmers back then stored all their images in this way, they wouldn't have been able to store more than a handful of sprites. As it happens, modern day microcontrollers share a lot of these limitations.
Constraints often foster innovation, and the constraints in these early systems forced programmers to come up with amazingly smart ideas to shave off bytes and reuse data. One such idea is the color palette.
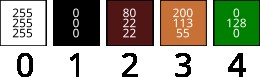
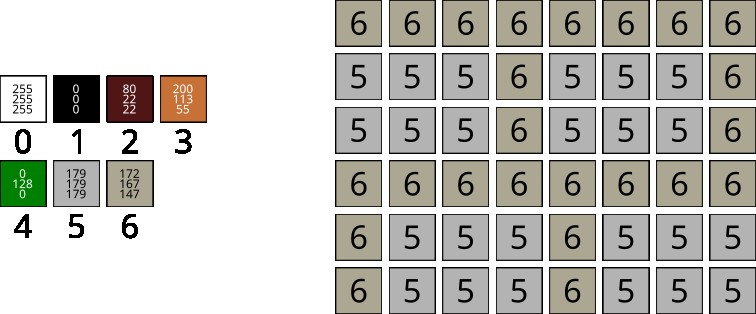
Notice how there are only five pixel color values in the table above:
- White, for the background. Red: 255, green: 255, blue: 255
- Black, for the eyes. Red: 0, green: 0, blue: 0
- Dark brown, for hair and feet. Red: 80, green: 22, blue: 22
- Brown, for the skin. Red: 200, green: 113, blue: 55
- Green, for the clothes. Red: 0, green: 128, blue: 0
Thus, we could create a small table that holds just those five colors, like this:
Again, storing each color component as a byte, this palette only weighs 5
colors × 3 bytes = 15 bytes.
I've written a number below each cell in the palette so we can refer to these
colors later. The reason why the first cell is labeled 0 instead of 1 is
that we want this color to be transparent, and zero usually represents
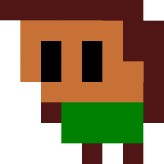
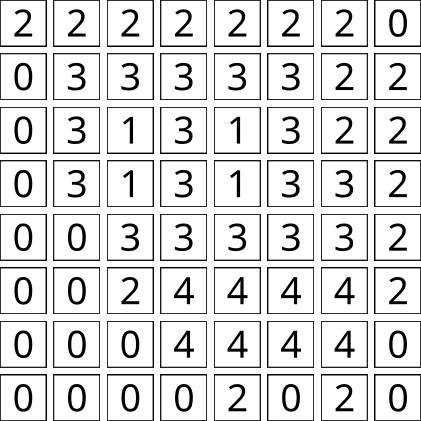
nothingness. With this in mind, we can now rework Emilia's sprite table as
follows:
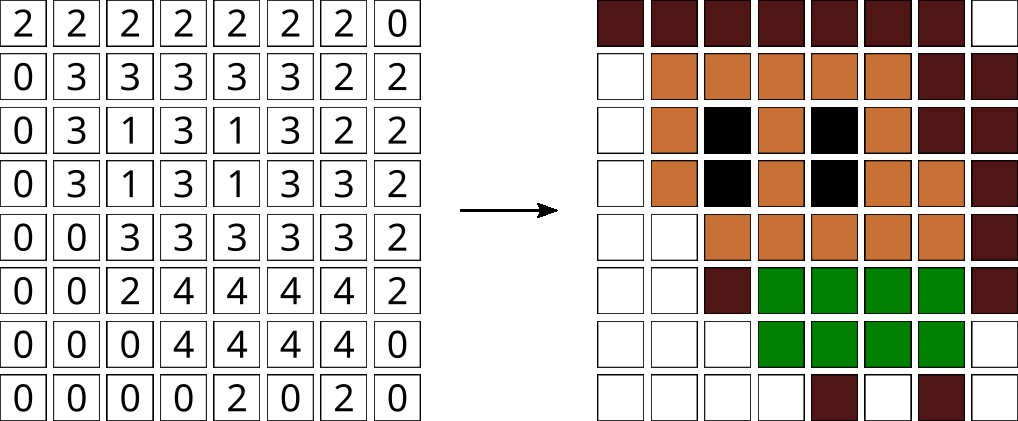
Now, each of the cells holds just one value. If we're not too conservative, we
can store each cell as a byte, giving us 64 bytes for the image (a 3x reduction
in size), plus the 15 bytes we used for the palette, totaling 64 + 15 = 79
bytes.
This may not seem like a huge improvement, but if we reuse this palette over and over for other sprites, we'll be shaving off enormous amounts of memory.
Of course, there are tricks to save even more space that involve clever ways to represent whole lines of cells in a single byte, but for our educational purposes this will suffice.
MicroBlocks implementation
The first thing we're going to do is load the 8 Bit Graphics library. You can find it by opening the Libraries dialog and navigating to the Graphics and Displays folder.
Let's first define our palette as follows:
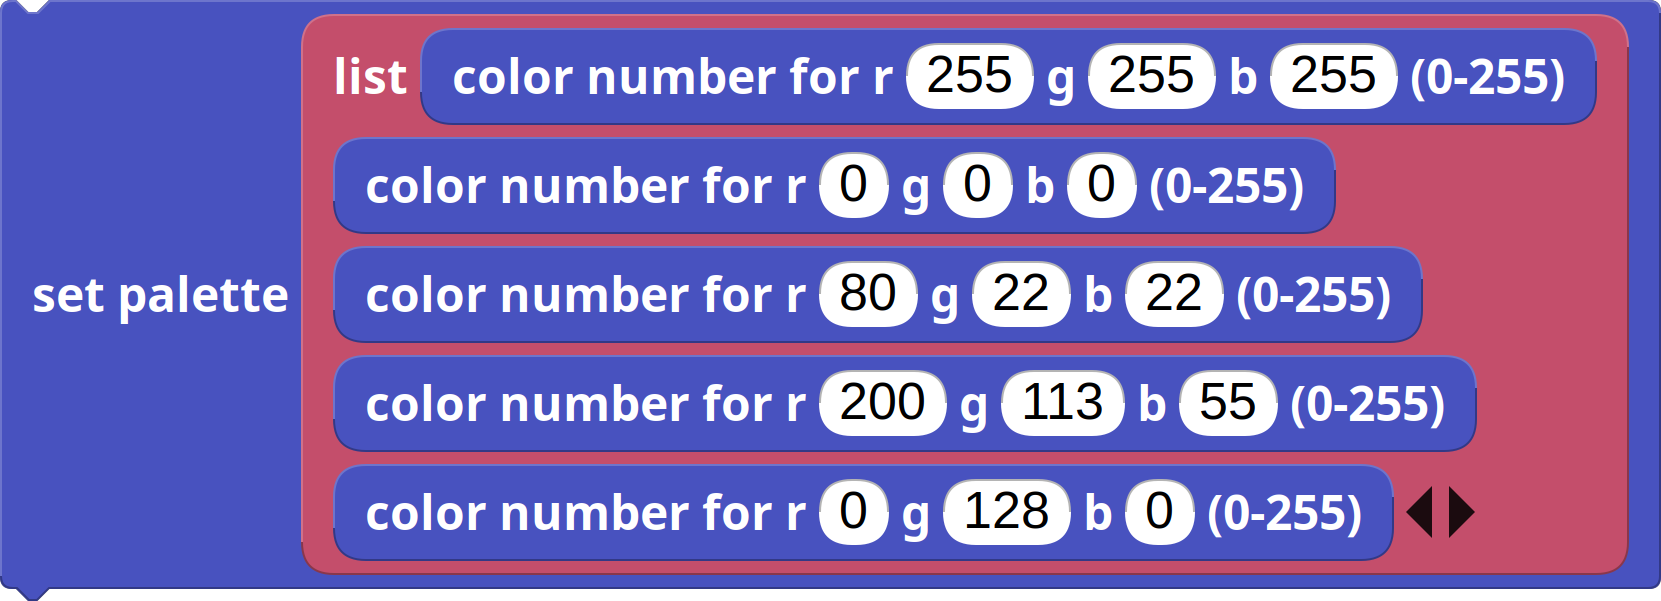
We can now make sure it's been properly defined by running the draw palette
table block with no arguments. By default, it will draw the currently set
palette:

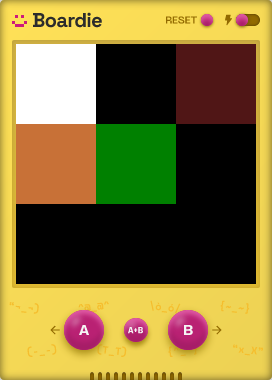
See how Boardie renders the 5 colors of the current palette in order, and leaves the rest of the screen black.
Let's now create a sprite for Emilia, making use of this palette. To store it,
we will use a global variable, and we'll assign it a new bitmap of width 8
pixels and the contents of the bitmap table we've established before. To make a
new variable, just navigate to the Variables category and click on the Add a
variable button.
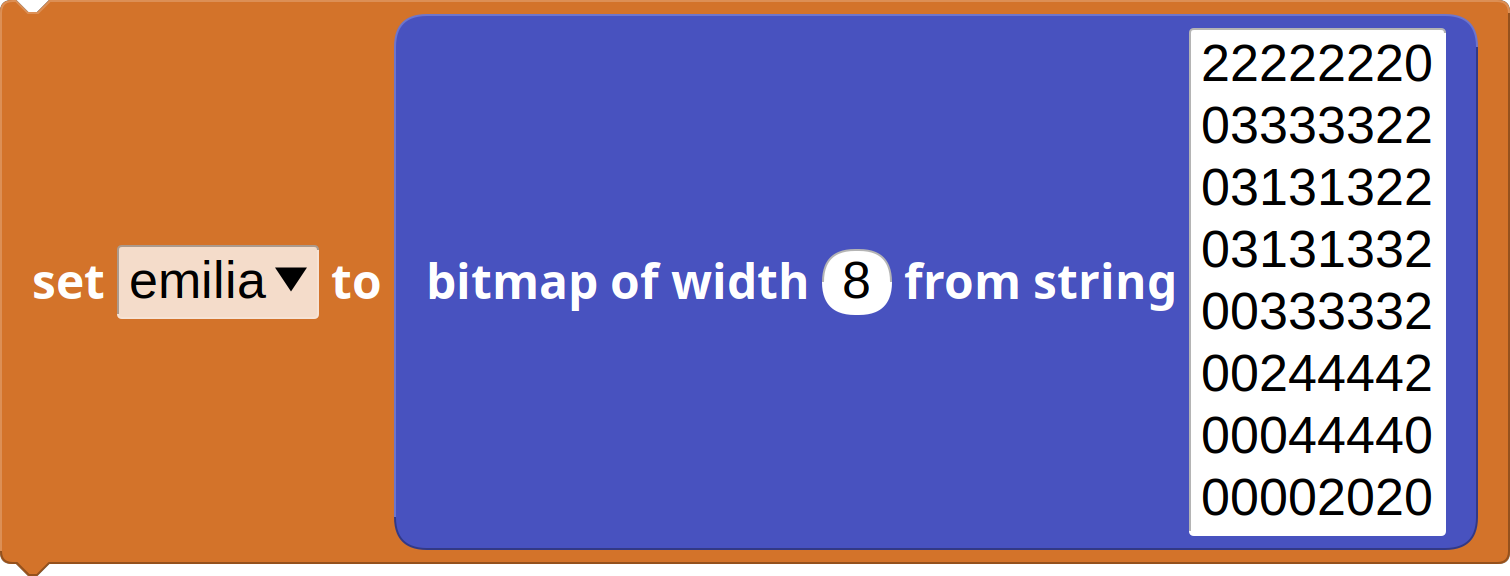
The 8 Bit Graphics library will automatically parse the string representation of the bitmap into actual numbers, and deal with any newlines so you can format it in a more reader friendly way.
Now to the actual part we've been working up to: drawing Emilia.
Mimicking how lots of early systems worked, the 8 Bit Graphics library doesn't draw sprites directly onto the screen. Instead, it has an internal buffer that you merge graphics into, and it's up to the programmer to decide when the buffer should be stamped onto the screen. The rationale behind this seemingly useless middle step is that drawing onto a screen is usually an expensive operation, whereas writing into a buffer is much cheaper. This way, we can concatenate a bunch of graphic operations into the buffer and, only when the next frame is ready to be shown, draw the contents of the buffer onto the screen.
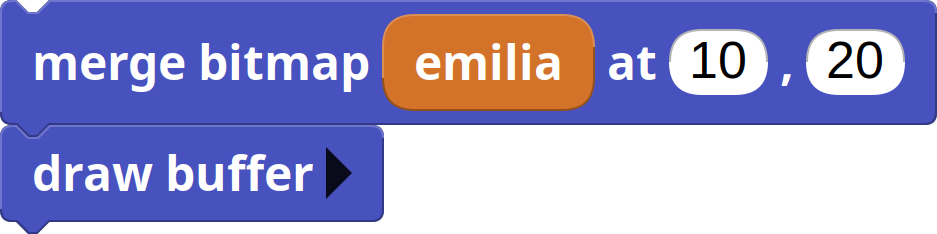
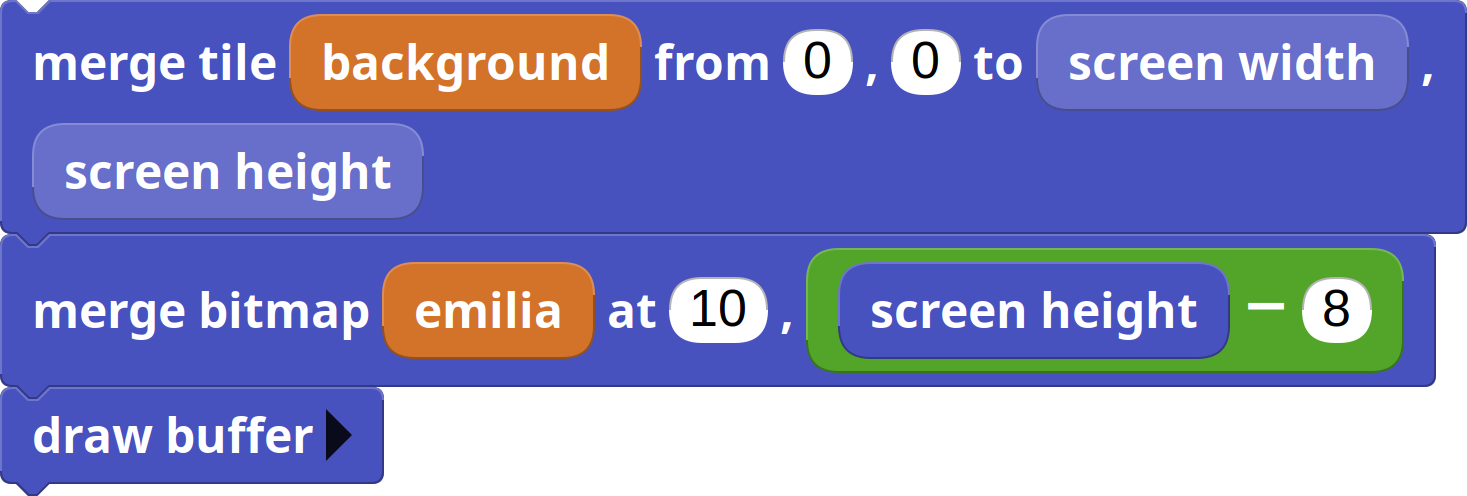
So, let's begin by merging Emilia onto the buffer:

The 10 and 20 parameters represent the x and y coordinates where we want
to merge the sprite. Let's now ask Boardie to draw the whole buffer onto the
screen:

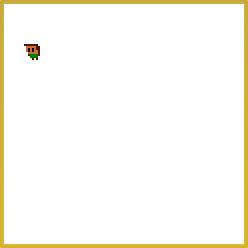
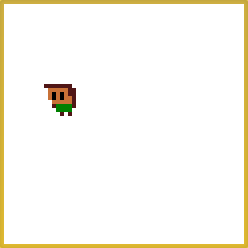
By default, the 8 Bit Graphics library will render graphics at 2x scale. That is, each pixel in a sprite is going to result in a 2 pixels wide square in the screen. At this default scale, Emilia looks pretty small, so let's set the global graphics scale to 4:
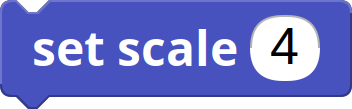
After doing that, the buffer has been rebuilt and cleared, so we'll need to merge Emilia back into it, and force a redraw:
That's more like it!
Scale considerations are not just for aesthetics. Right now we're programming on the Boardie virtual microcontroller, and Boardie has quite a lot of memory available and a very fast graphics throughput. On real hardware, though, we may be limited to smaller buffer sizes and slower drawing speeds. In those cases, the less graphics data we handle, the better our game is going to perform.
Positioning emilia
In this game, food is going to be falling from the sky, and Emilia will have to move left and right to either avoid it or eat it. Thus, Emilia needs to be positioned at the bottom of the screen.
Having scaled the graphics up, it would be a bit of a hassle to make out how
many pixels from the top Emilia needs to be drawn at, which is why the 8 Bit
Graphics library provides us with screen height and screen width blocks.
These give you what we call the virtual dimensions of the screen. That is, the
dimensions of the screen as if its actual hardware pixels had been scaled up.
Thus, knowing that Emilia is 8 pixels high, we can place her at the bottom as follows:

If you draw the buffer now, though, something funny is going to happen:
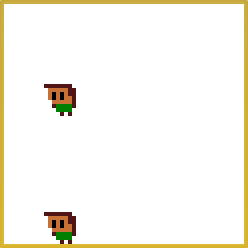
We now have two Emilias, and it's only natural, since we've merged it twice into different positions of the buffer! We'd need to erase the old one, but here's the thing: there is no erase operation in the 8 Bit Graphics library. How are we supposed to make a game if we can't even erase a sprite? How are we going to create the illusion that the sprite is moving, if we can't first remove it from where it was drawn previously?
You may think we could just make a new sprite full of 0s and merge it on top
of what we want to have erased, but remember that 0 represents transparency,
so we'd be drawing nothing!
The solution to this conundrum is to have a background covering the whole screen, behind every other sprite. When needed, we'll merge little parts of this background onto the regions that need erasing.
Tiles and movement
A tiled background
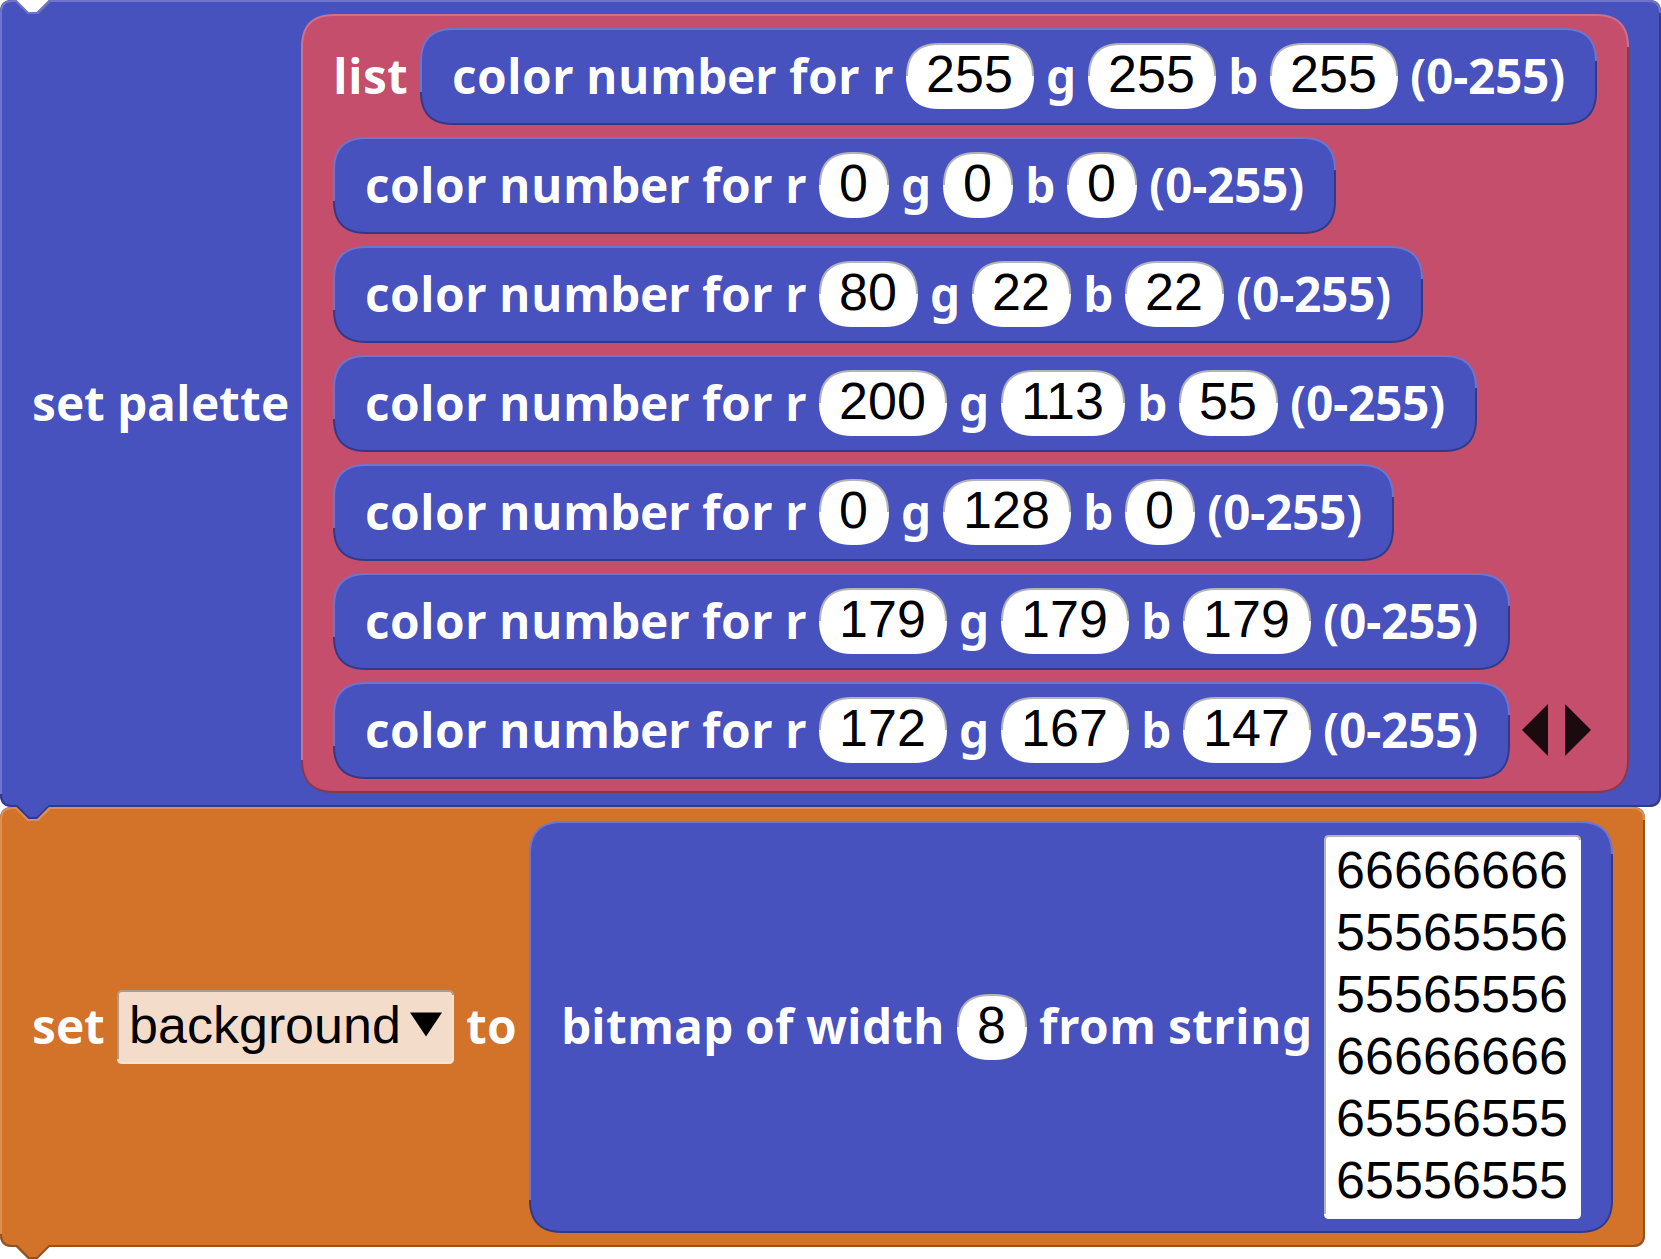
To draw this background sprite we'll need to add some colors to the palette, and design a new sprite that's going to be tiled over the whole screen. To make things simple, we're going to design a brick wall.
In MicroBlocks code, our new palette and background sprite look like this:
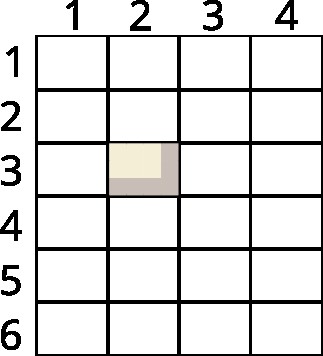
Now, tiling a bitmap over an area is a very common operation in games, which is why the 8 Bit Graphics library provides us with two blocks that help make the task easier. The first one lets you merge a bitmap at a particular tile position. That is, if you were tiling a wall, how many tile dimensions from the left and top would this particular tile be at.

The other block, often more useful, lets you tile a whole area comprised between
two virtual coordinates. That is, you give it origin and destination x and y
positions, and it will place tiles that cover all pixels in the area.

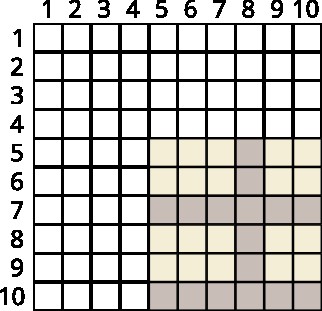
Notice how the area tiling block aims to cover all the specified area with tiles, even if that means overshooting and covering a larger area than specified.
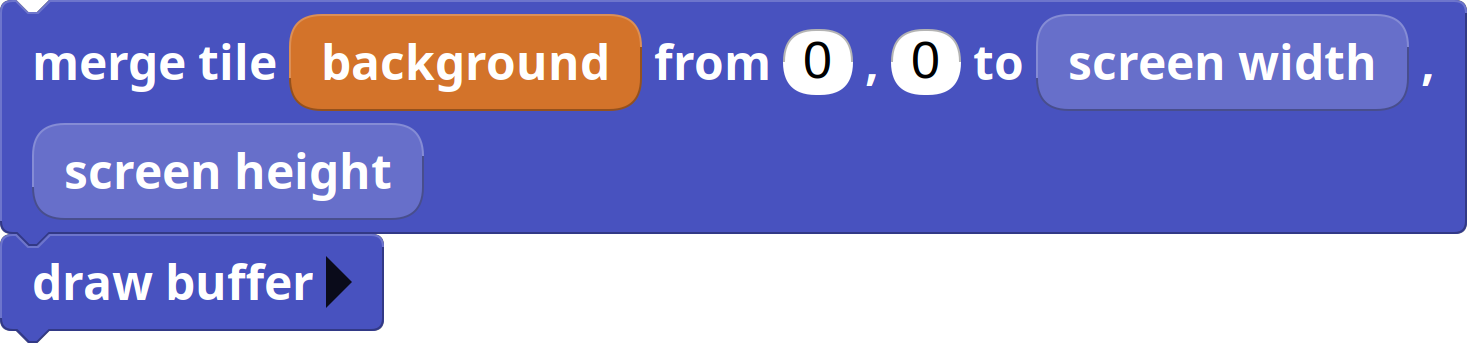
We can now tile the whole background with this new tile sprite, like this:

Which, of course has been merged over both Emilias. Let's get her back in:

Assembling it all so far
At this point, it is worth assembling a bunch of these operations into a new initialization block. In particular, we'll want to set the scale, define the palette and create the two sprites.
To do so, go to the My Blocks category and click on Add a command block. You can name the new block initialize graphics, for example, and define it as follows:
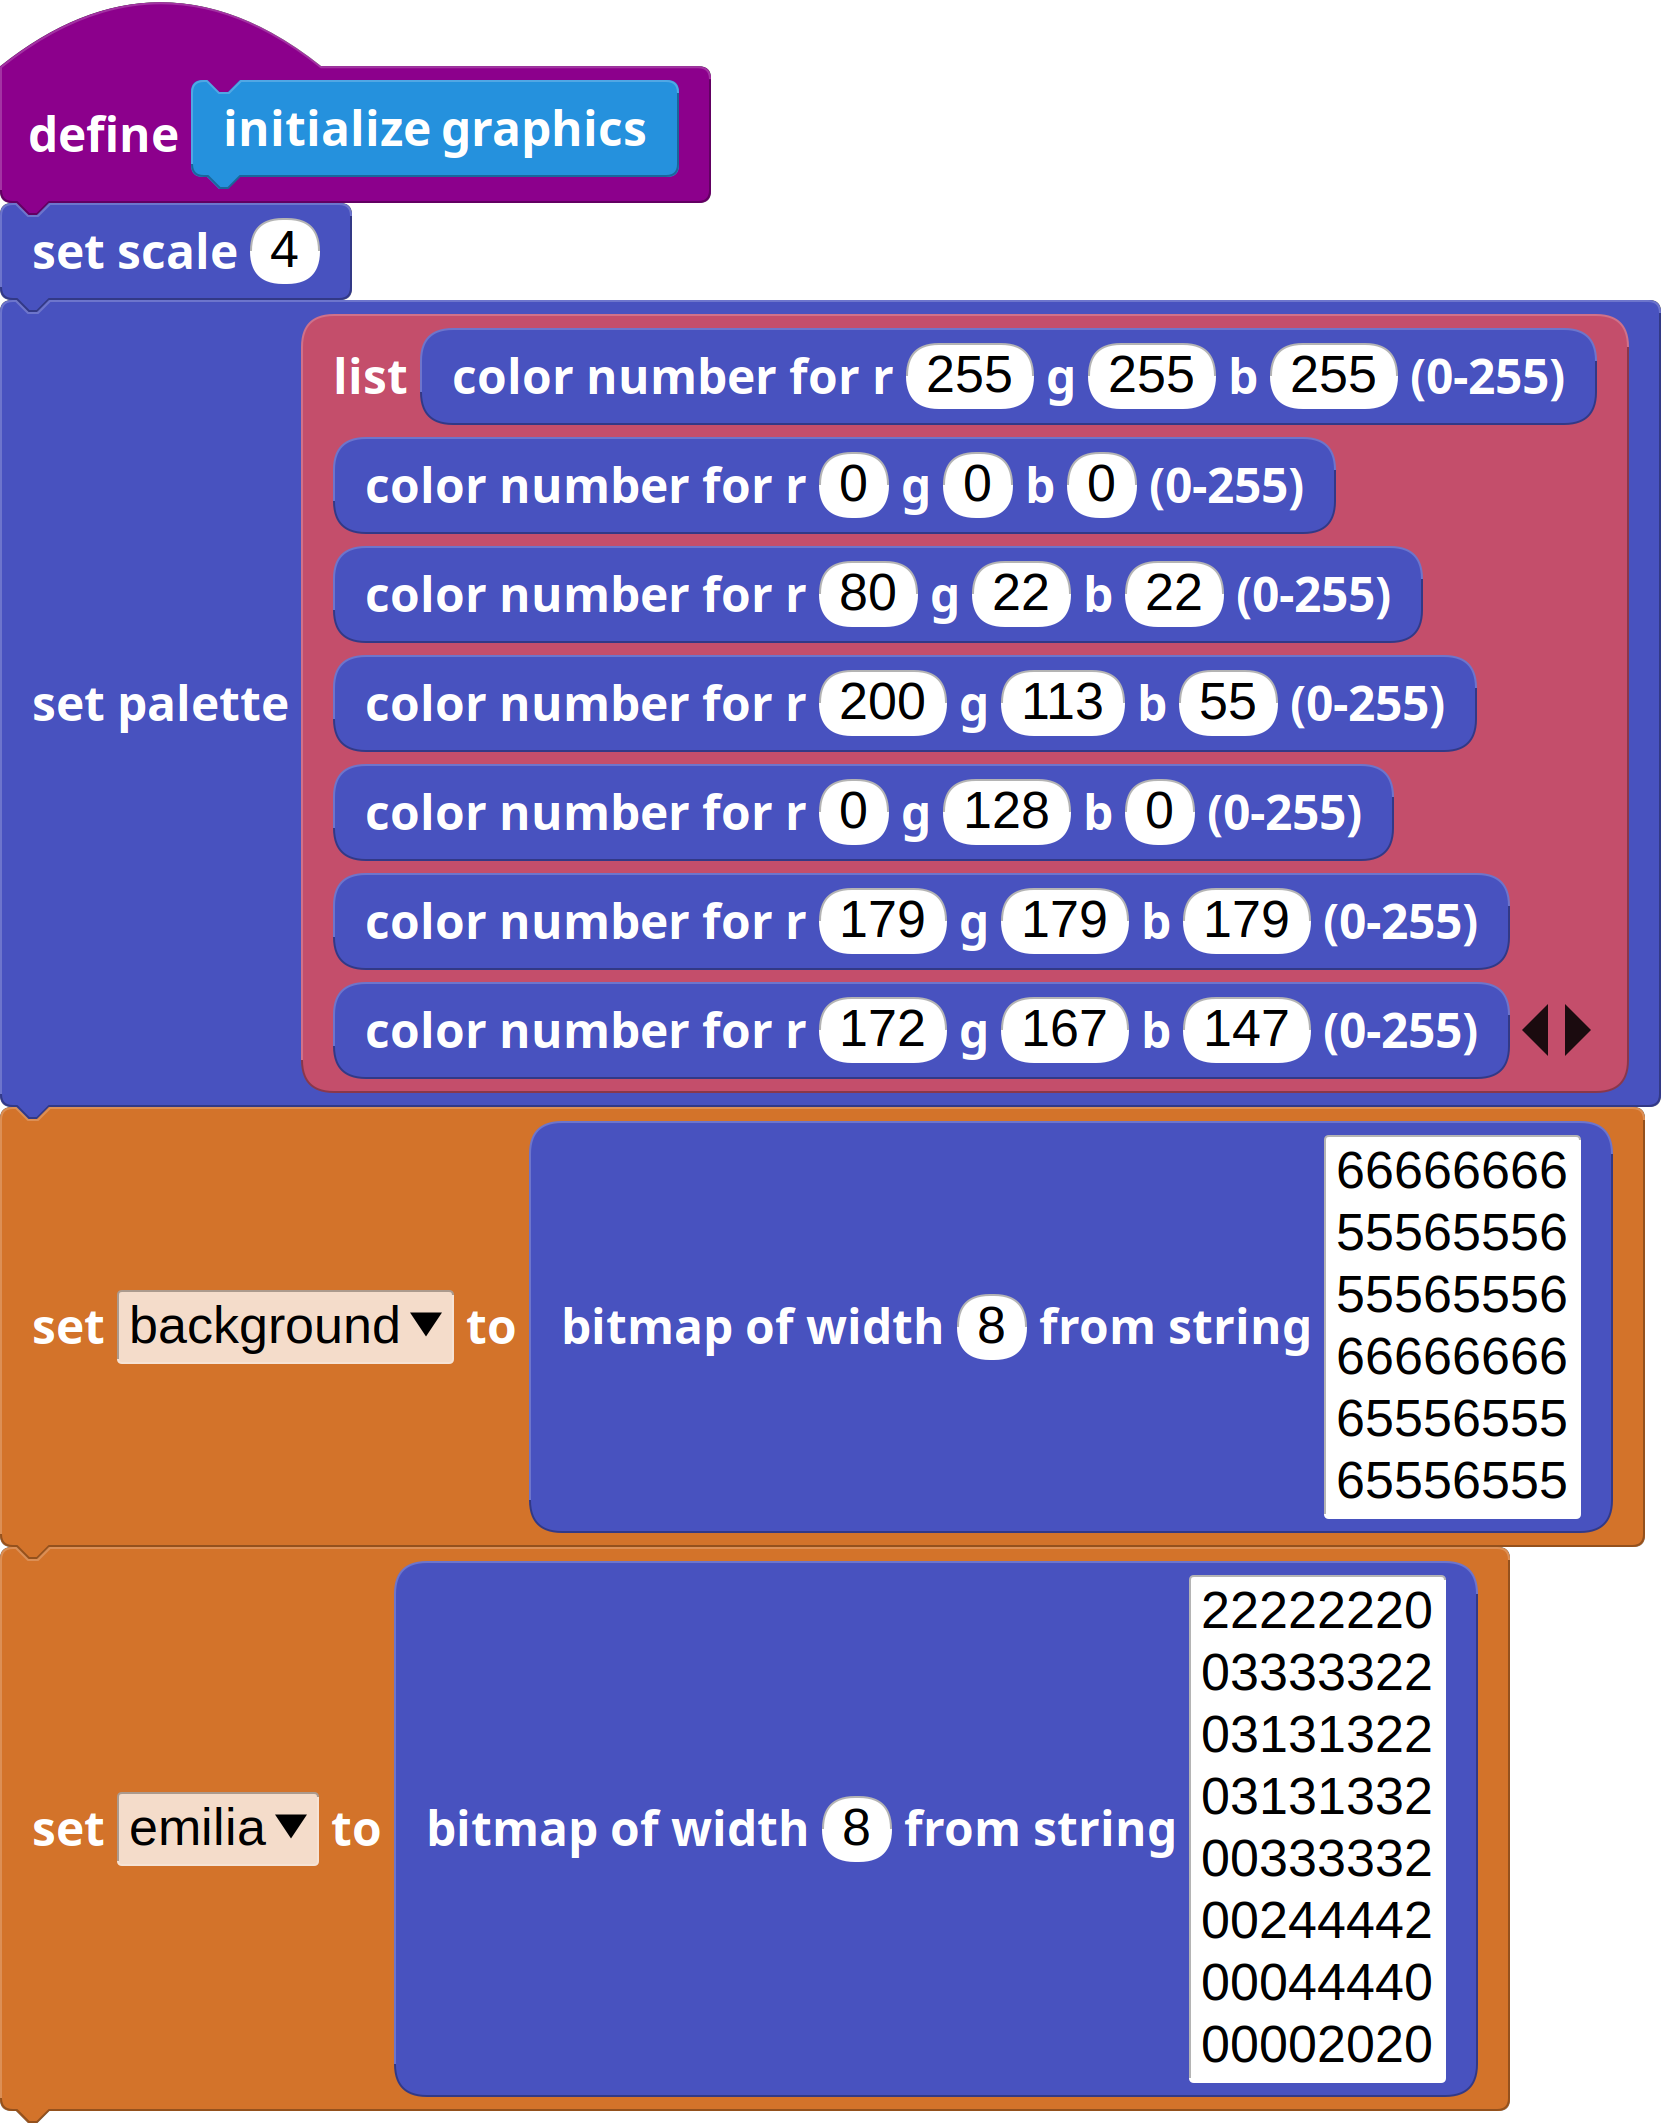
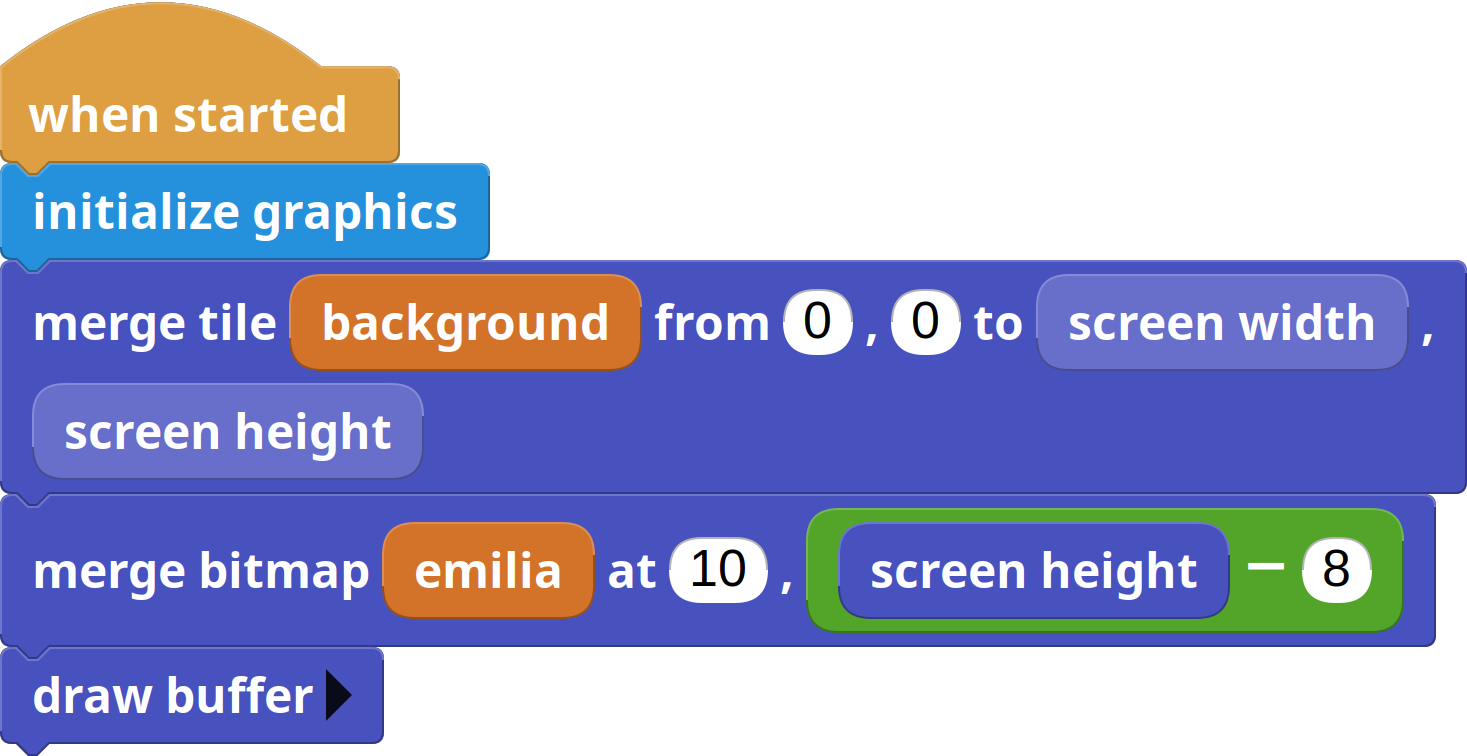
Here's what the complete project looks like up to now:
Moving Emilia
To move Emilia left and right we are going to use the A and B buttons on the Boardie virtual microcontroller.
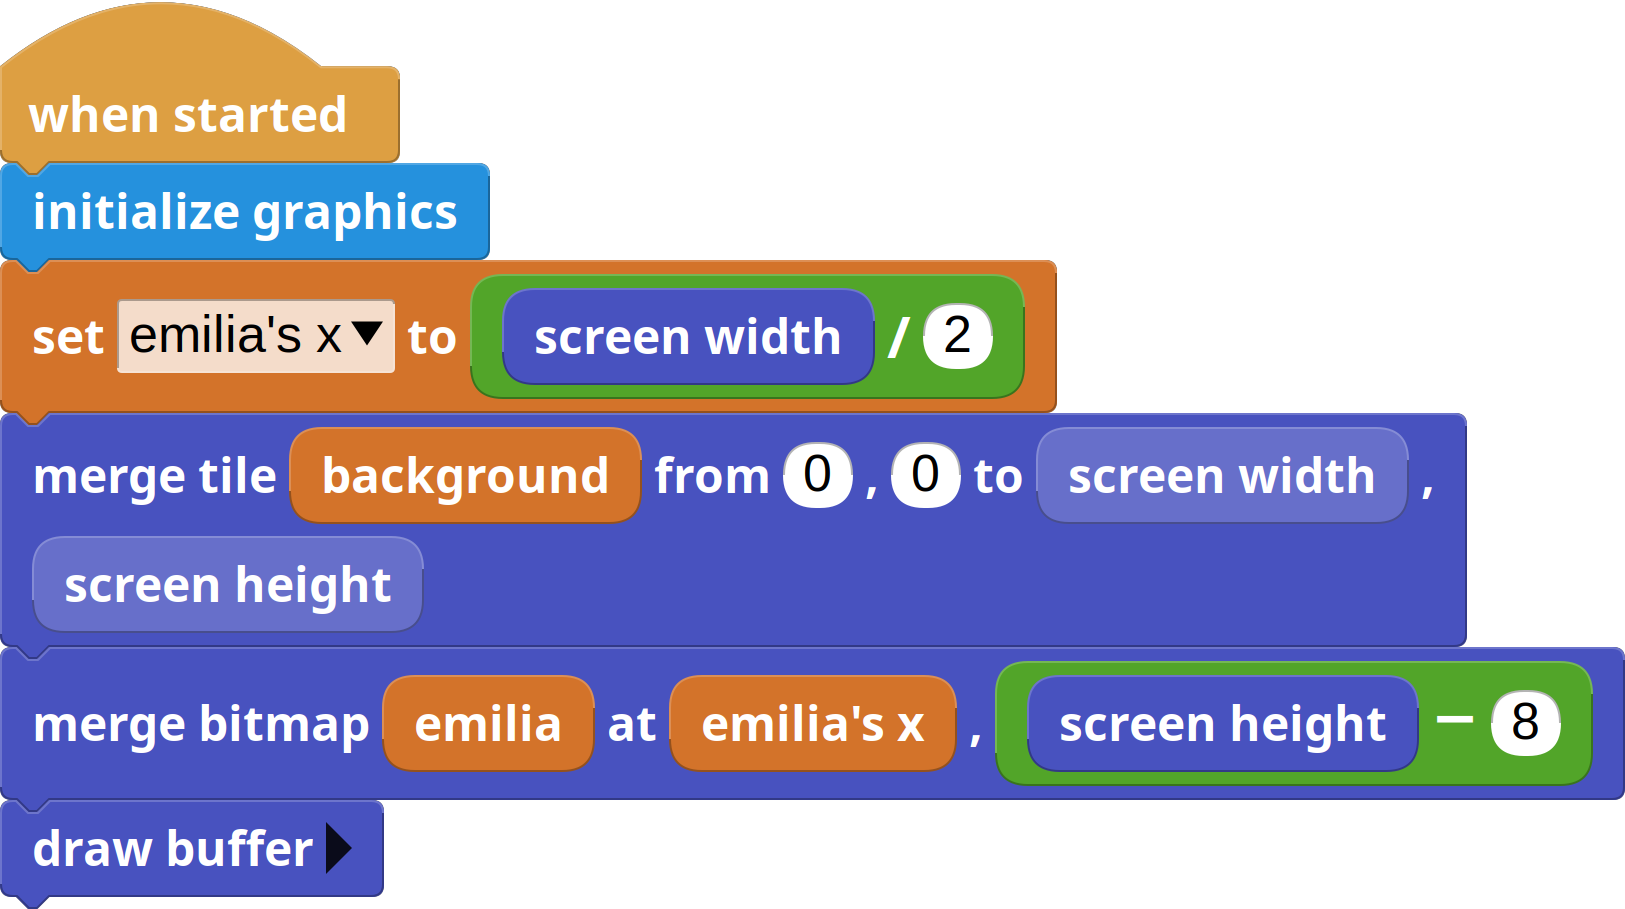
But, first, we're going to need to store Emilia's horizontal position in a variable, that we can aptly name Emilia's x.
Let's begin by assigning it a value of, say, ![]() when starting the project. We should modify the
when starting the project. We should modify the ![]() block accordingly to use the new variable to position Emilia on the screen,
leaving the initial script like this:
block accordingly to use the new variable to position Emilia on the screen,
leaving the initial script like this:
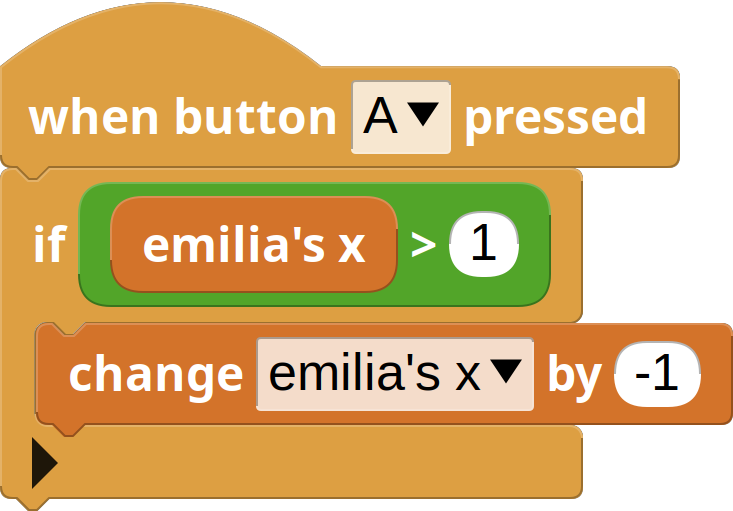
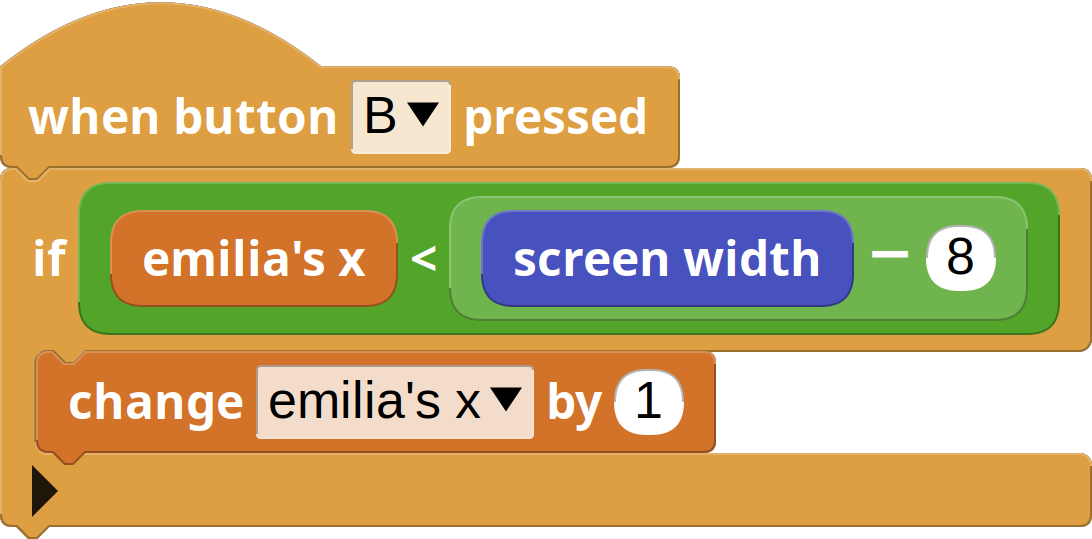
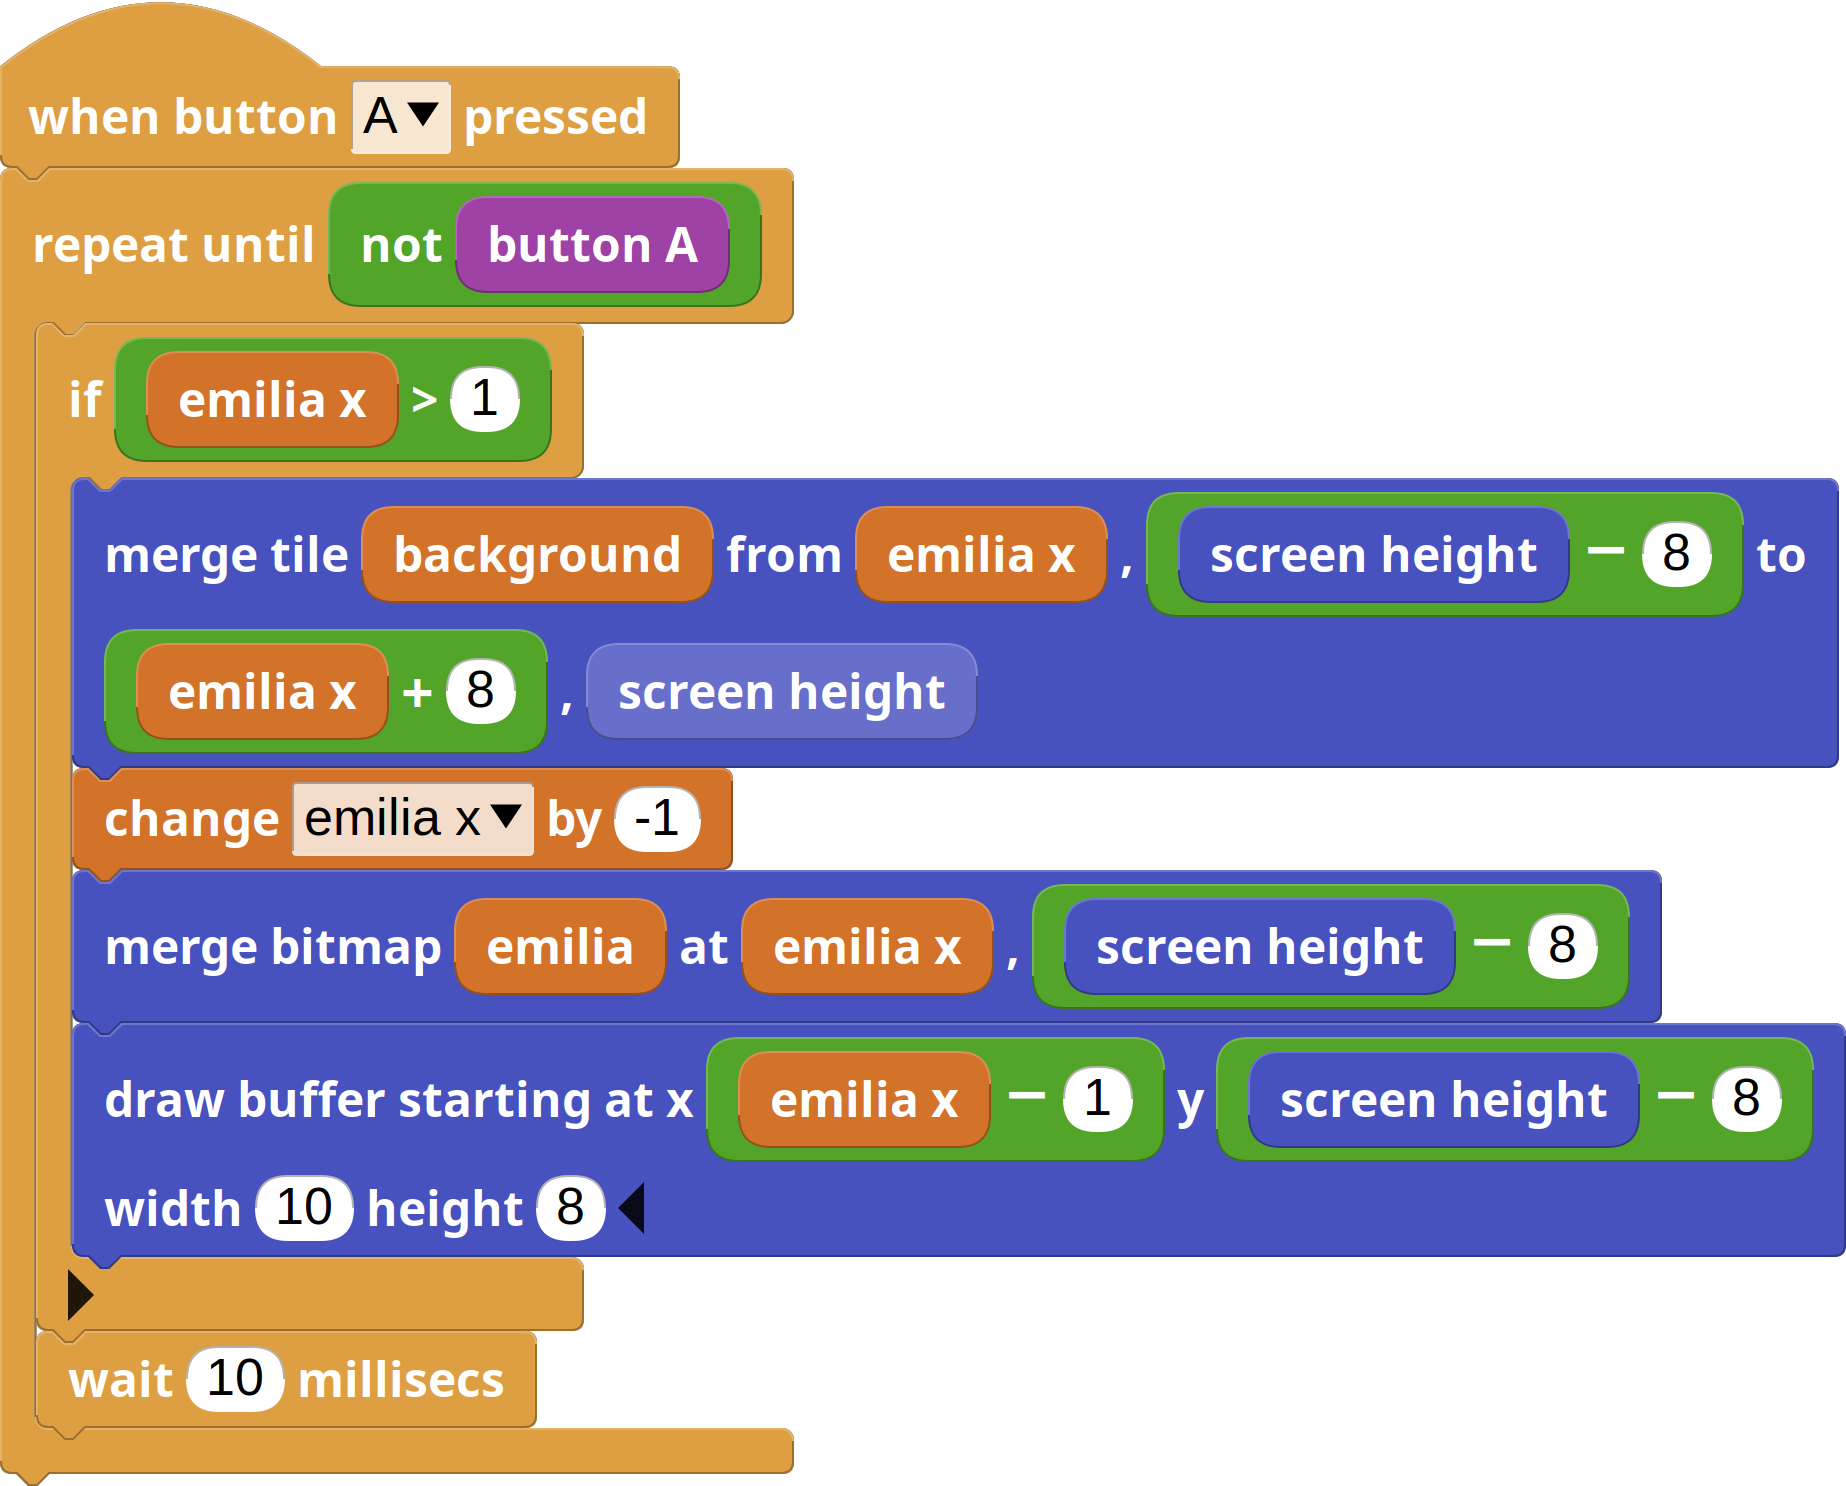
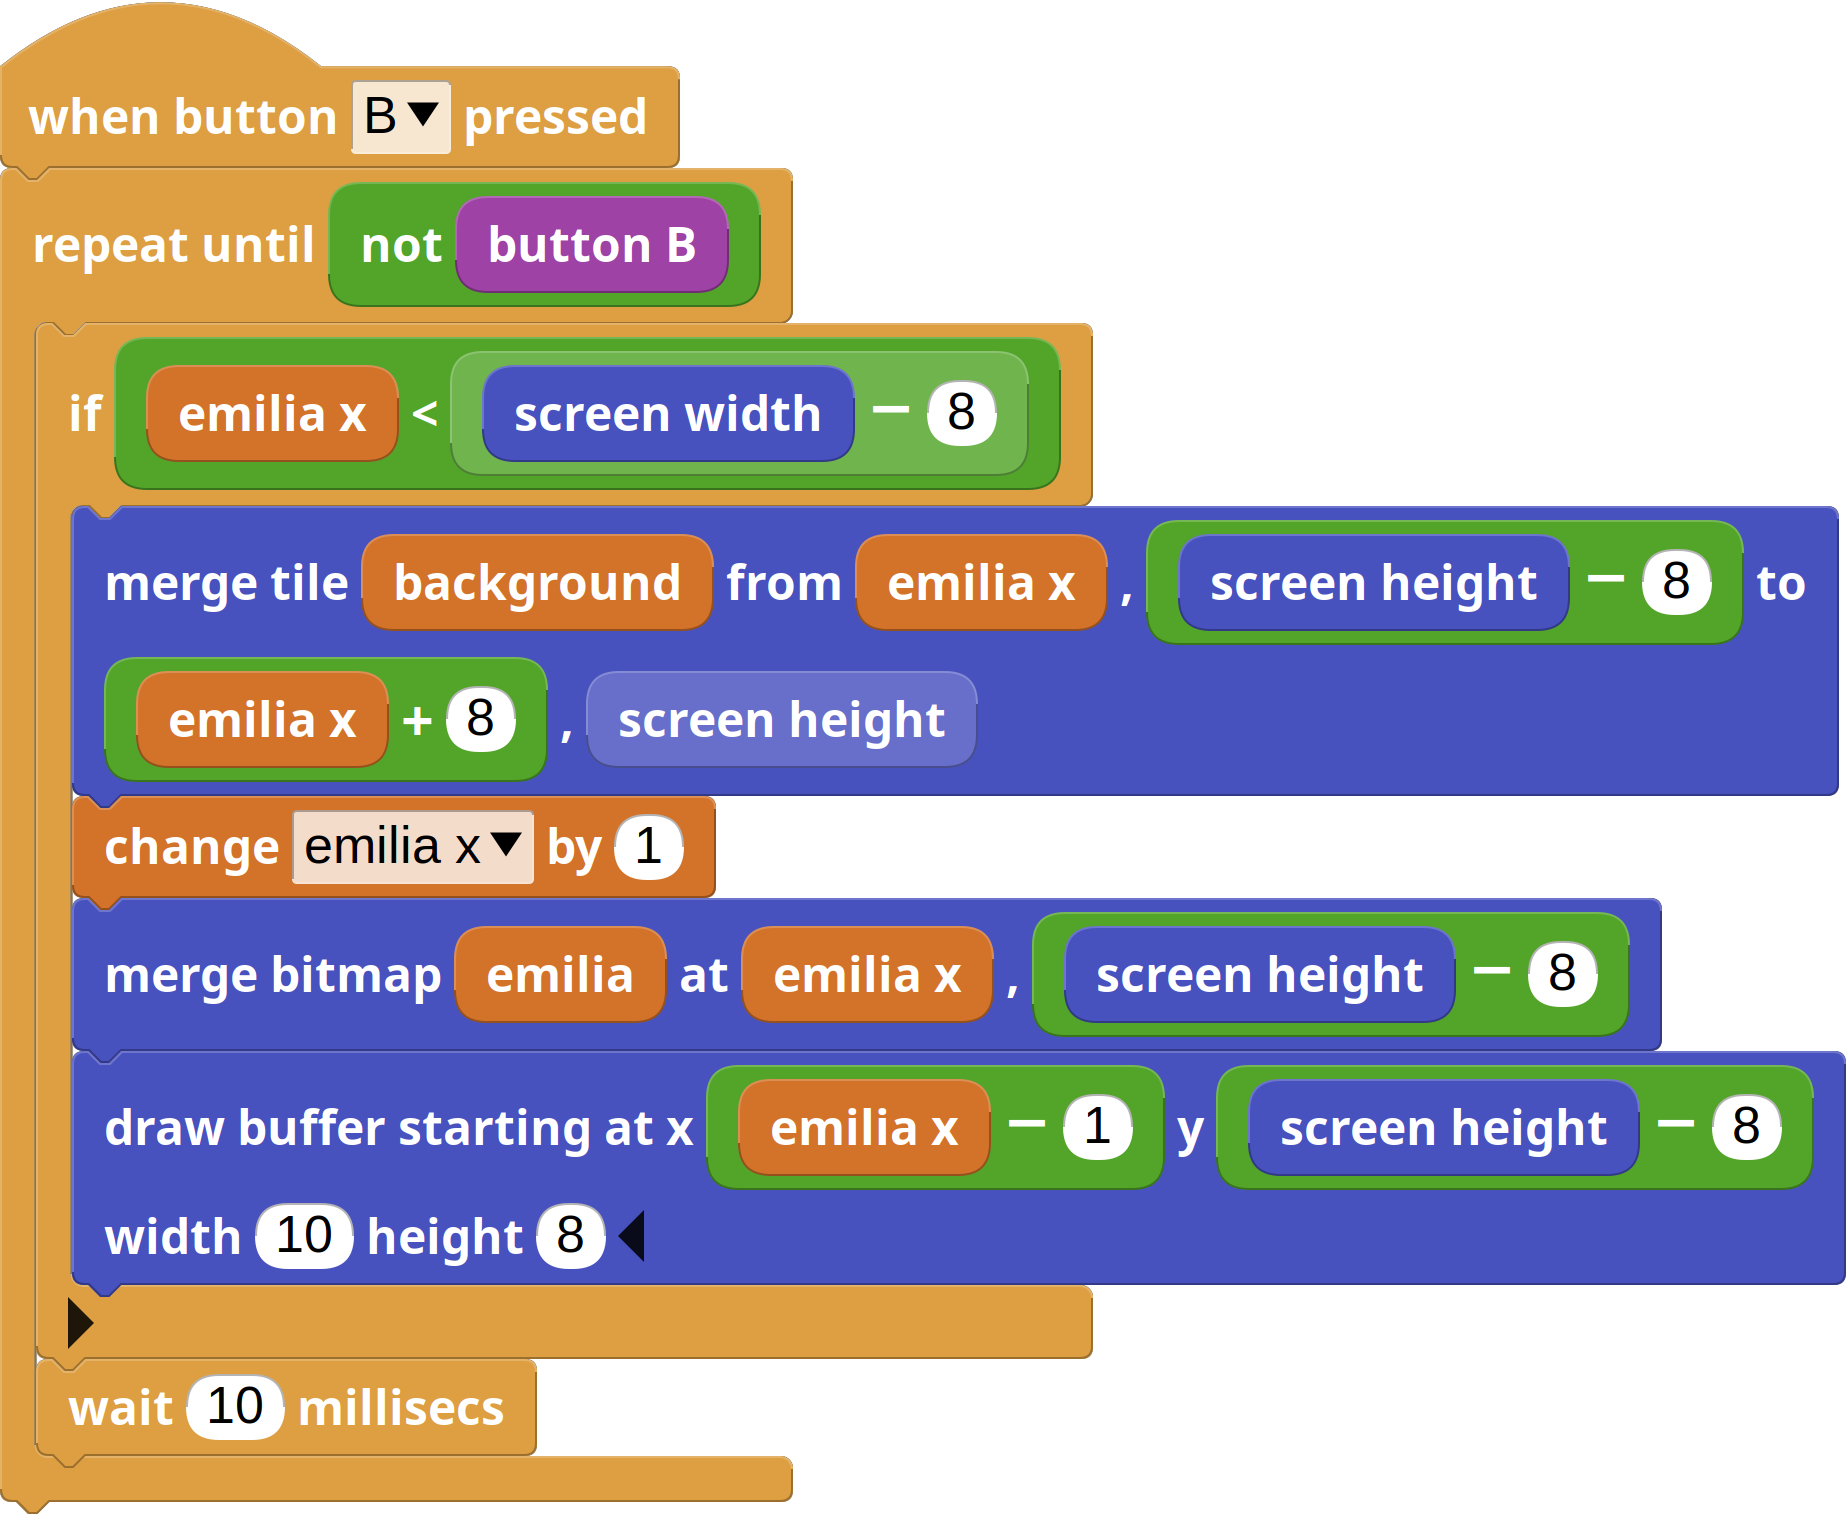
Now, whenever the A button is pressed, we're going to decrease the value of emilia x, and increase it when button B is pressed instead, but only if the resulting value would stay between the screen horizontal limits, to prevent Emilia from walking off the world. Notice that we need to subtract 8 from the screen width for the rightmost limit to account for Emilia's width.
If you press those buttons now, though, nothing is going to happen. We're changing the value of emilia x, but we're not redrawing her in her new position.
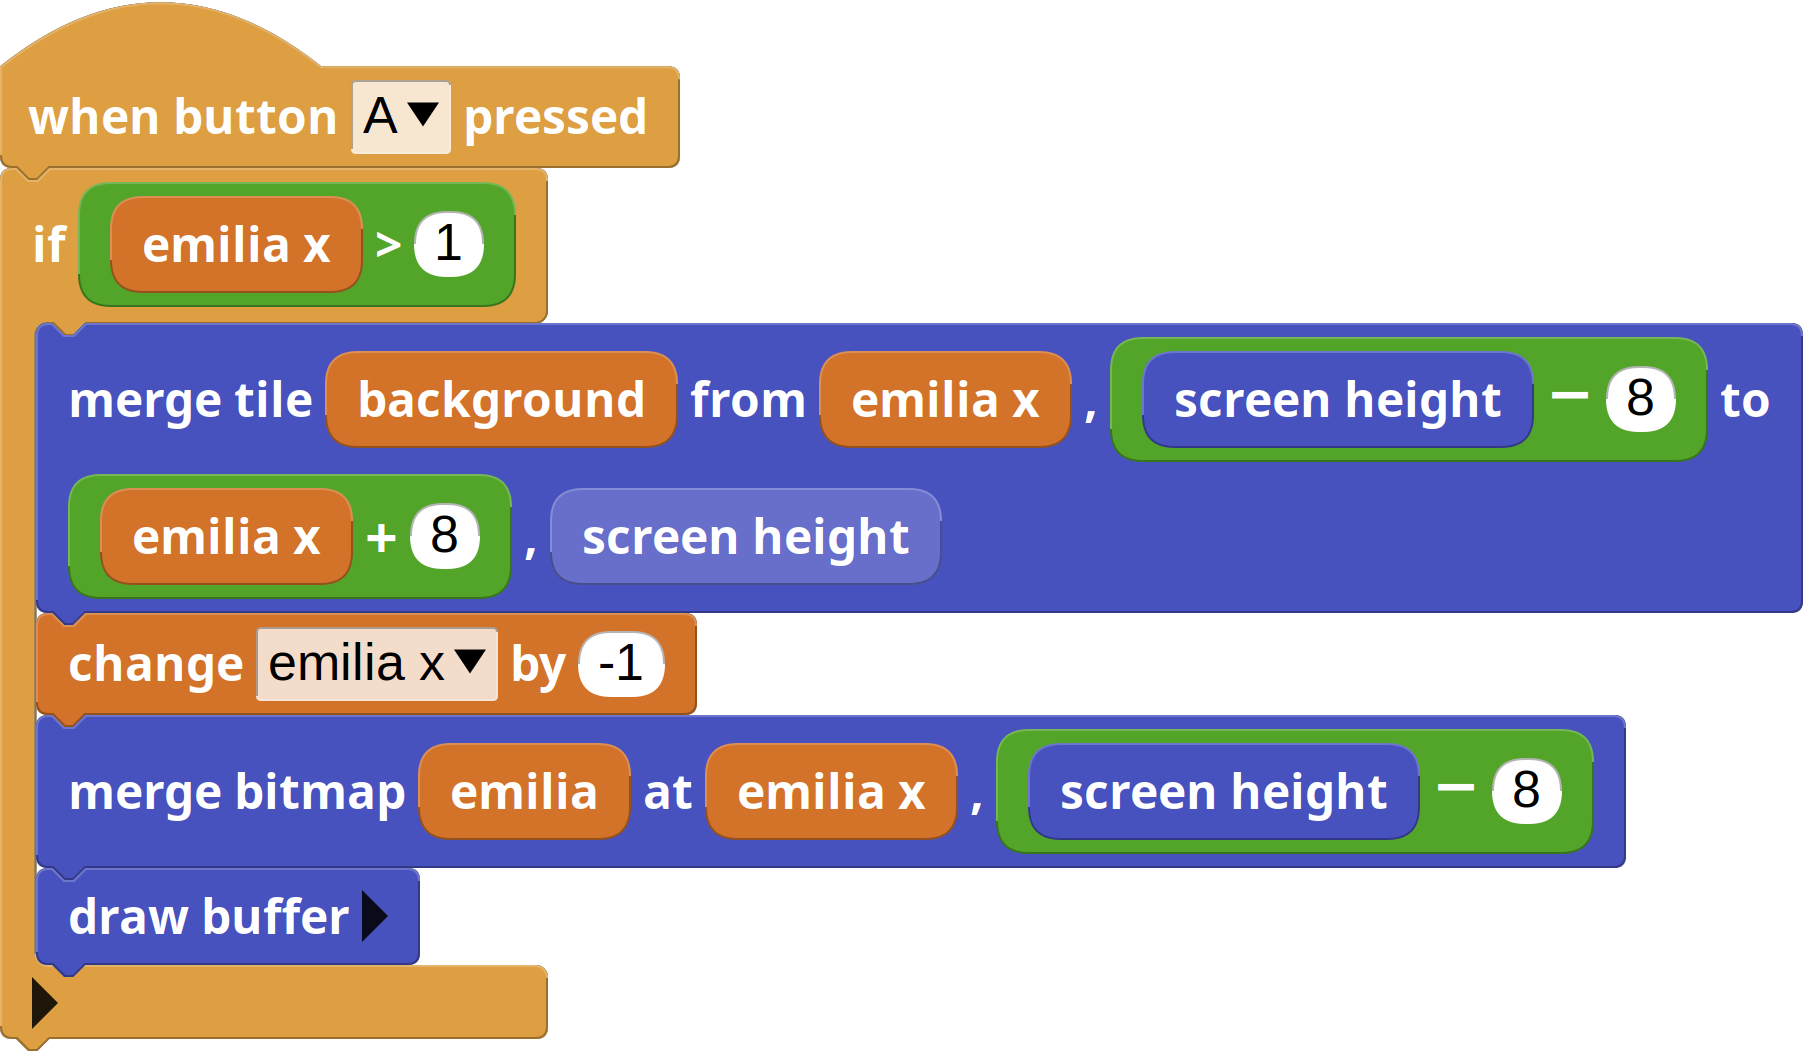
To erase Emilia we'll need to merge background tiles on top of its previous
position. The area that needs clearing goes from (emilia x), ((screen height) - 8),
which is at the top left corner of Emilia, to ((emilia x) + 8), (screen height),
at its bottom right corner. Those 8s come from the width and height of the
Emilia sprite.
So, to erase Emilia, we do:

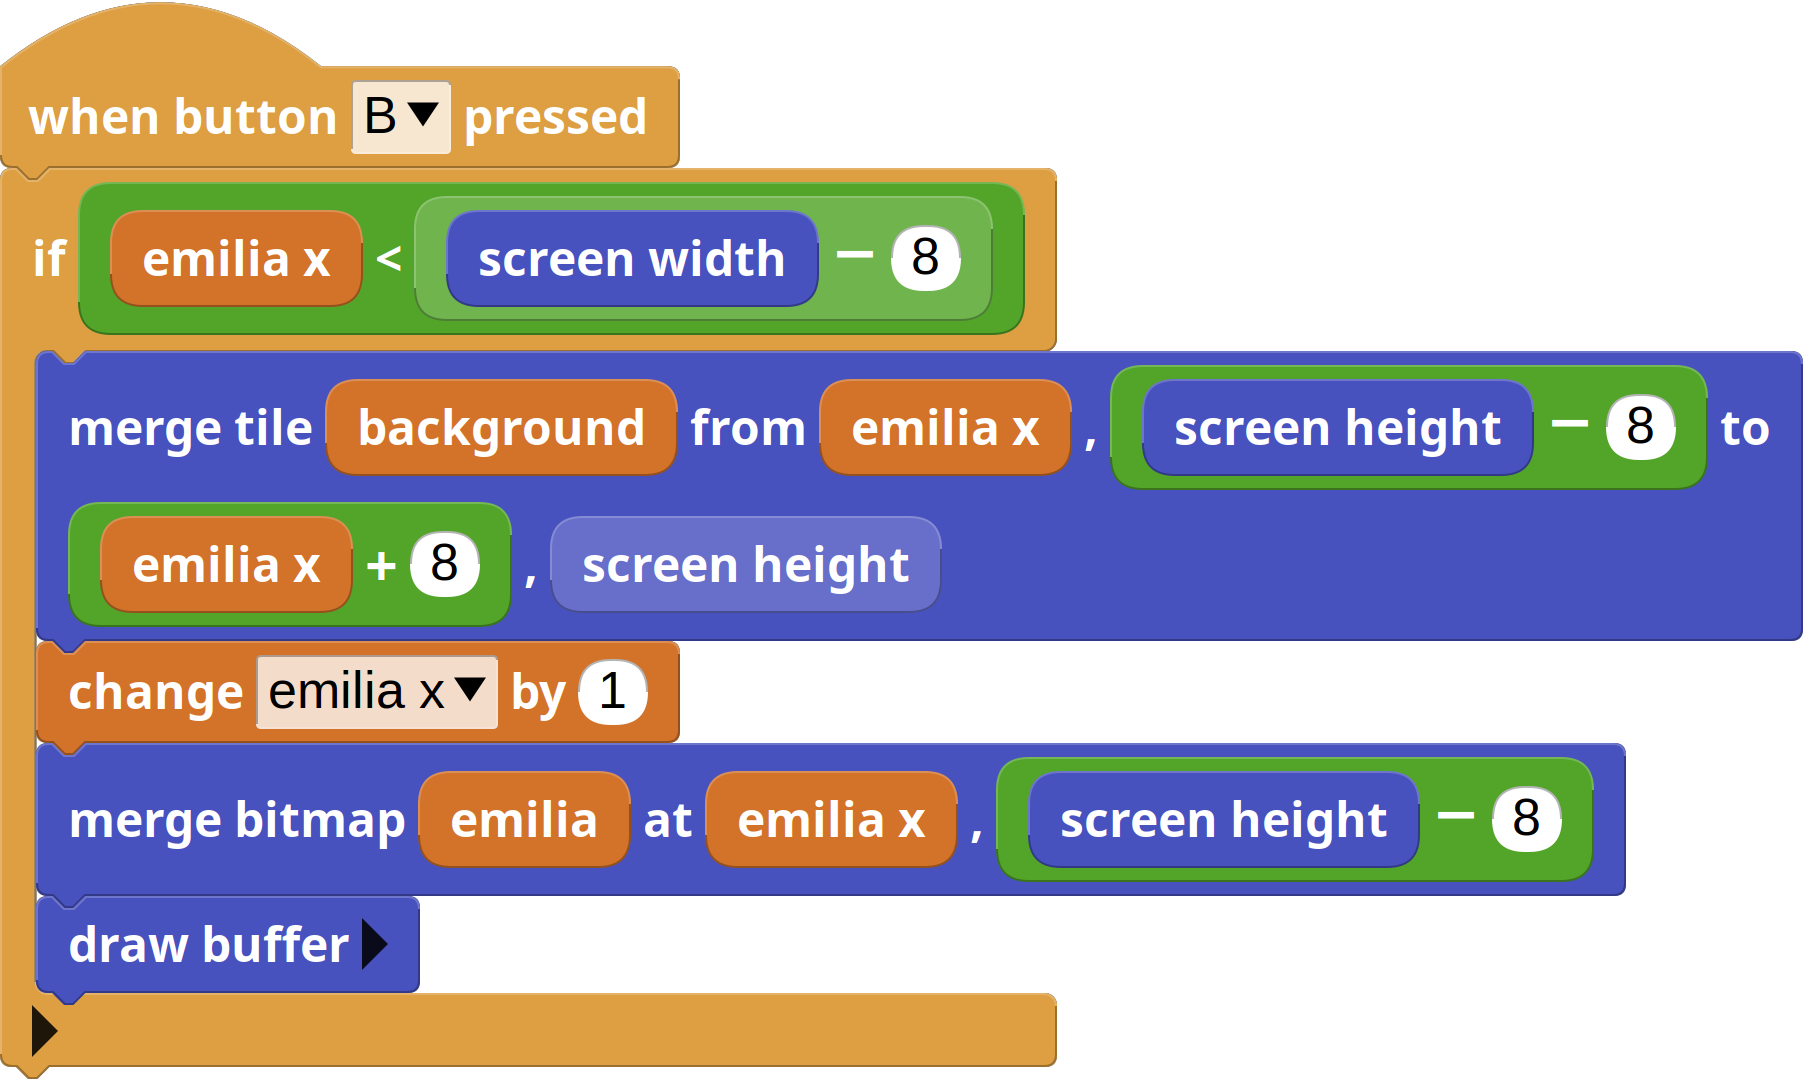
After that, we can change the value of emilia x according to the button that's just been pressed, and then redraw Emilia back. The full code to move Emilia, thus, looks like this:
Buttons A and B do work now, but the movement is too slow at 1 single pixel per button press. Let's make that happen until we release the button.
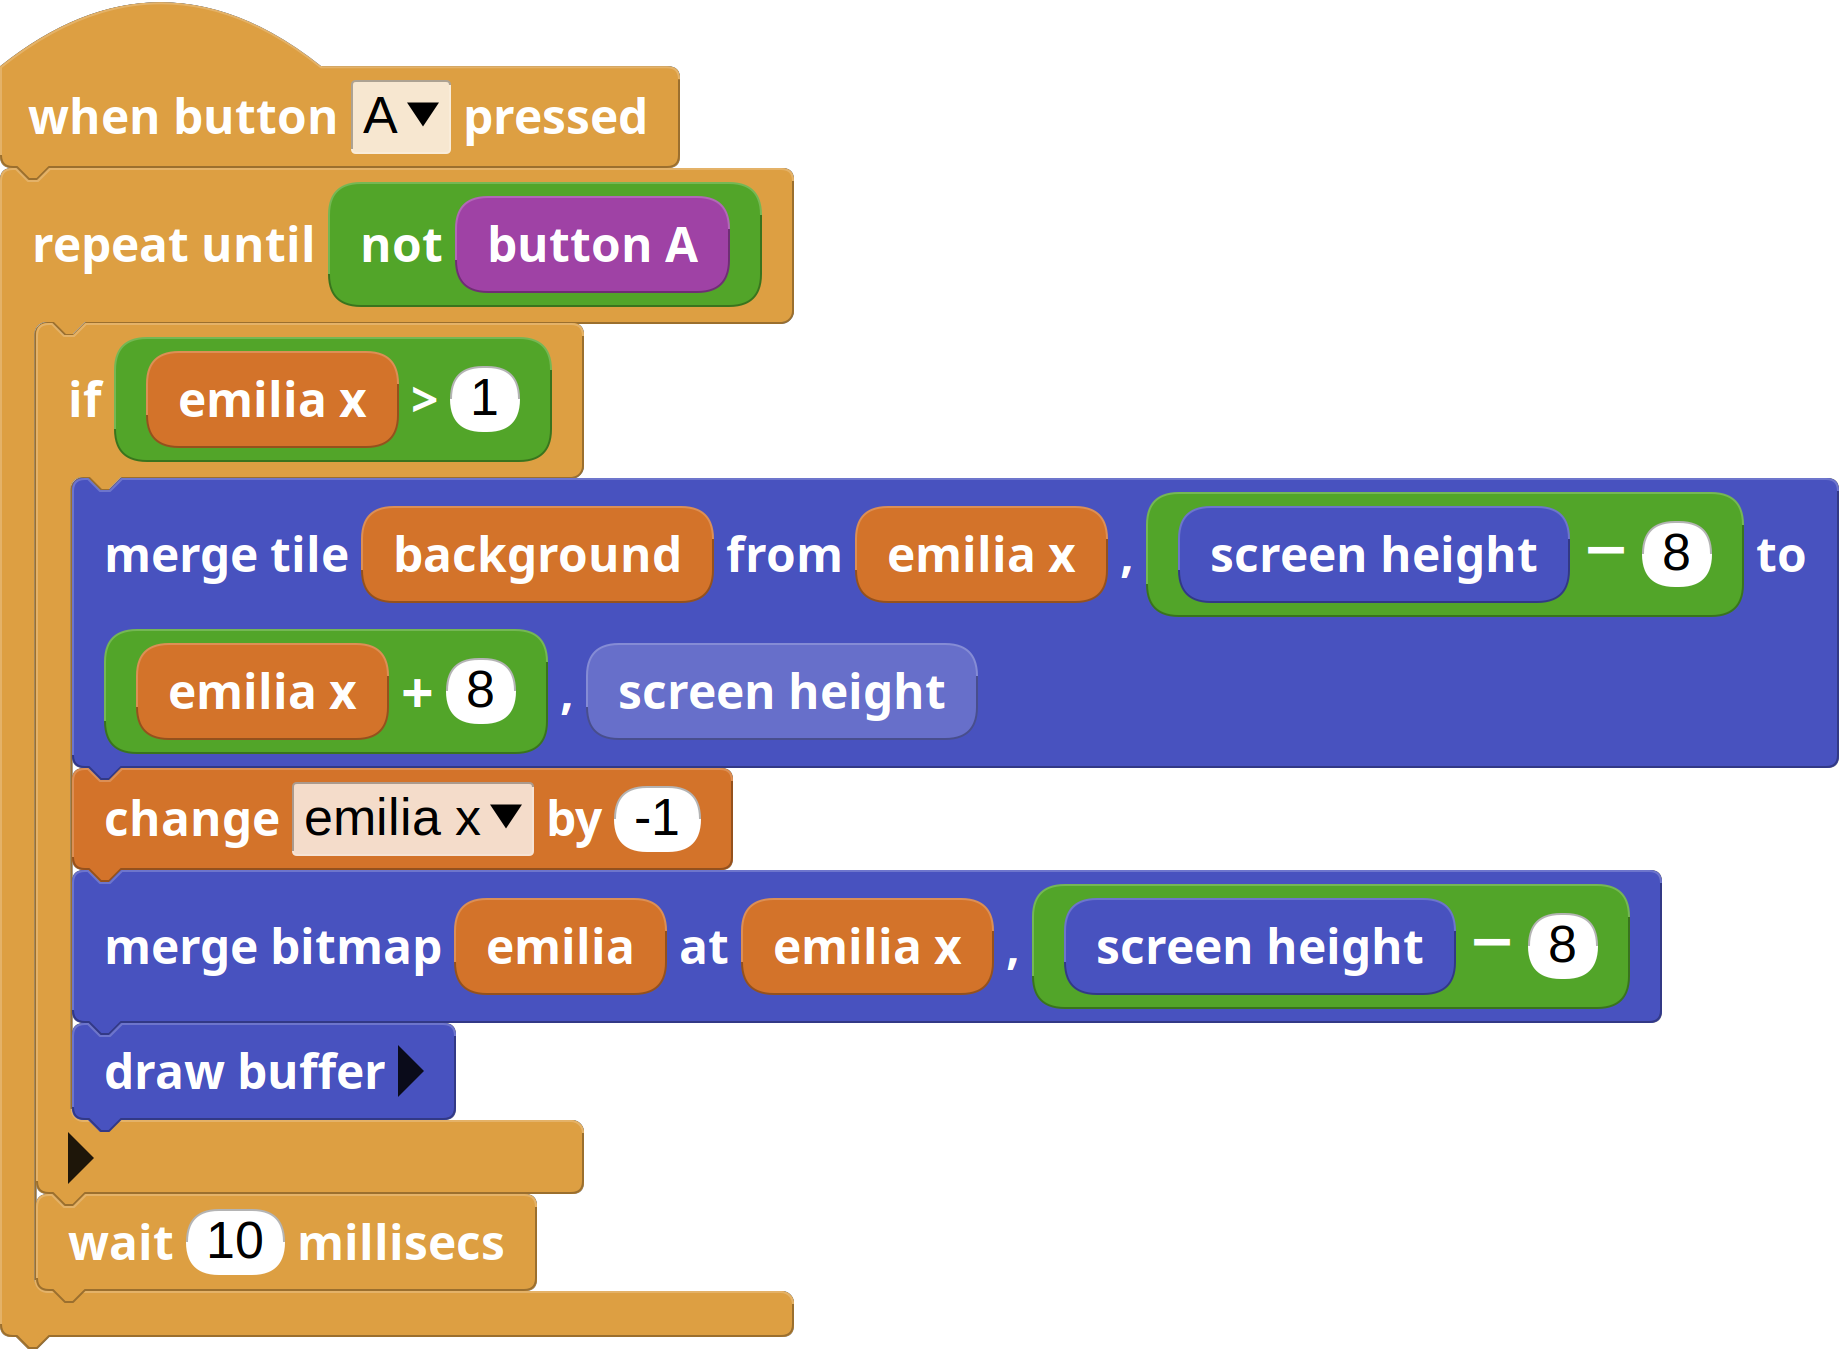
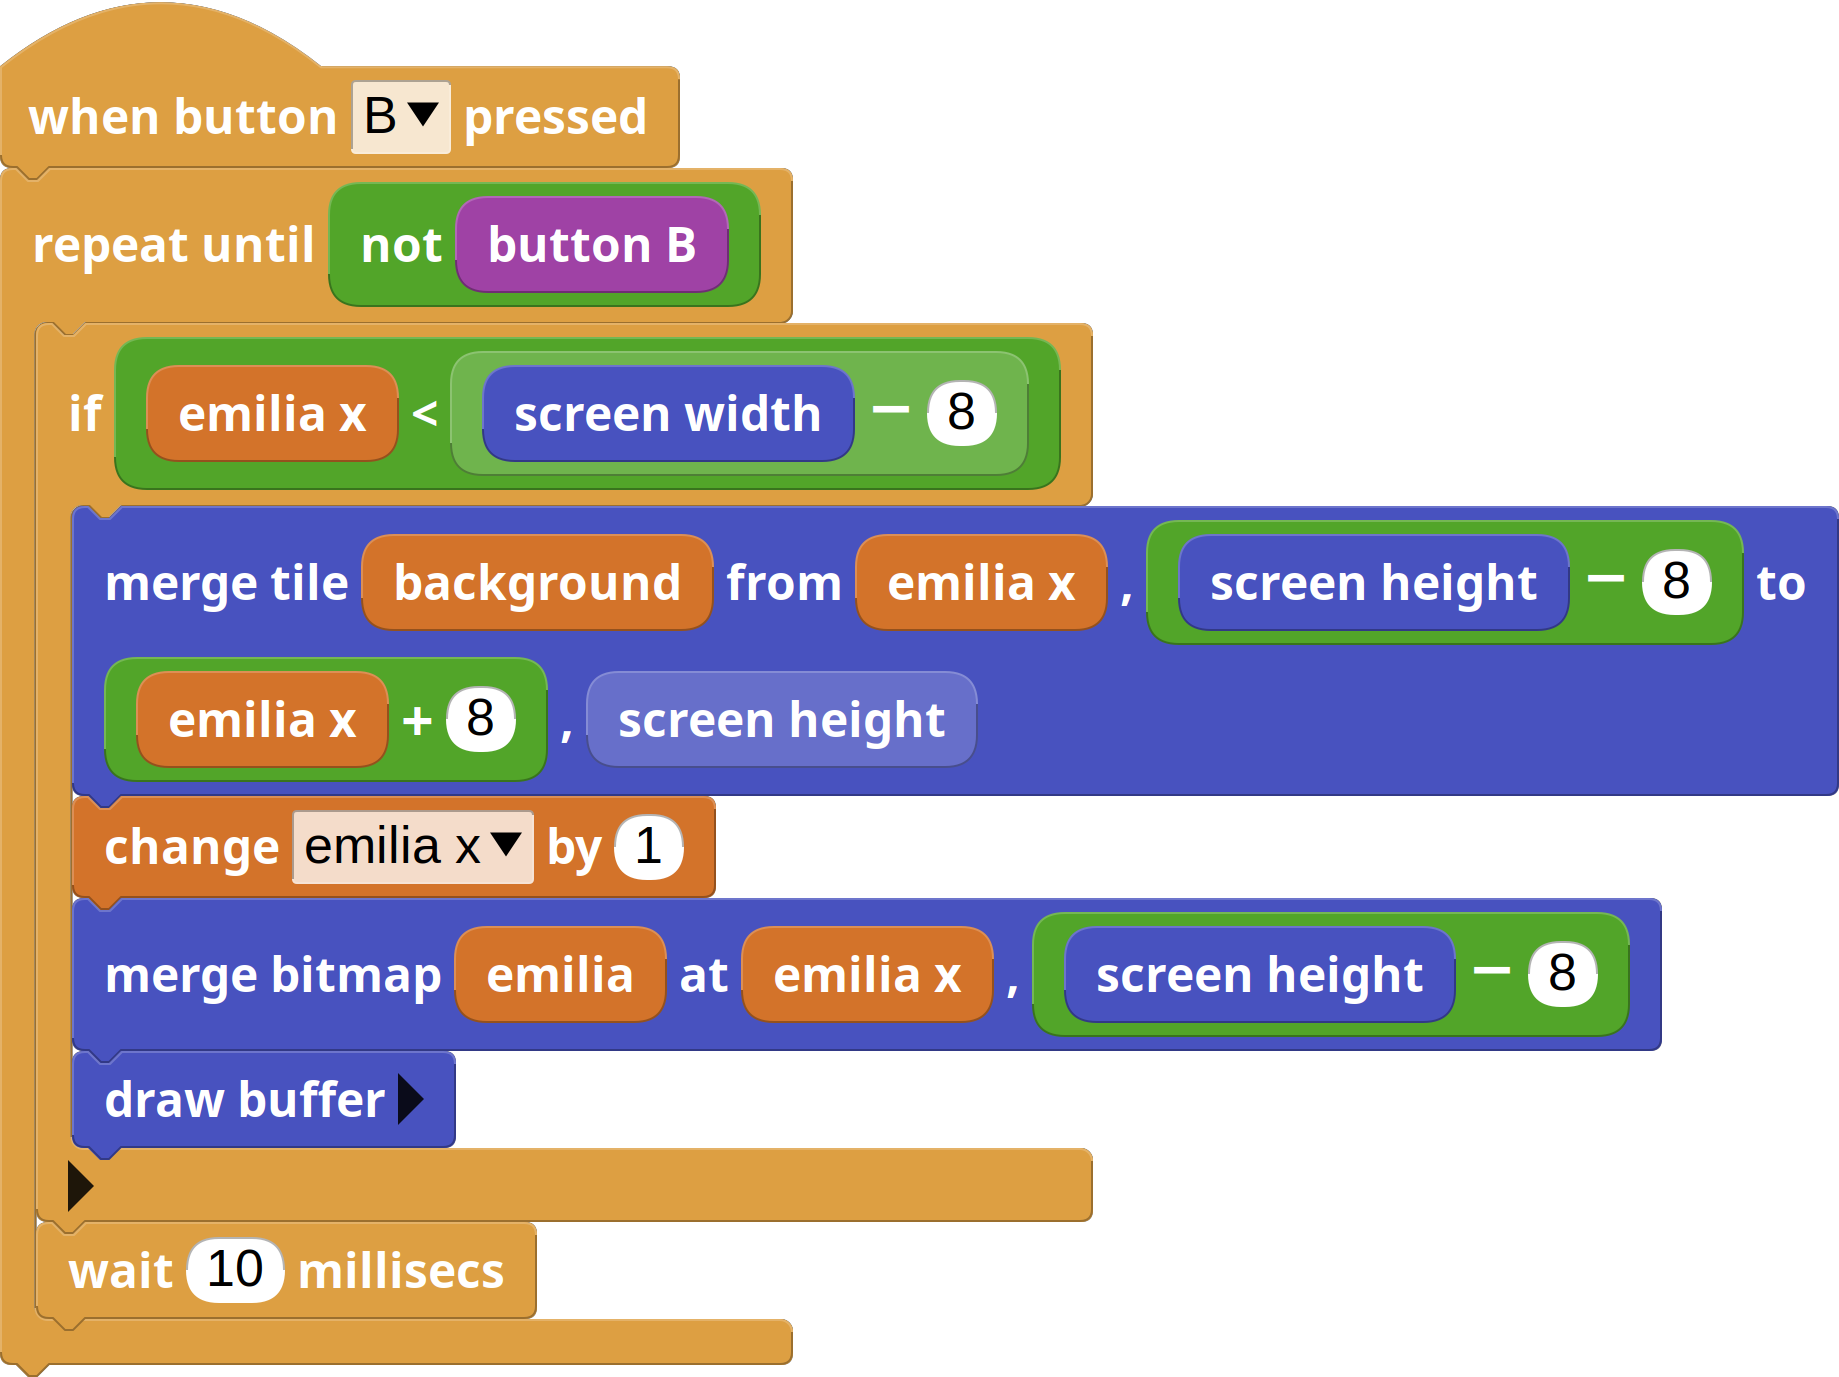
Notice how we've added a little wait in the loop. Otherwise Emilia would move so fast we wouldn't be able to control her accurately.
That should be it, as far as Emilia is concerned.
By the way, did you know that you can use the left and right arrow keys to trigger Boardie's A and B buttons? To try it, make sure you've clicked somewhere on Boardie first, to make sure the cursor focus is on it.
Let's now move on to drawing the rest of the game sprites.
Food from the skies
As a reminder, the aim of the game is to get Emilia to eat the healthy food items that fall from the sky while avoiding the unhealthy ones. We, thus, need a bunch of new food sprites.
Food sprites
Since we still have space in the palette, we can afford to add a couple more colors for the food sprites. We're going to add a shade of red and a shade of yellow.
We need a couple of unhealthy items, like a doughnut and a slice of pizza, and a couple of healthy ones, like an apple and a banana. These sprites are going to be a bit smaller, at 6x6 pixels, so we'll have to use a little bit of imagination to discern the food that they represent.
![]()
Now let's proceed to update the palette, make new sprites and assign them to four new variables in MicroBlocks. Remember that all of that is handled by the initialize graphics block, that we can edit by right clicking on it and selecting show block definition…
![]()
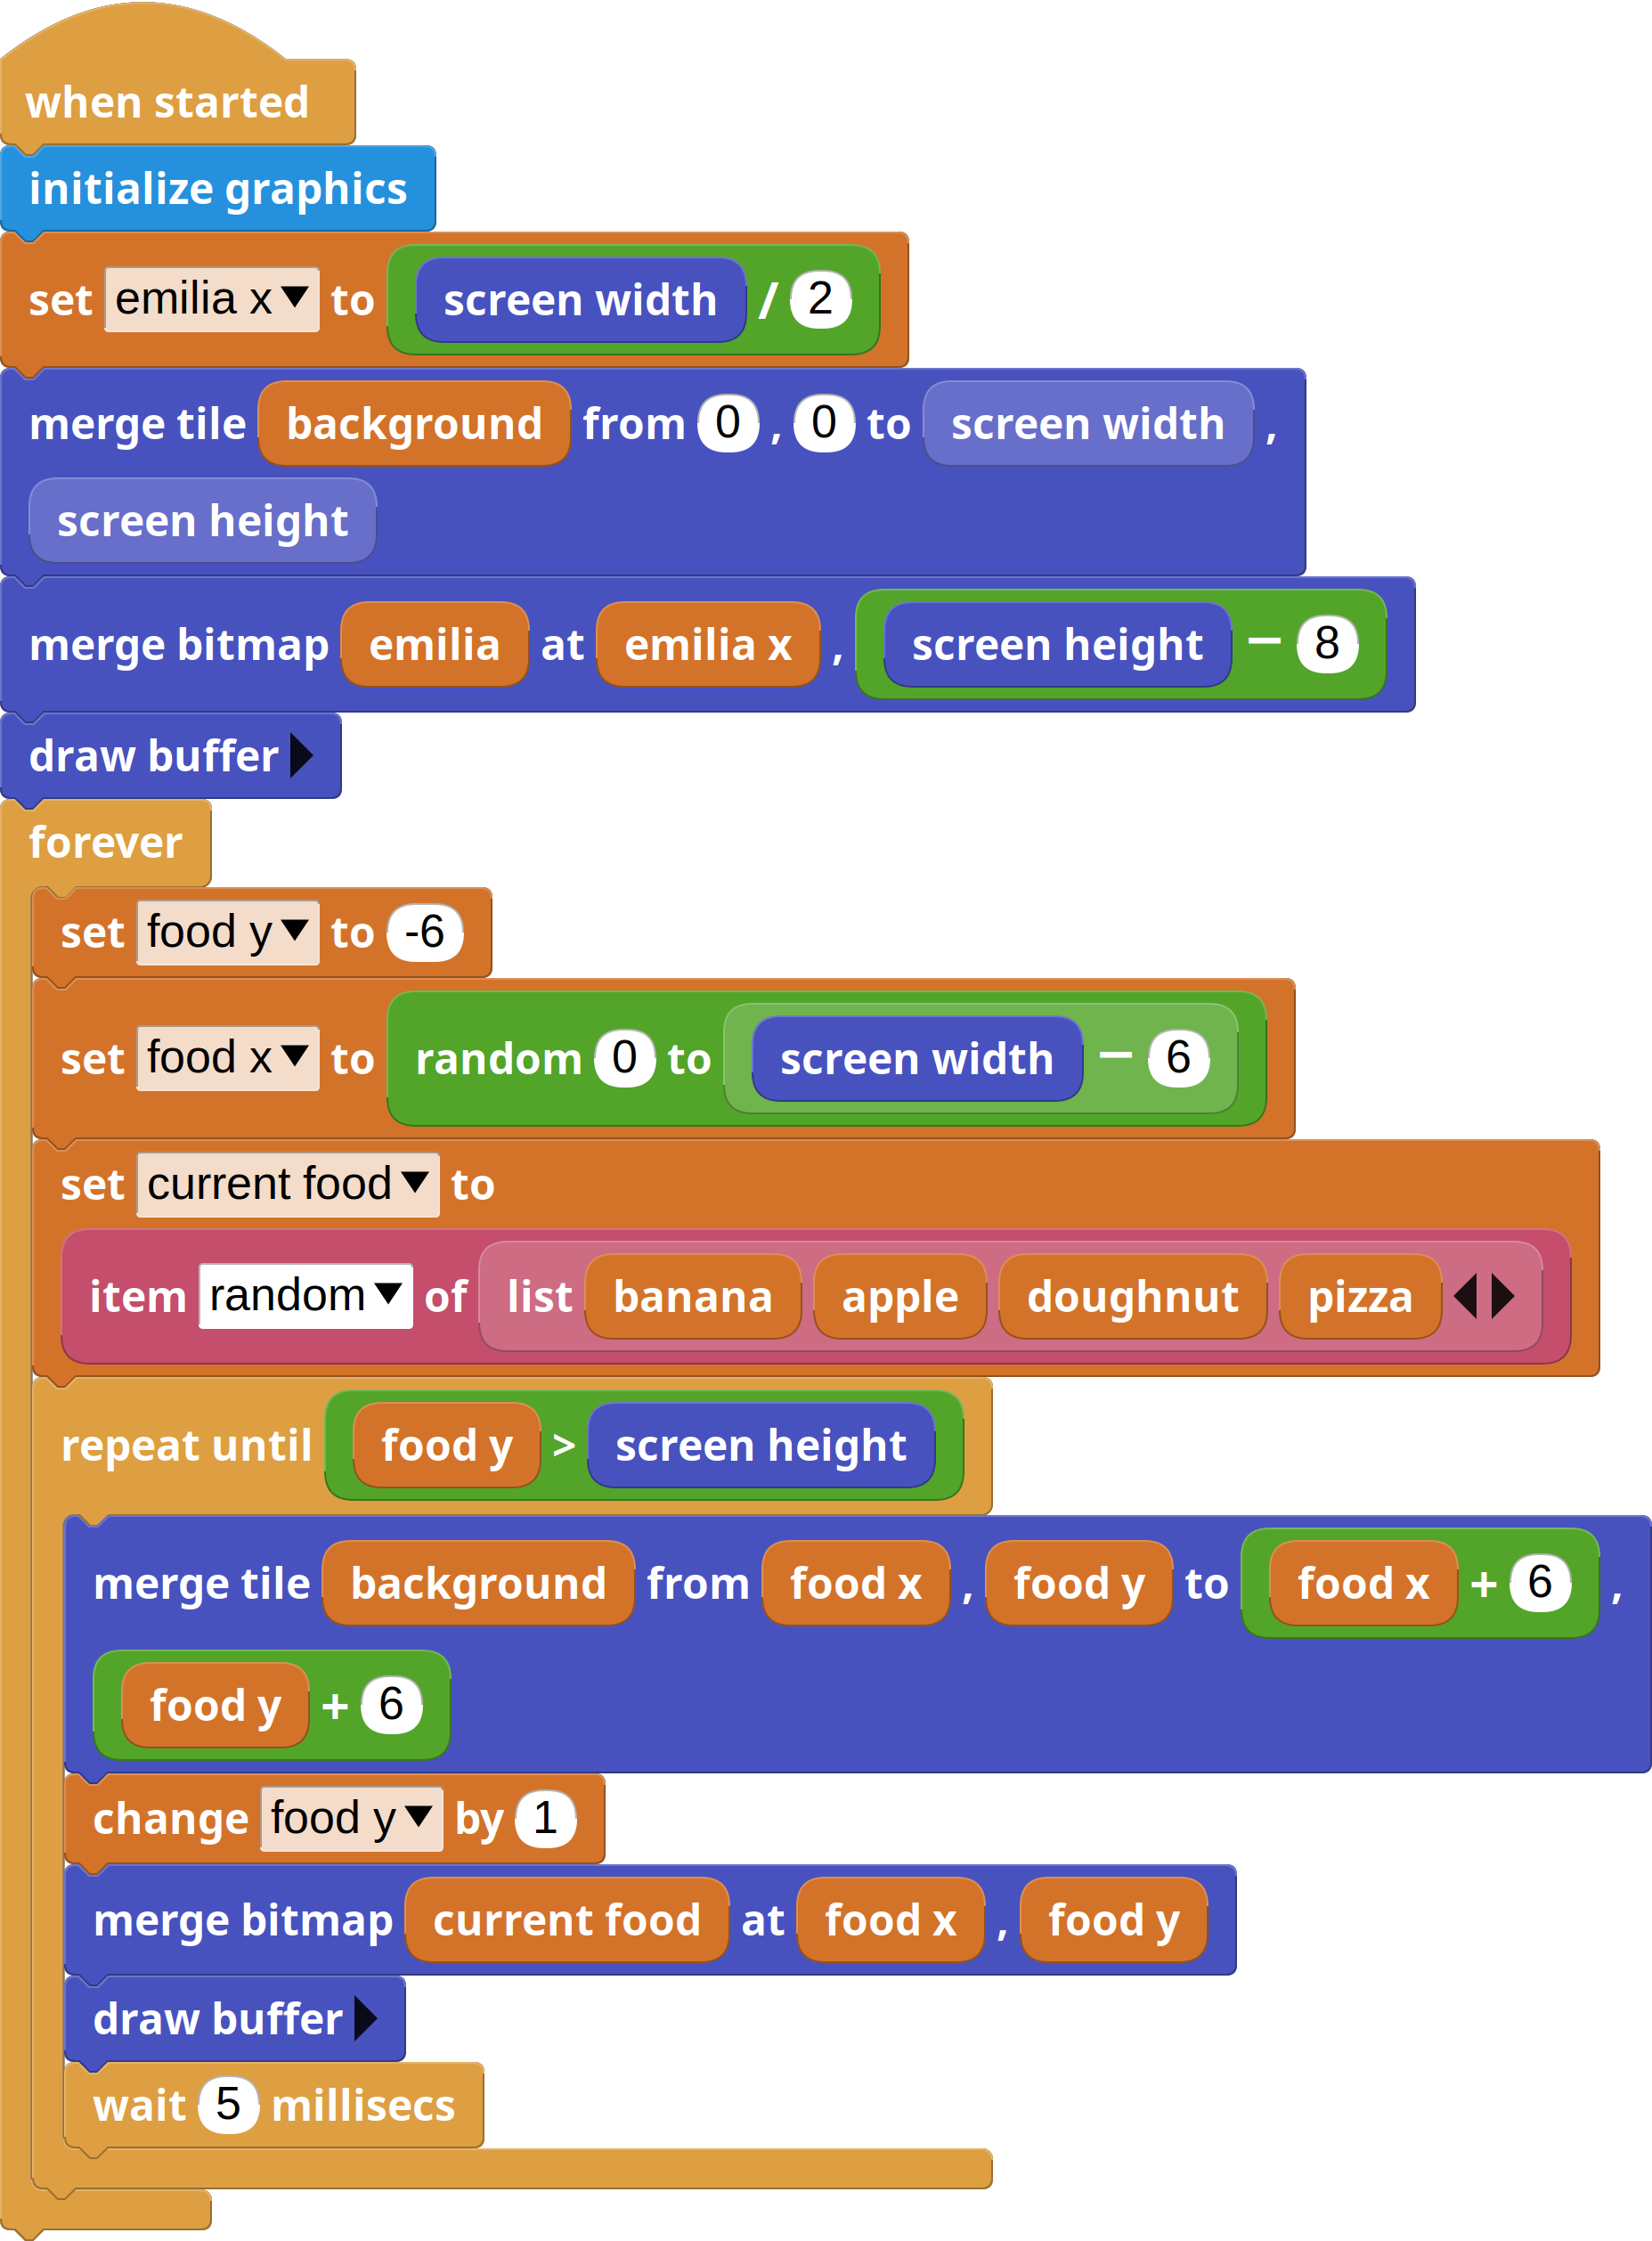
Adding gravity
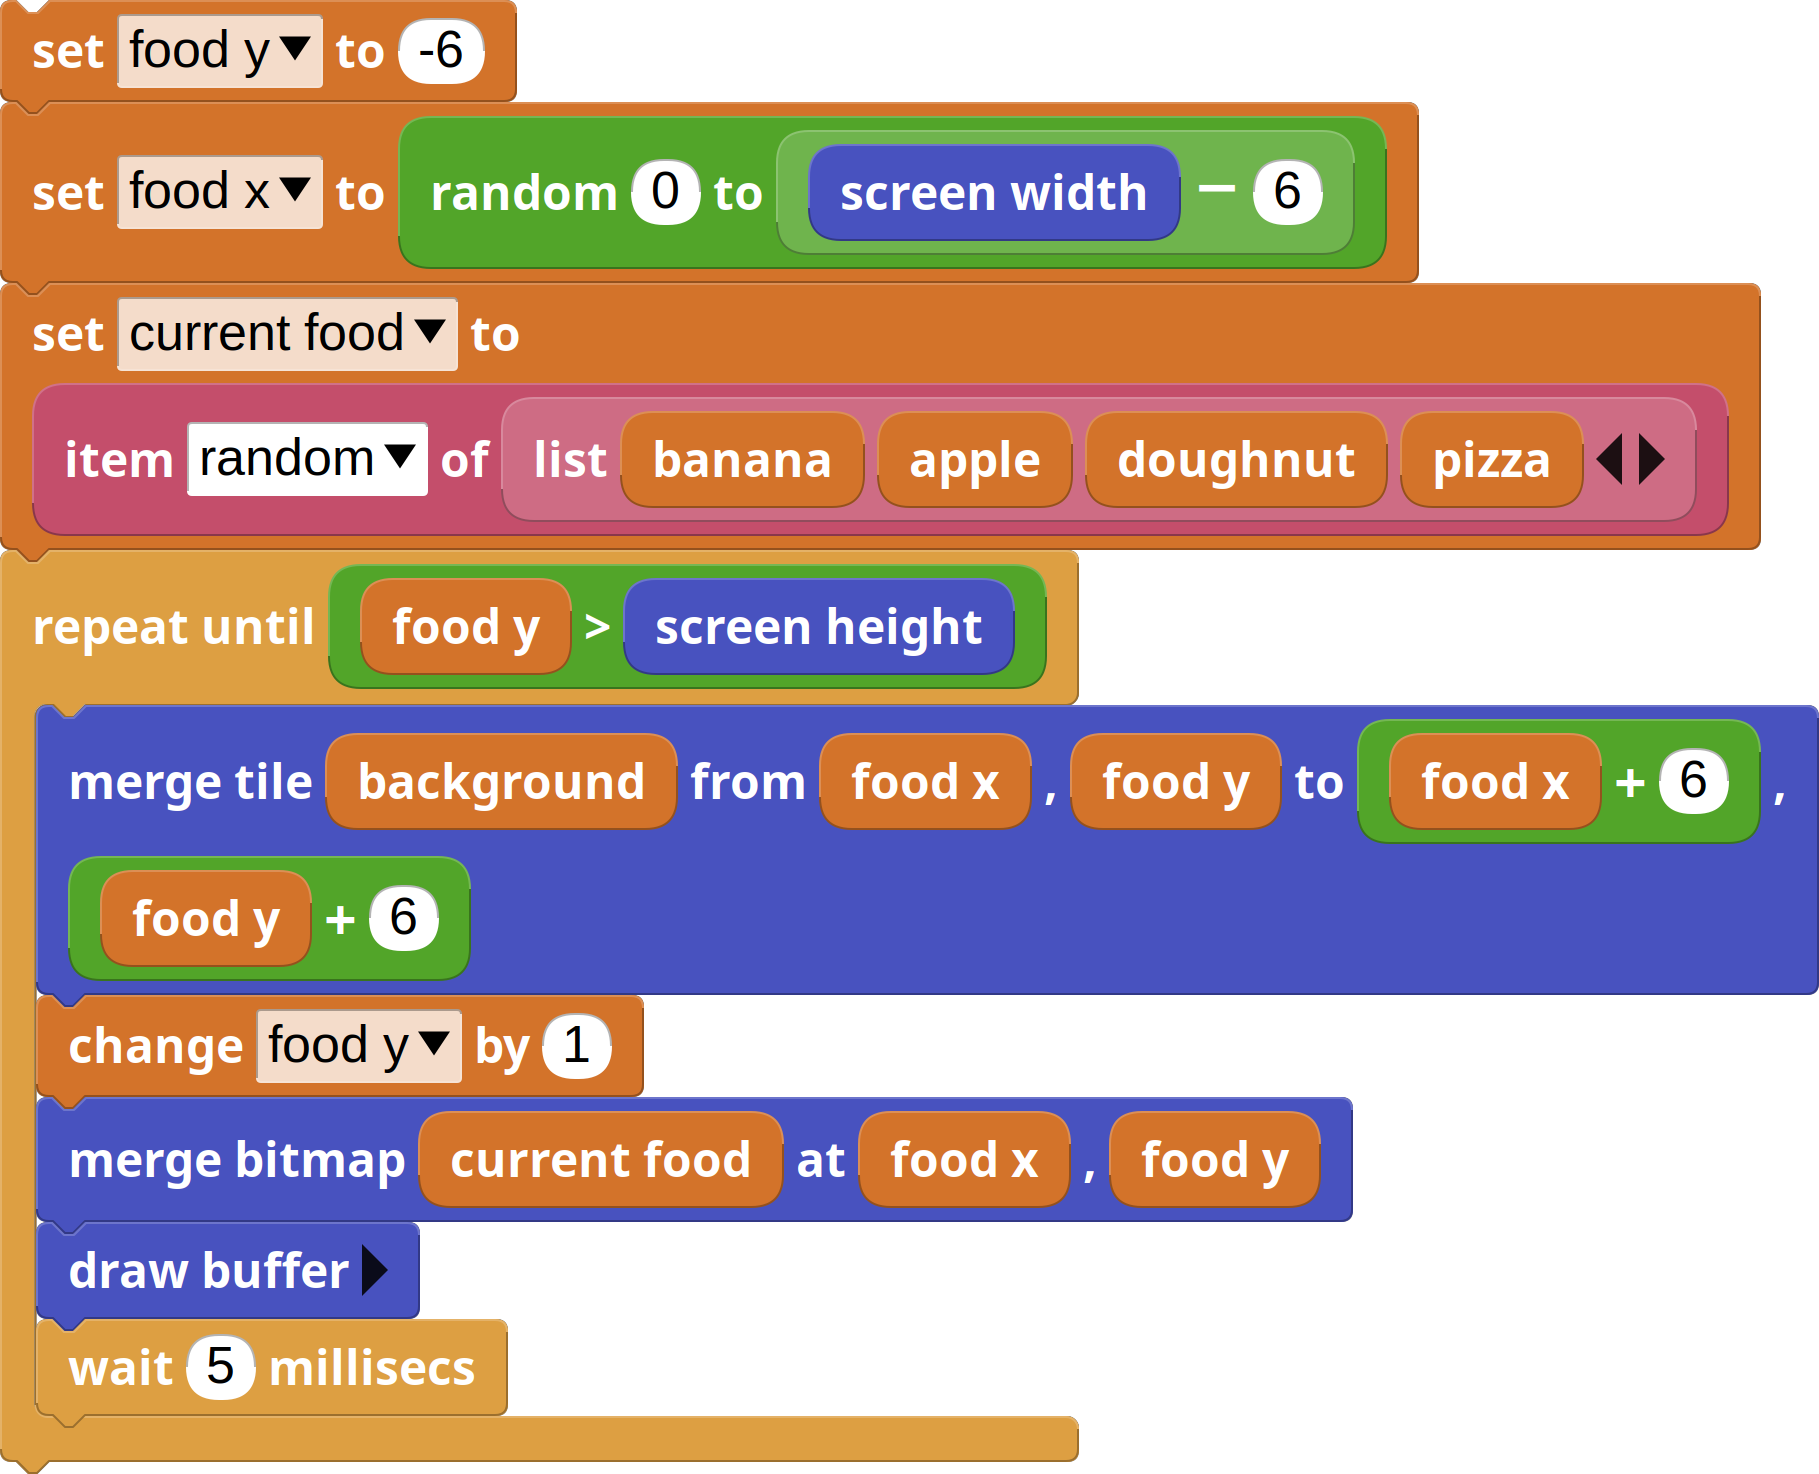
One random food item should fall from the sky every few seconds. Since we'll never have more than one item on screen at the same time, we can use a single global variable -that we can name food y- to control the vertical position of the currently falling item, and an extra food x variable to define its horizontal position, that will be chosen randomly between the two edges of the screen. Additionally, we are going to need another variable to hold the currently falling item, that we'll choose at random among the four new sprites we have added to the project.
All together, it should look like this:

All these 6es come from the fact that food sprites are 6x6 pixels in ares.
Initializing food y to -6 makes sure it starts falling from above the top
limit of the screen. If we initialized it to 0, the food item would pop up at
the top row of the screen as if it had been teleported there somehow.
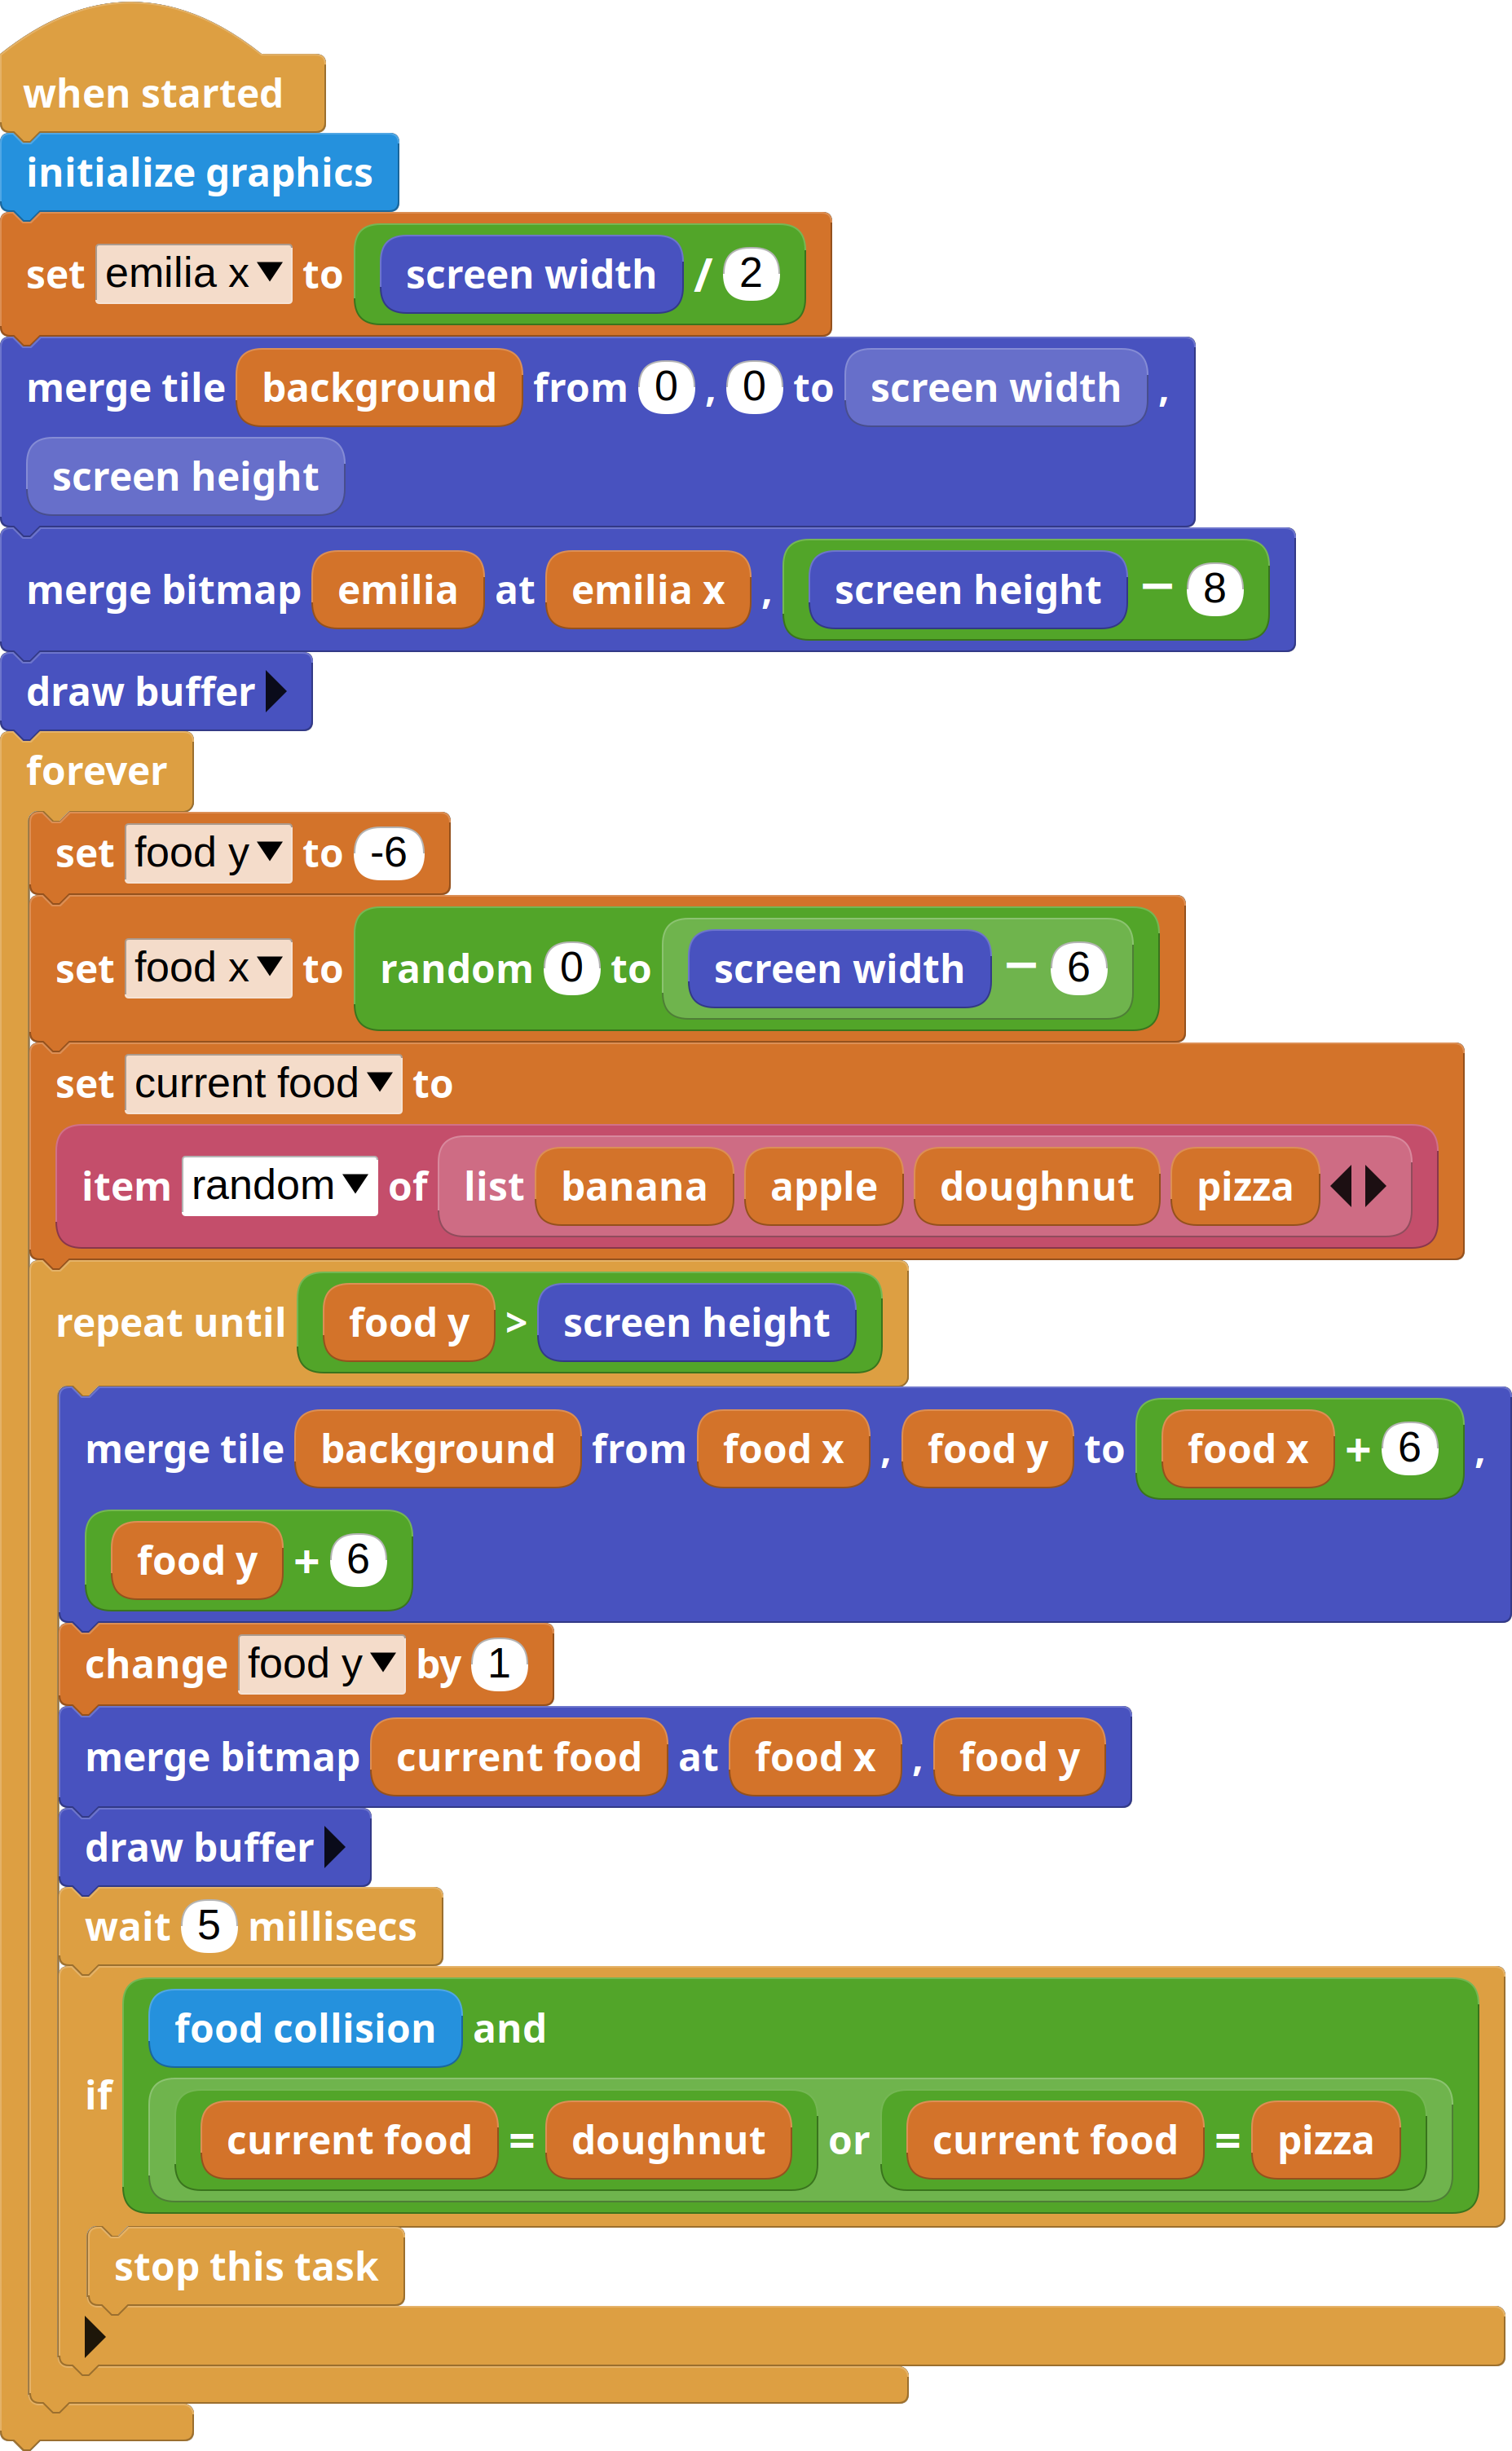
Next up is getting the current food item to fall down to the bottom. That is, we need to increase food y until it gets larger than the screen height. Additionally, just like we did with Emilia, we'll need to erase the food from where it was before changing food y, and merge it back into the buffer afterwards.
Let's not forget to also include a little wait in the loop so the item falls at a reasonable pace.
Of course, that should be happening constantly. When an item goes past the
bottom of the screen, another one should start falling from the top. We can just
wrap the whole thing in a forever loop and, since we want this loop to get
started as soon as the project runs, we can just snap it to the bottom of the
when started script.
Collisions and game logic
Next up is detecting when Emilia is touching a food item. Collision detection can be a whole complicated subject in itself, especially when you're aiming for pixel-perfect collisions, but in our case we'll stick to the simplest possible collision detection strategy: bounding box collision.
Bounding box collision detection
By bounding box we'll understand the rectangle that contains the image data for a sprite. In our case, food items have a 6x6 pixels rectangle, and Emilia has an 8x8 pixels one.
Bounding box collision detection consists in checking whether one rectangle -let's call it A- intersects the other -let's call it B- at any point.
A will intersect B if and only if:
- The left side of A is at the left of the right side of B, and
- the right side of A is at the right of the left side of B, and
- the bottom side of A is below the top side of B, and
- the top side of A is above the bottom side of B.
If you want to convince yourself that those are the four conditions that need to be met, you can test them against the 9 possible rectangle intersections.
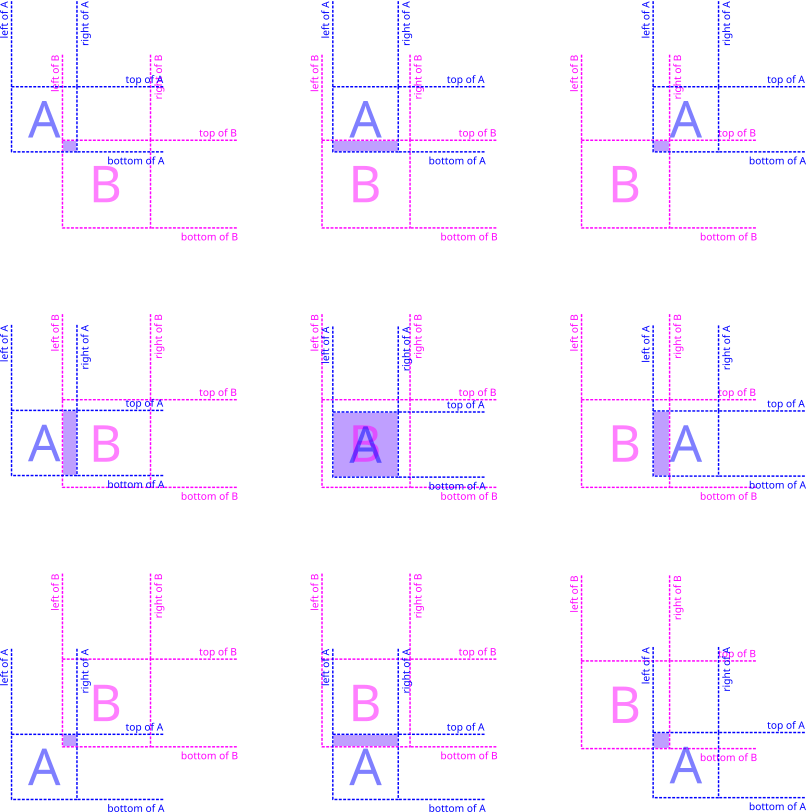
However, since Emilia is always at the bottom of the screen, we don't need to care about the three cases in the last row.
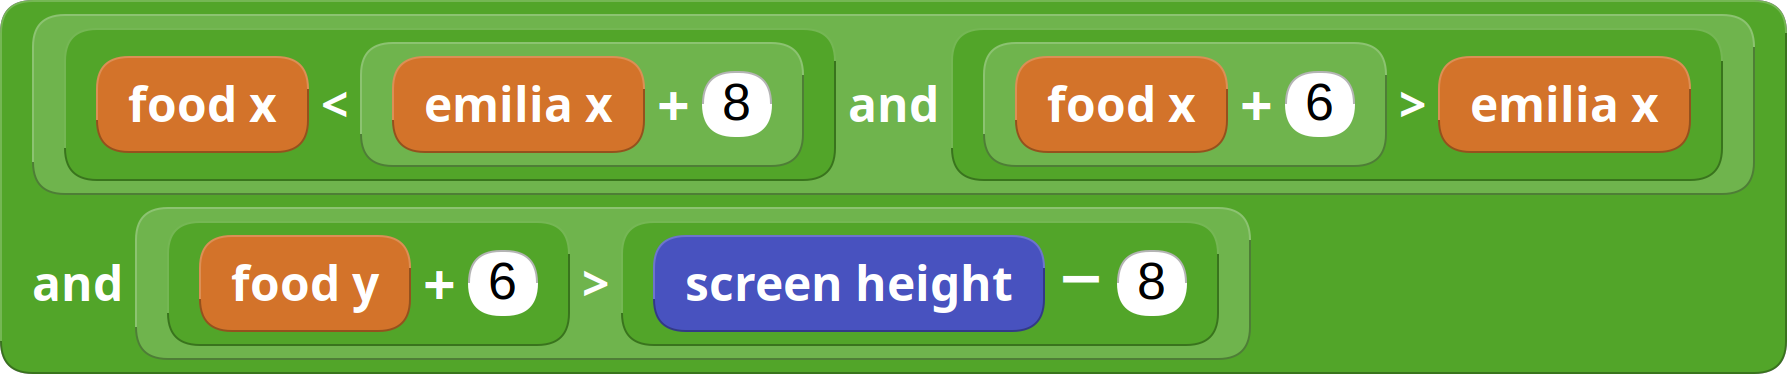
For our purposes, A is going to be the food item, and B is going to be Emilia. Here's what the relevant values mean for our two sprites:

MicroBlocks implementation
And, thus, the MicroBlocks implementation of the collision check goes as follows:
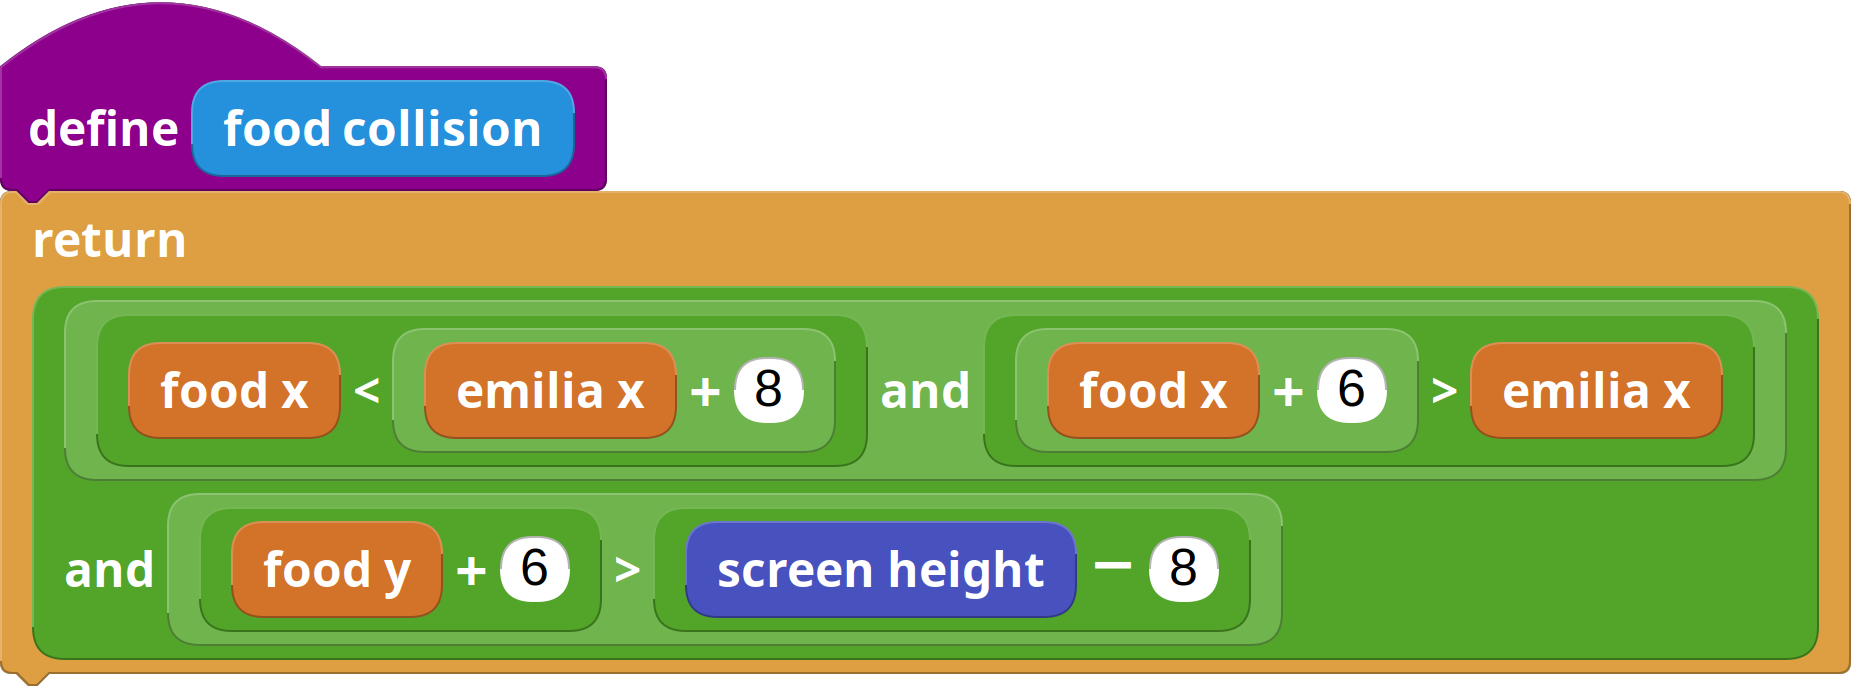
We should turn this check into a new reporter block to make our code more readable. To do so, navigate to the My Blocks category, click on Add a reporter block and name it something like food collision.
Reporter blocks need to report, or return, a value. That means that they
don't perform an action, but instead give a value back when we run them. That's
why the first thing we'll need to do is attach a return block -from the
Control category- into its definition. Inside of the return block we'll drop
the whole check that we had assembled just before.
The only thing left to do is to do something when this condition is true. Even though this is just the prototype of a game, we can start to sketch a little bit of the game logic. To make it extremely simple, the only thing we're going to do is stop the whole game whenever Emilia touches an unhealthy item.
Here's what the whole thing should look like now:
A few fixes and optimizations
You will probably have found a whole bunch of little errors and things that could work better. Let's go over a few of these.
You may have noticed that Emilia gets partially erased sometimes when food flies close to her. This responds to a couple of factors, but an important one is that both the script that deals with the food item and the ones that deal with Emilia's movement are redrawing the whole buffer at once. It would be much smarter to only redraw the parts of the buffer that actually need redrawing.
If you expand the draw buffer block by clicking on its right arrow, you'll see
it has a bunch of extra parameters that let us define an area to draw. In the
case of Emilia, that should be an area that covers Emilia and her possible
previous position. That is, Emilia plus an extra pixel per side.
We can now do the same for the food item. Let's just draw the part of the buffer that we really need for the sprite, no more.

This makes things slightly better, but healthy food still erases Emilia when it flies on top of her! What can we do? One simple fix would be to not erase or redraw Emilia at all in the button scripts, but do it always in the main when started script. This way we can control who gets drawn in which order.
What's more. We could take all these merging and drawing operations and make a new block that deals with the graphic part of the game. Let's call it redraw.
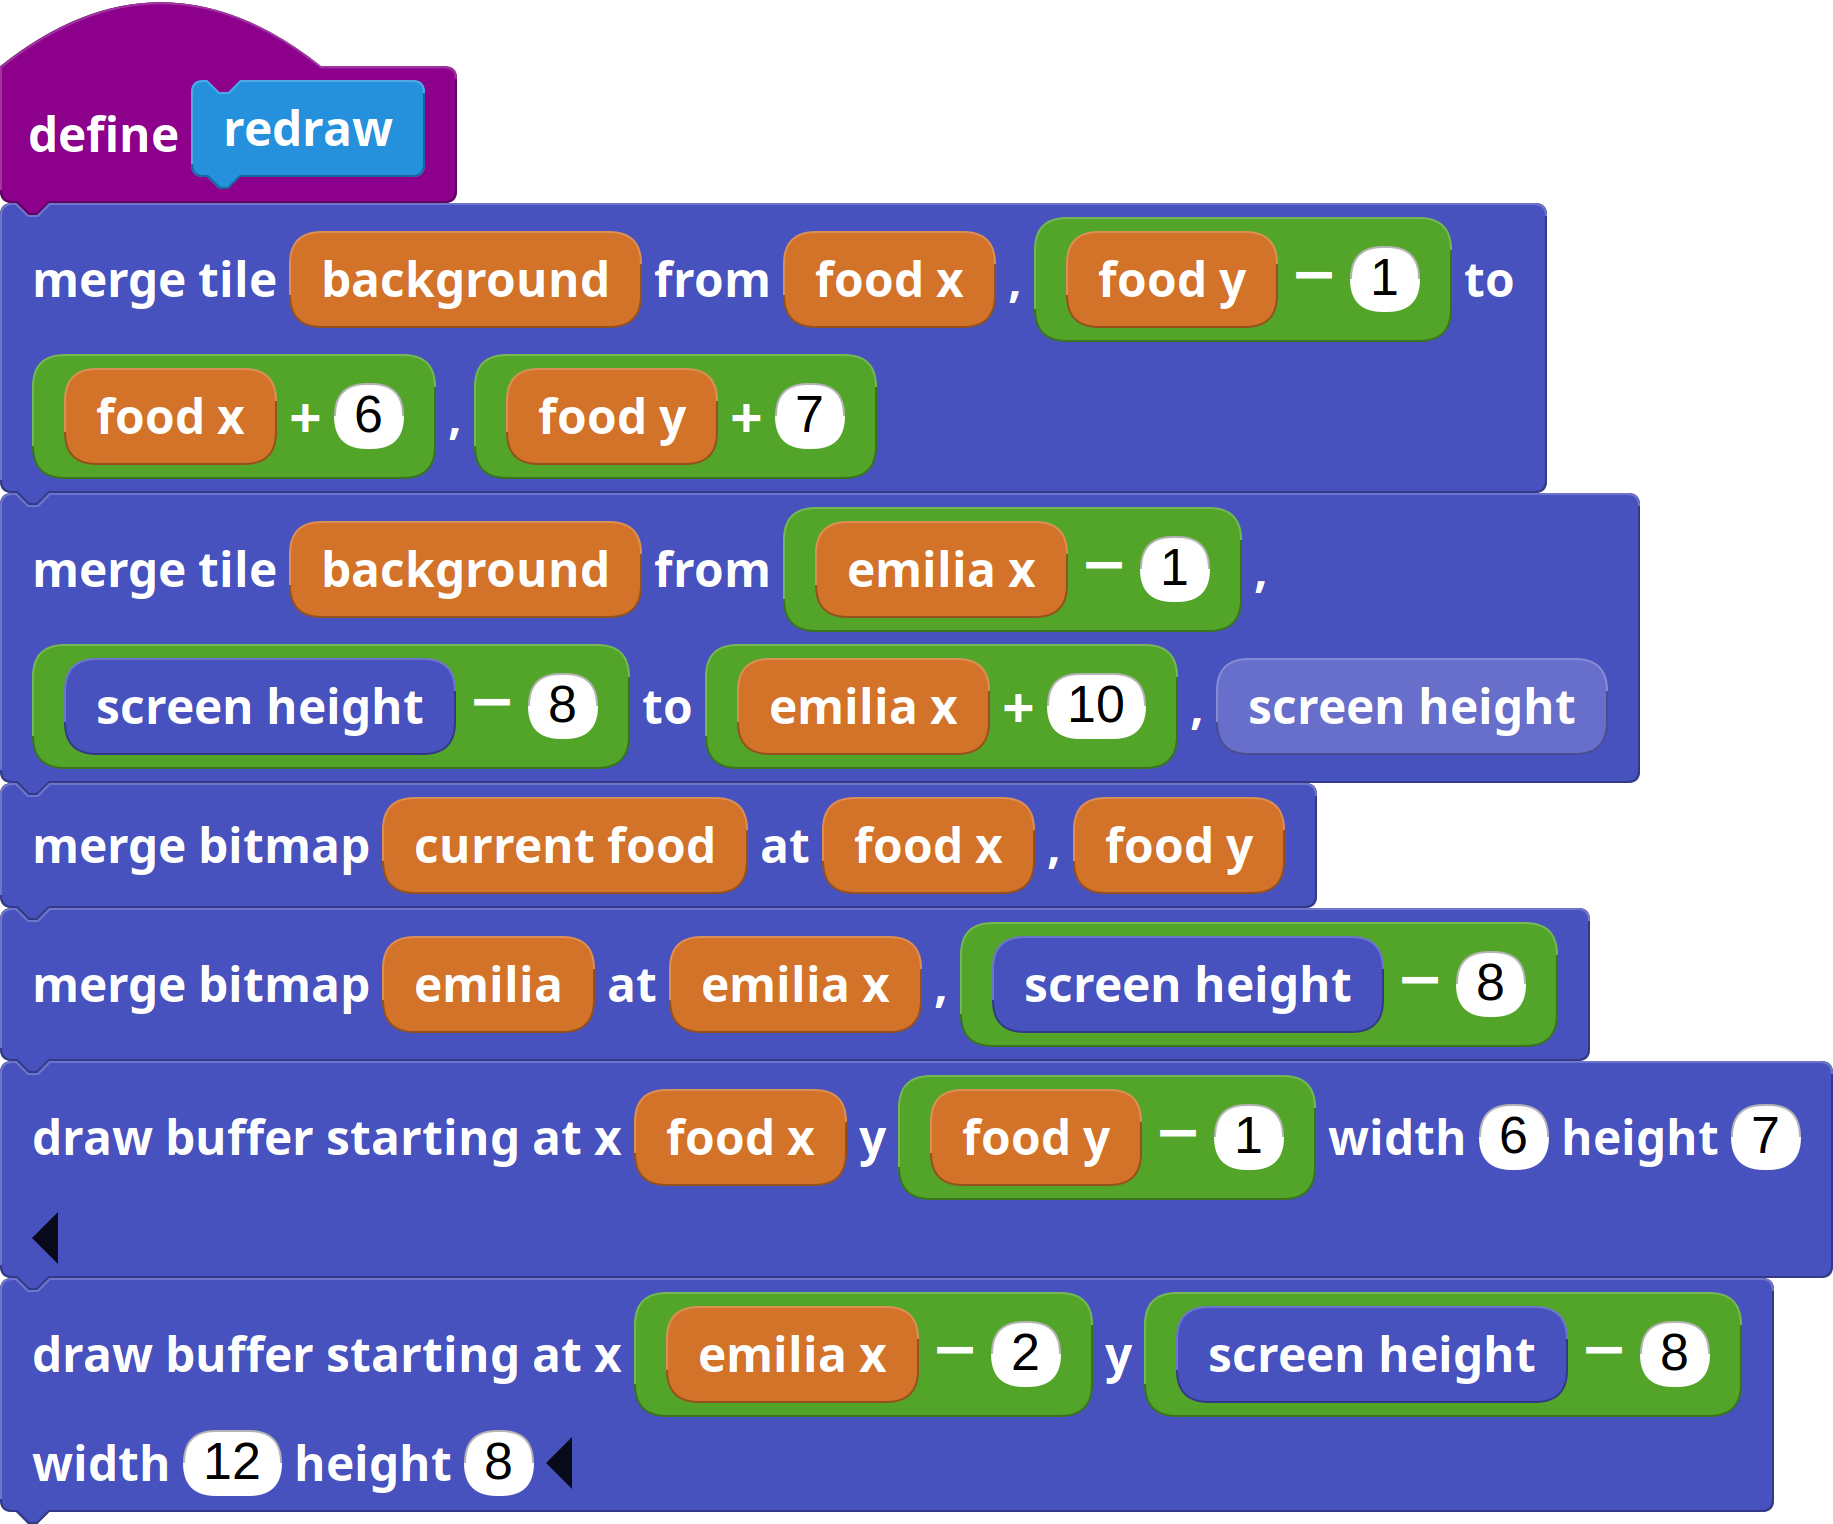
A few considerations. Notice how we've expanded the background merges to account for the possible previous positions of both the food item and Emilia. Also notice how we've expanded the Emilia buffer draw by 2 more pixels, at a now total width of 12 pixels. These extra pixels account for the fact that the buttons work at 10 millisecond intervals, while the redraw loop works at 5 millisecond intervals, which could cause glitches in drawing Emilia while it's moving.
This is what the new main loop looks like now:
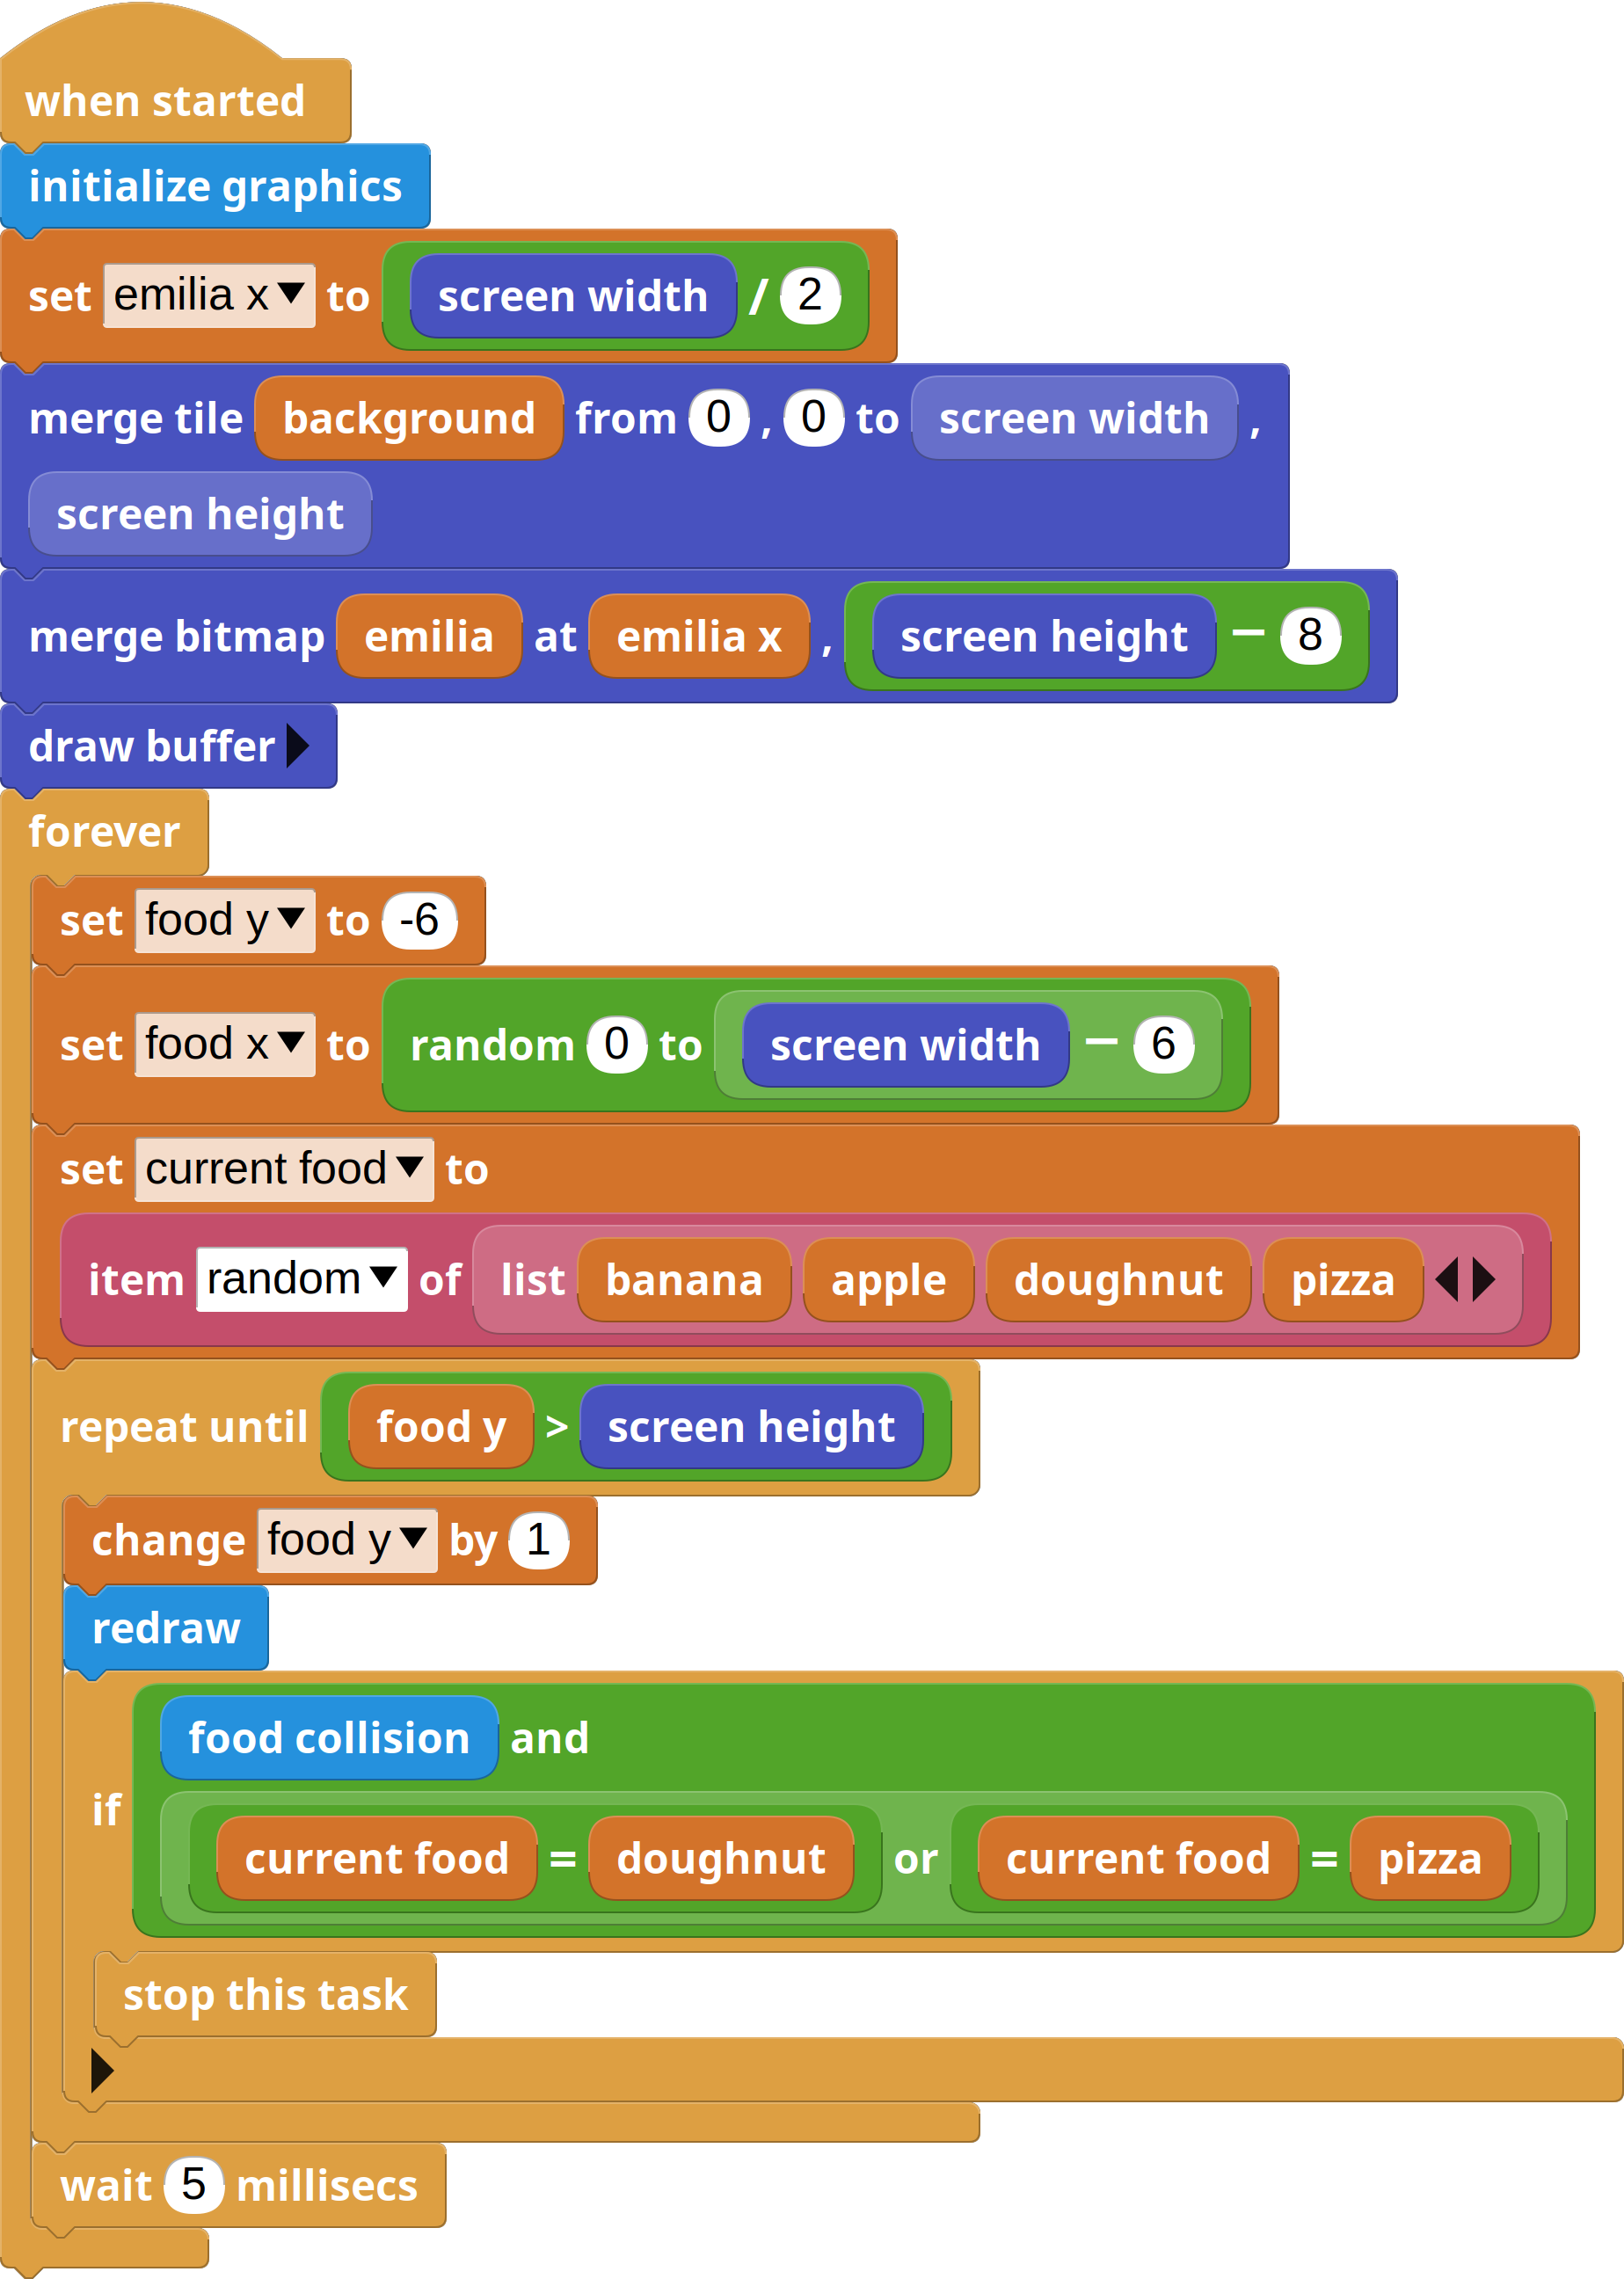

Final words and suggestions
This concludes this introduction to indexed graphics and buffer-based drawing. However, this game is obviously incomplete.
I encourage you to try to polish it and make it into more of a playable game. Here's a list of changes and improvements that you could try:
- Add a title screen.
- Add a game over screen.
- Add extra sprites to animate Emilia. You could start by adding a mirrored version of Emilia to make her look the other way when she's walking to the right.
- Keep track of the score. Have healthy food count one point. Then, use the TFT library -from the Graphics and Displays folder- to write text on the screen and display the current score.
- Use the Ringtone library -at the root folder- to add some music to the game. You can also use the Tone library to add very basic sound effects.