
Live music, really?
Yes, really! People have been programming live music in front of an audience for a while. This practice is known as live coding, and it has a vibrant and passionate community all over the world.
Usually, live coders use languages that can produce sound themselves, and while microcontrollers can produce sound themselves, you could have a hard time if you want to get an audience to dance to that.
Microcontrollers can interface to music-making devices via a protocol called MIDI, and that's exactly what we're going to be using in this activity.
Microcontroller sound generation
If you're interested in the kinds of sounds you can make with a microcontroller alone, you will have probably already tried out the Tone and Ringtone libraries at the root of the Library browser, but there are a few additional libraries you should check out. Namely, the Analog Synthesis, Wavetable synthesis, Chiptunes, Square Wave Chords, Pluck and MultiTone libraries under the Sound folder in the Library browser.
What device should I use
The best MIDI device is the one that you already have. If you have an old digital piano, synthesizer, or MIDI module -some people used MIDI modules in the early years of PC gaming for an astronomically better musical experience-, that's what you should be using.
The second best MIDI device is the one someone else already has and doesn't want. Look for "MIDI modules" in second hand websites and apps. You can make sure they do what you need by looking for their instruction manual online, or by searching for videos that go through the particular module you've found. It is recommended to first at least skim through this activity to understand what you're looking for, but in general terms you want a sound module with a MIDI IN port and an audio output connection. I've had luck with modules under 100€ in the past, but I've also been unlucky with more expensive modules that looked very promising and ended up sounding rather poorly.
Of course, the third best MIDI device is the one you buy today. You absolutely do not need to spend too much money on your first synth. There are independent shops that sell very well-crafted and affordable modules. Look for "MIDI wavetable module" online, and pick your poison.
If you're crafty, there are a bunch of custom kits out there that you can get PCBs for and solder yourself.
If you are unsure of what to get exactly, you can always contact us to ask for more concrete options.
What if I still have no synth
No worries. The fourth best MIDI device is a virtual one. If your board supports USB MIDI you can always use a software synthesizer. FluidSynth and its graphical companion QSynth are the most common ones, but you could even use a web-based synthesizer over WebMIDI. If that's what you want to try, we recommend SpessaSynth.
You will need to give SpessaSynth permission to access WebMIDI the first time you try it, and you should be good to go after that.
What microcontroller should I use
Any should do! Beware, though, that some microcontrollers have slightly slower persistent memory, and that could cause your tempo to experience drops. Even a small 10 millisecond tempo drop will be largely noticeable by the human ear.
What if I have no microcontroller
Well, MicroBlocks is a programming language for microcontrollers, but you could always use Boardie, our virtual microcontroller, to try things out.
If you follow this route, know that you will only be able to use USB MIDI or WebMIDI devices. If you choose to go fully web-based and use Boardie with a WebMIDI synthesizer, you will first have to run one of the MIDI blocks in MicroBlocks to trigger the browser to ask for permission to use WebMIDI.
Physical connection
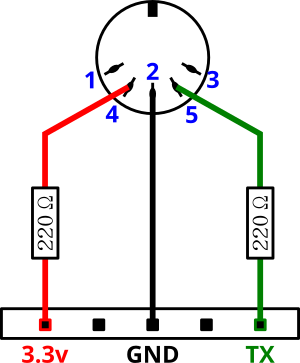
To begin with, you'll need to connect your microcontroller to the MIDI IN port of your device. Most of the time you'll only need two wires:
- Pin 5 of the MIDI DIN connector should go to the serial pin in your microcontroller. If your microcontroller uses 5v logic, you'll want to add a 220Ω resistor in series in that wire. For a 3.3v microcontroller, the resistor value should be of 10Ω.
- Pin 4 of the MIDI DIN connector should go to a 3.3v or 5v pin in your microcontroller. Again, add a 220Ω resistor in series for 5v boards, or a 10Ω one for 3.3 ones.
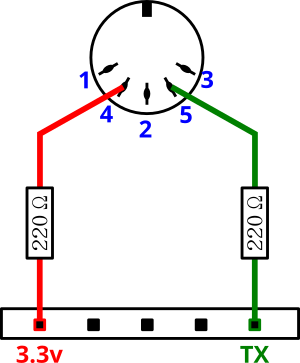
If that doesn't work, your MIDI module may also need a ground line, in which case you'll need an extra wire:
- Pin 2 of the MIDI DIN connector should go to the GND pin in your microcontroller.
A few words about MIDI
MIDI -Musical Instrument Digital Interface- is a communication standard system for musical devices. These include devices that make music -such as synthesizers, samplers, wave table boards, romplers, and all other sorts of music making gizmos- and devices that control these music-making devices -such as keyboard controllers, arpeggiators, sequencers, sampler pads, or, in our case, programming languages.-
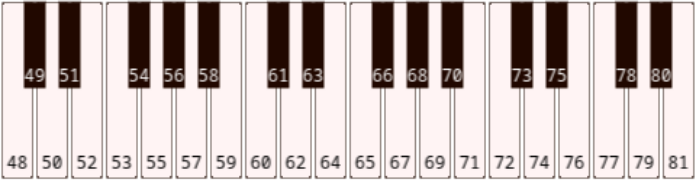
In MIDI, every note in Western music is assigned a corresponding number. These are better represented on a piano keyboard:
⋯  ⋯
⋯
In addition, MIDI devices can usually play music on different channels at the same time. Each channel can also be set up to play on a different instrument.
The MicroBlocks MIDI library follows the General MIDI (or GM) standardized specification for musical instruments. GM is a classification of musical instruments that a lot of MIDI-enabled musical instruments follow. This means, for instance, that you can expect lots of instruments to actually play a soprano-sax-like sound when you tell them to play instrument number 65. It also means that a lot of instruments will play drums and percussion instruments when you ask them to play a note on channel 10.
That said, not all instruments follow the GM convention, so your mileage may vary.
First steps
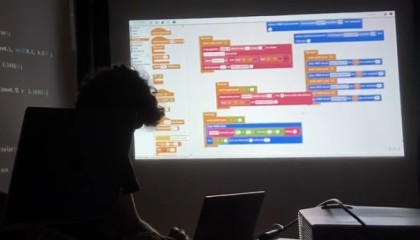
To be able to interface with your MIDI device, start by importing the MIDI library. Click on the plus sign next to Libraries, just below the block category list, and navigate to the Sound folder. Then, select the MIDI library and click Open.
Don't be overwhelmed by all the blocks provided by the MIDI library. In this activity, we'll only be covering a few of them, namely:


We'll explain what the first four blocks do in the next sections, so they don't need much explanation right now.
The ![]() block will ask your
synthesizer to stop all sounds and go back to its original state. This is
especially useful in cases where a note has been left playing and you don't know
which one or in which channel.
block will ask your
synthesizer to stop all sounds and go back to its original state. This is
especially useful in cases where a note has been left playing and you don't know
which one or in which channel.
If you have connected your device to the default hardware serial pin in your
board, you're all set. Otherwise, keep on reading to learn what the ![]() block does.
block does.
Software serial
To set up your board to send MIDI commands through a software serial port, just
input the correct pin number into the ![]() block and click on it.
block and click on it.
USB MIDI
If your board supports it, you can interface it to a USB MIDI device. Just
select USB in the ![]() block and click on it.
block and click on it.
Here's the caveat, though. You can't program the board through its USB connector if you've connected it to a USB MIDI device! One of your options would be to use a software synthesizer -such as FluidSynth-, which receives MIDI commands via the same USB cable that MicroBlocks is using to communicate to the board. The other option is to program your board via BLE. In that case, you'll want to use the web version of the MicroBlocks IDE.
Playing your first note
To test that everything is set up correctly -and assuming your synthesizer is
ready to receive MIDI commands through channel 0 and play music accordingly-,
click on the ![]() block. In a
standard configuration, your MIDI device should have played a C4 -or central Do-
note, most probably producing a piano sound.
block. In a
standard configuration, your MIDI device should have played a C4 -or central Do-
note, most probably producing a piano sound.
If that isn't the case, please make sure to review all previous instructions, starting from physical connection. Also please read through the documentation of your MIDI device to make sure it is ready to receive MIDI commands on channel 0. If you own a MIDI controller you can try to connect it to your MIDI device. That will rule out any MicroBlocks configuration issues.
A first simple song
Let's begin by selecting a different instrument for channel 1. Whichever is your favorite:

We can now compose a simple song by using a loop over a list of notes, like this:
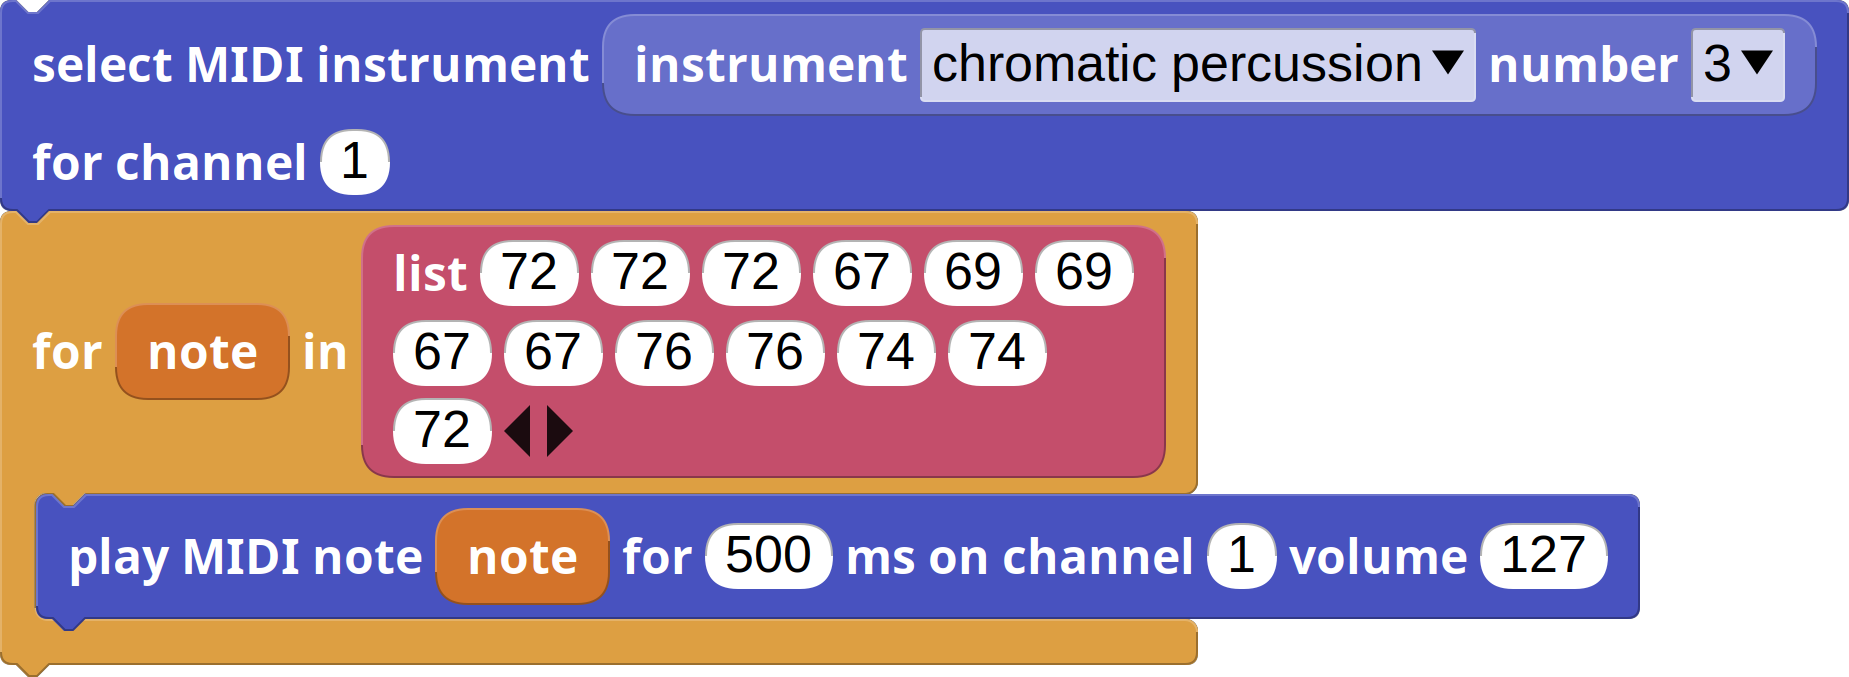
That's all great for writing melodies, but you would have to be a very fast coder to make it enjoyable for an audience to look at you compose melodies live on stage like this.
Let's look at a few tricks we can use to create music live. We may lose a little bit of control over the exact melodies we write, but in return we'll gain a lot of composing speed and variation.
Creating rhythmic patterns
To begin with, we're going to be creating a bunch of drum patterns on top of which we can then add other instruments. This can get the audience moving, while we use the time to build more complex musical structures.
To do so, we're going to be using the Rhythm library, that has abstractions for note durations, tempo, bars and beats. It also knows how to keep things in sync.
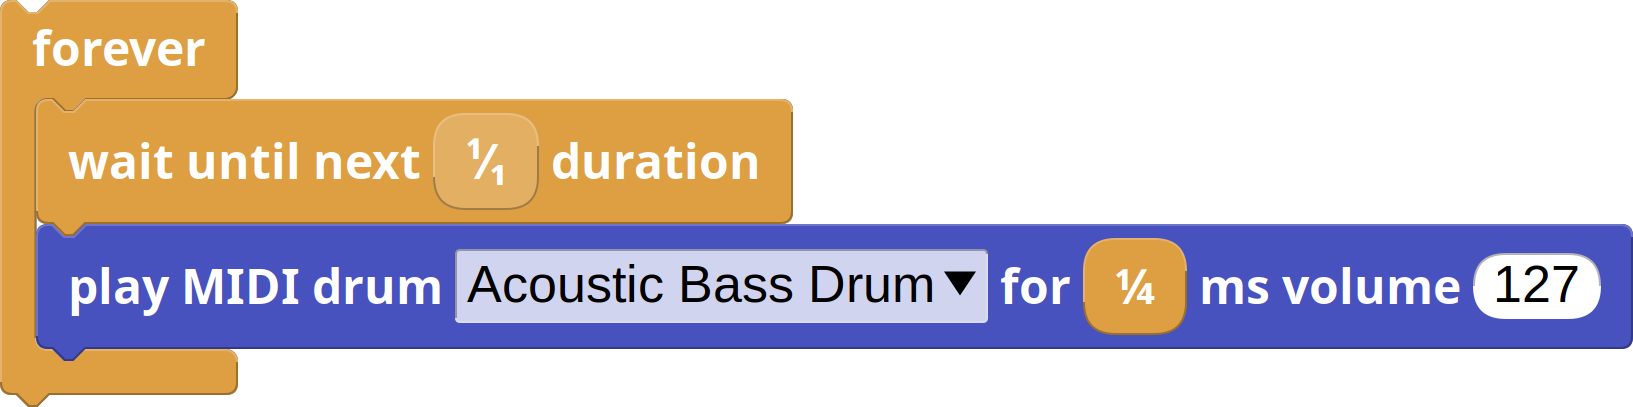
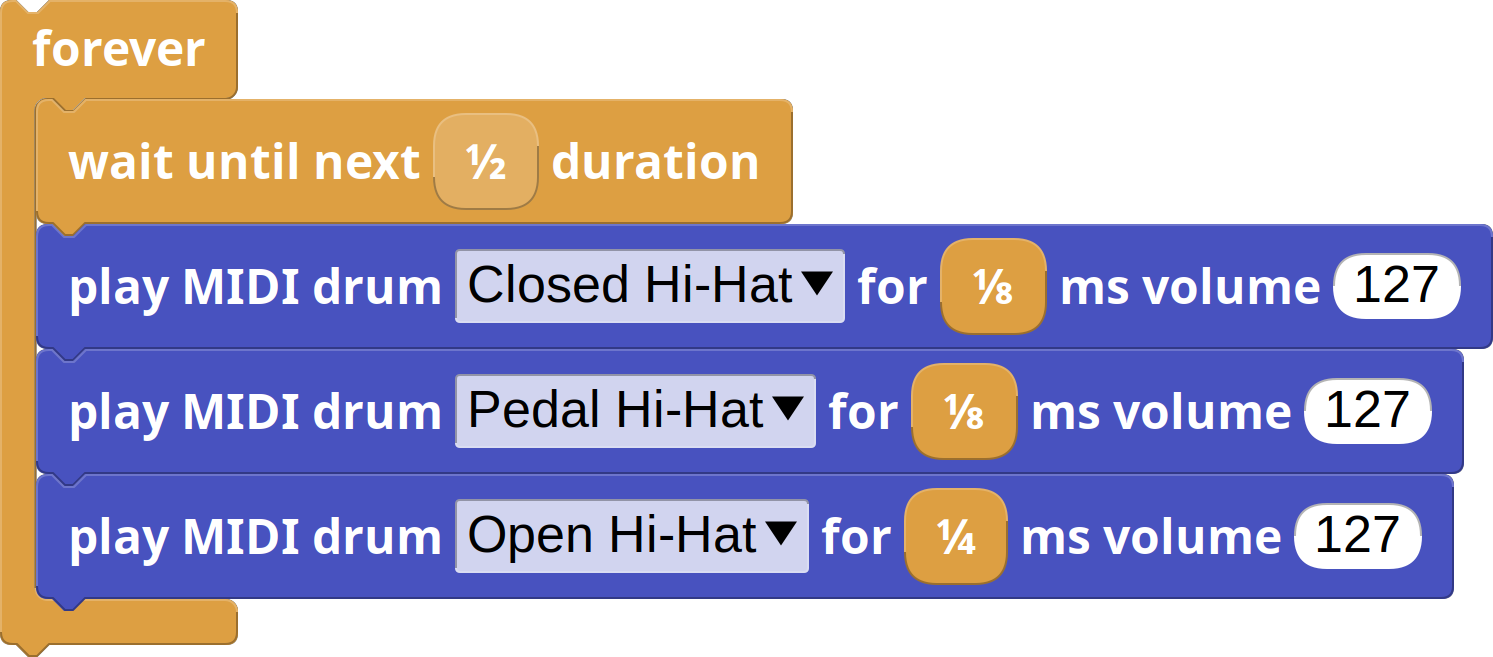
You may be thinking you don't actually need a rhythm library to make drum patterns, and you're right if that's all you want to do. Here's a simple rhythmic pattern you can build by using just the MIDI library and blocks from the standard palette:
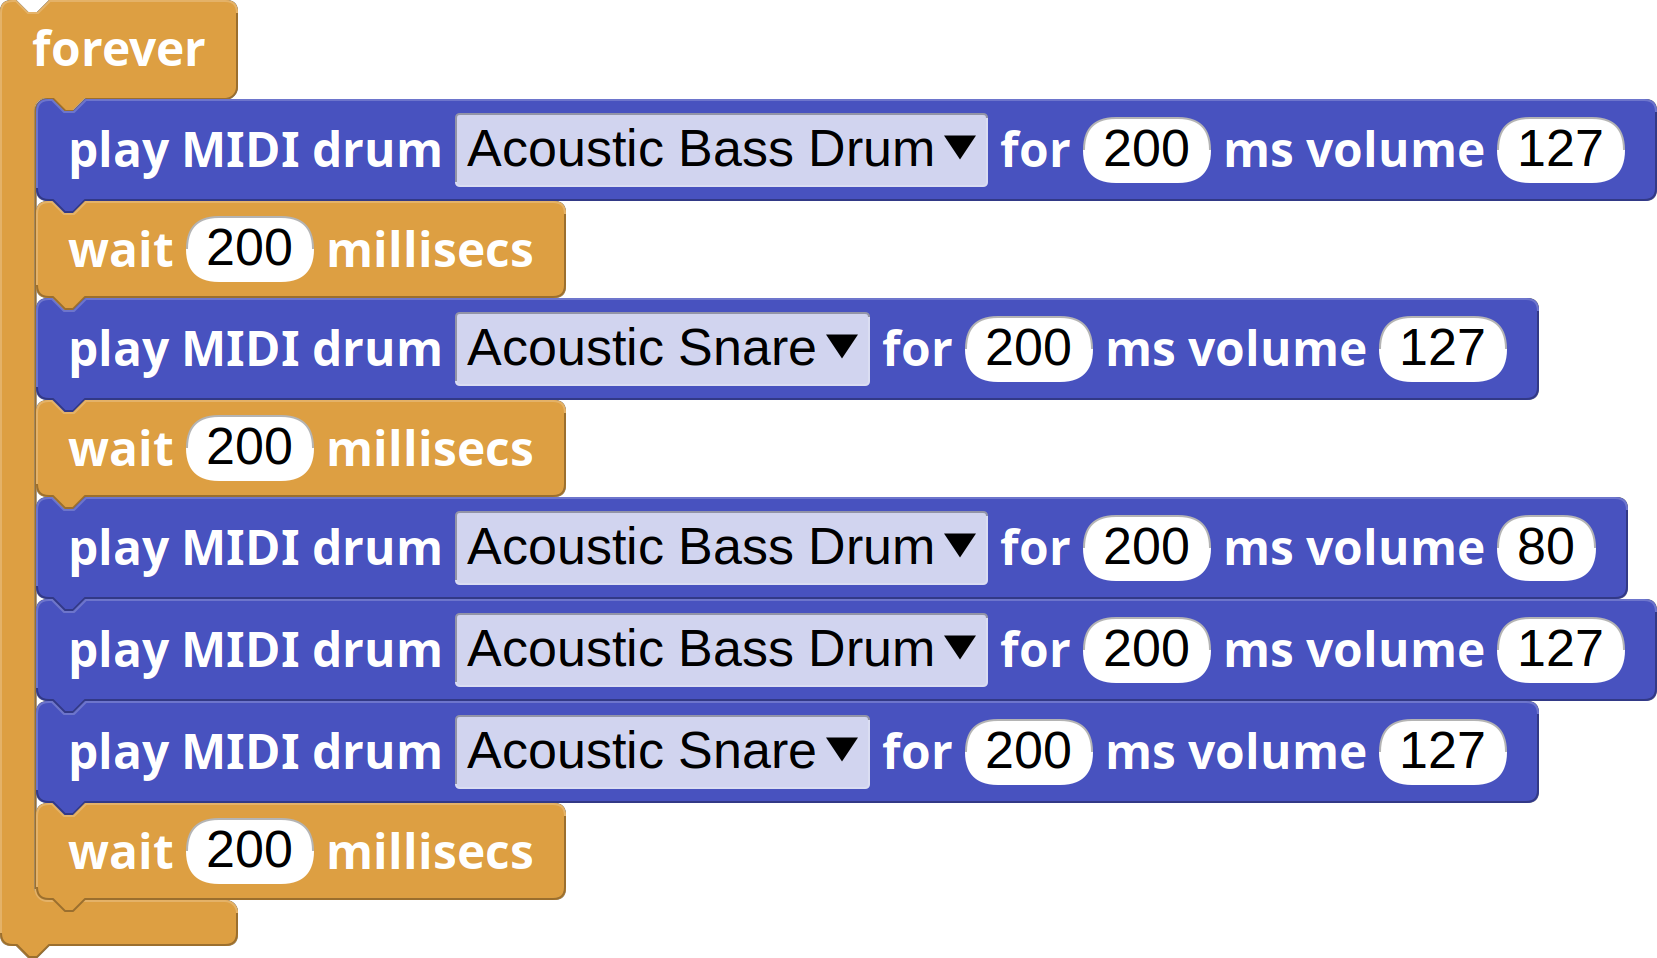
But if you wanted to, for example, have a hi-hat pattern on top, plus a bass line, a guitar chord progression and some piano improvisation, you'd very soon learn that synchronizing these wait blocks can get real tricky. Plus, thinking of rhythm in terms of milliseconds can quickly get complicated.
So let's see how the Rhythm library can help with that. You can find it in the Sound folder in the Library browser, just like you did with the MIDI library before.
A few words about rhythm
The Rhythm library provides abstractions for fractions of bars, also known as note durations. This is what the blocks for these durations look like:
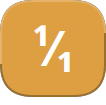


The ![]() block expresses what we call a whole note. The
rest of the duration blocks express fractions of a whole note. For instance,
block expresses what we call a whole note. The
rest of the duration blocks express fractions of a whole note. For instance,
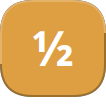
![]() represents a half-note (or half of a whole note), while
represents a half-note (or half of a whole note), while
![]() represents a quarter note.
represents a quarter note.
These durations are not set in stone, but relative values that depend on a tempo. You can set the tempo and time signature of your music by using this block:

The tempo, expressed in BPMs -beats per minute,- is responsible for how fast or slow your music plays. The more beats per minute, the faster the music plays (because it fits more notes in a minute.)
Time signatures
To make things simpler and easier to explain, we'll completely disregard time
signatures in this activity, but if you want to make more complex music you
should know that the Rhythm library has an internal metronome that you can
start by using the ![]() . You can then check what
the current beat and bar are by using the
. You can then check what
the current beat and bar are by using the ![]() and
and
![]() blocks, and use the corresponding wait blocks
to sync your music to the beat or bar that you need.
blocks, and use the corresponding wait blocks
to sync your music to the beat or bar that you need.
Synchronizing beats
As we've seen before, synchronizing scripts that make music can get tricky. The
purpose of the ![]() block is to make our life
easier in that regard. Try to run these two scripts in parallel:
block is to make our life
easier in that regard. Try to run these two scripts in parallel:
Notice how they never go out of sync? The trick lies in the fact that the
![]() block makes use of a metronome of sorts,
and will wait until the next note duration starts to give way to the next block.
block makes use of a metronome of sorts,
and will wait until the next note duration starts to give way to the next block.
It doesn't even matter whether we start both scripts at the same time or not.
The ![]() block will always make sure to keep
them in sync.
block will always make sure to keep
them in sync.
A drum pattern
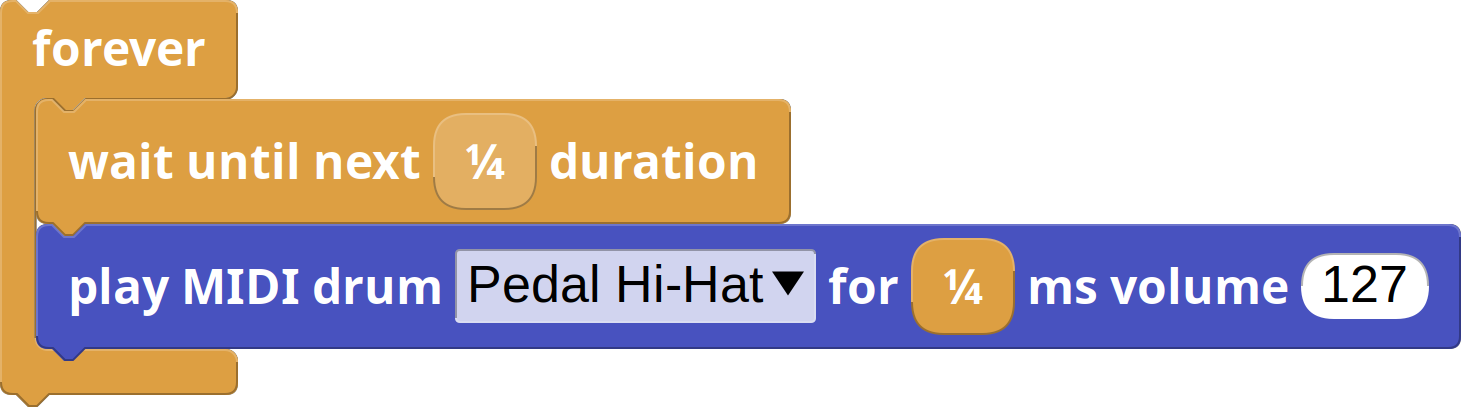
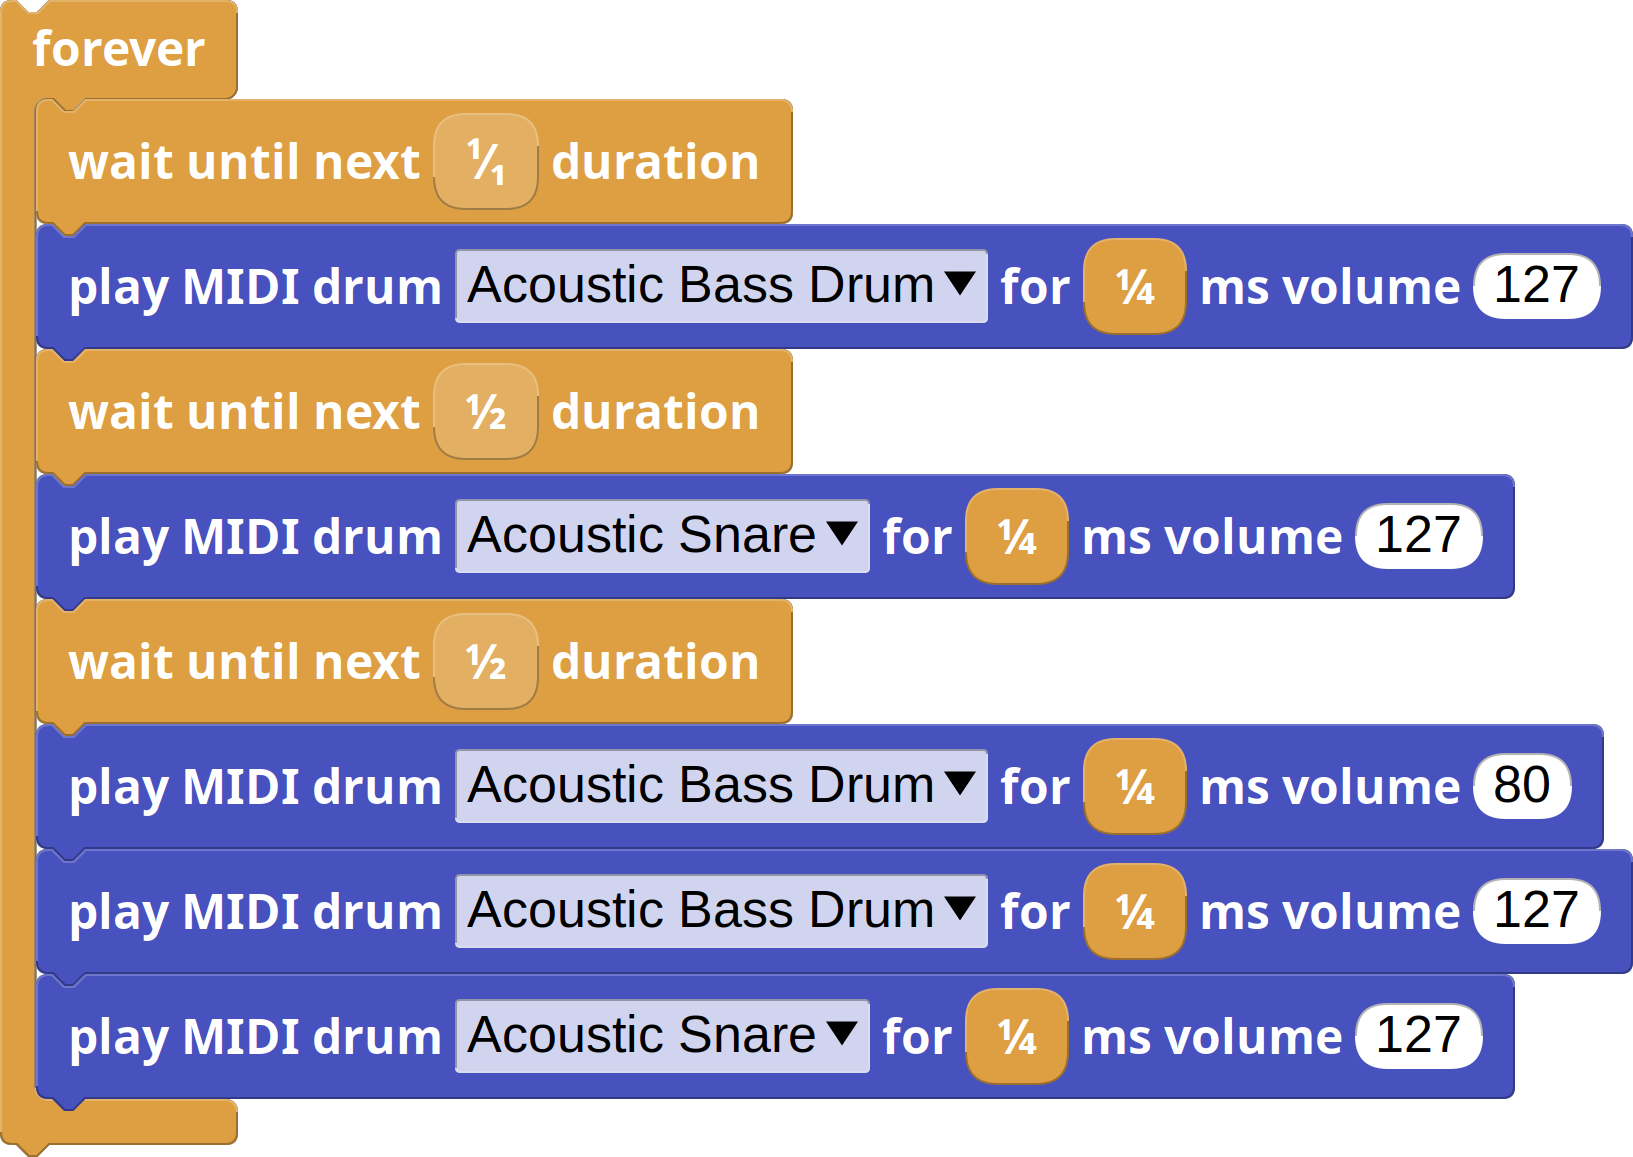
We can now remake the same pattern from the previous section, but this time using relative note durations and with a nice hi-hat pattern playing in parallel:
Harmonies and melodies
We are now going to add some instruments to the mix, and to create melodic and harmonic patterns with them we are going to be using the Scales & Chords library, which you can also find inside the Sound folder within the Library browser.
This can be a fairly daunting library, as it offers abstractions for many musical concepts, but in the context of this activity we are going to make use of just a few blocks.
Chords
Chords are just groups of notes that are played all at once. The Scales &
Chords library provides several ways to create chords and progressions of
chords (that is, chords that are meant to be played in succession), but in this
activity we're just going to use the more explicit ![]() .
.
The MIDI library ![]() block
can take chords as inputs in addition to just single notes, so if you drop the
block
can take chords as inputs in addition to just single notes, so if you drop the
![]() into the note input, it will just play it. In this
example, we have selected the default piano (number 1) for channel 1:
into the note input, it will just play it. In this
example, we have selected the default piano (number 1) for channel 1:

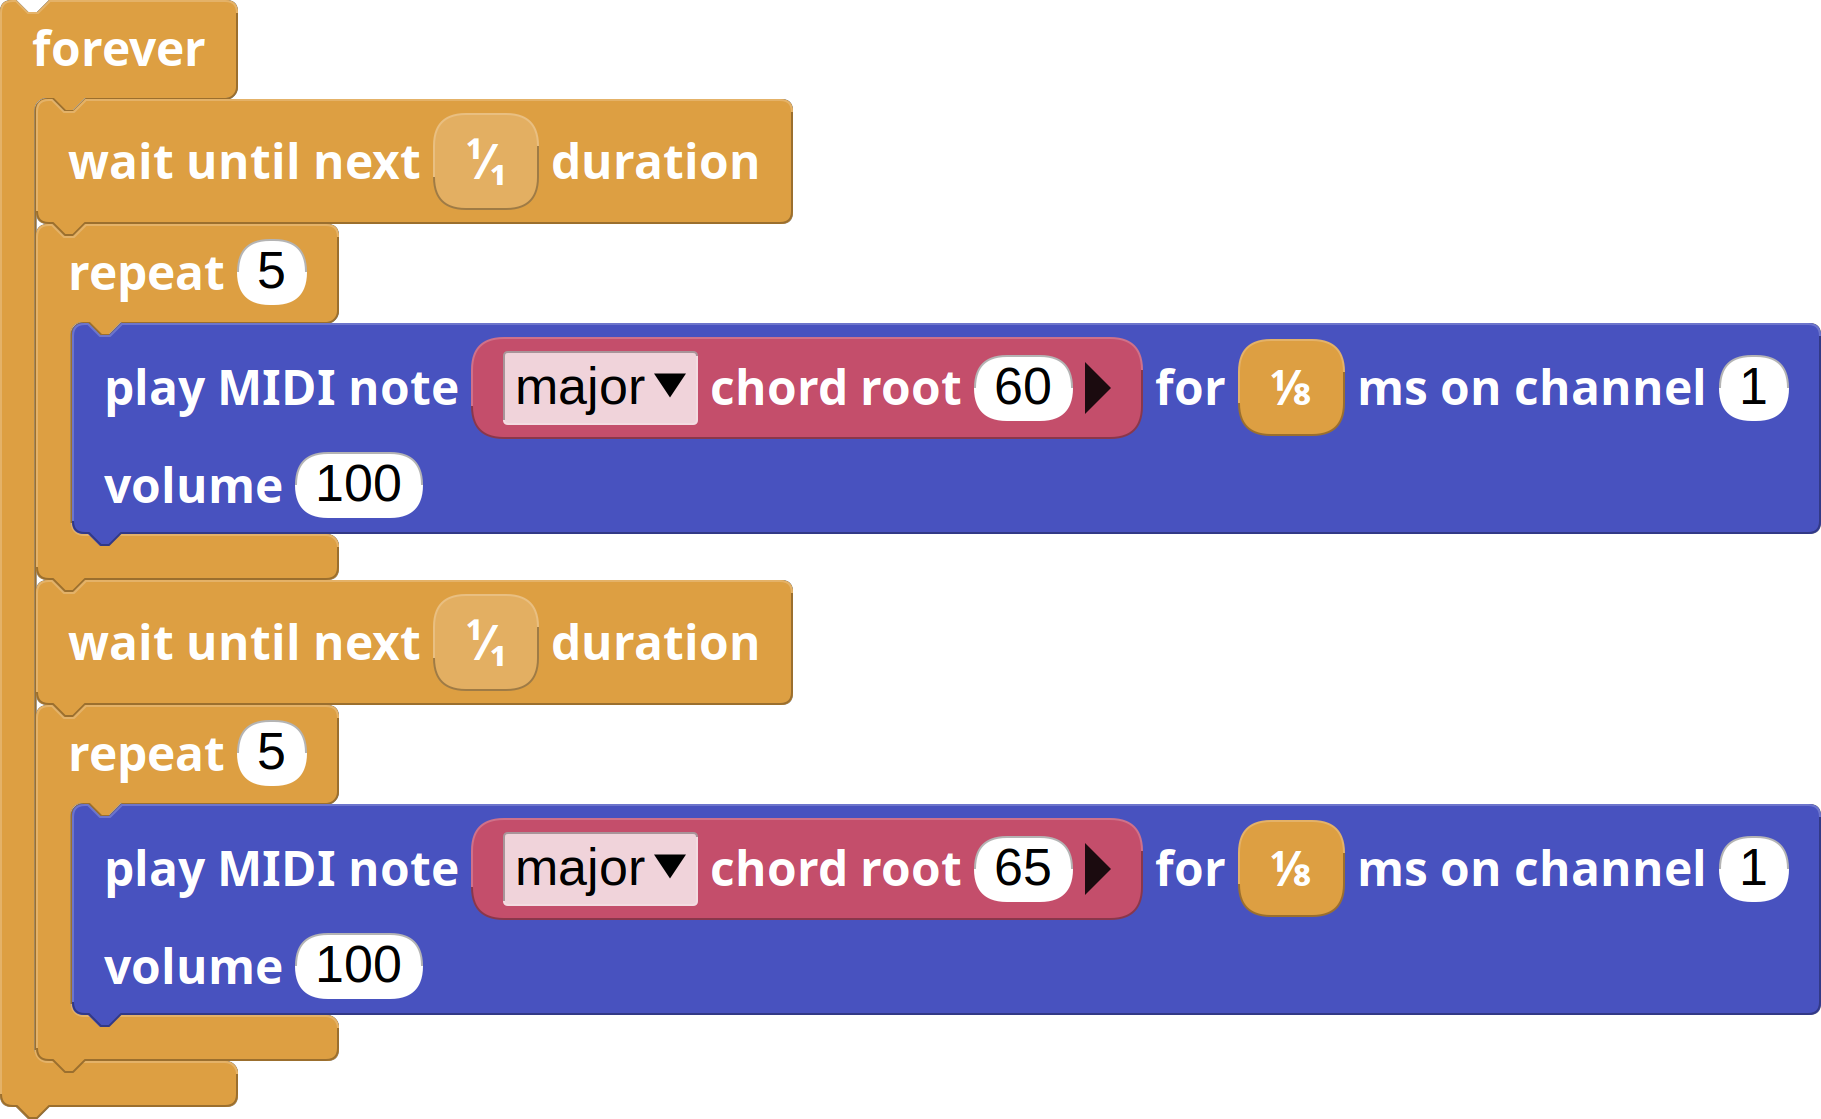
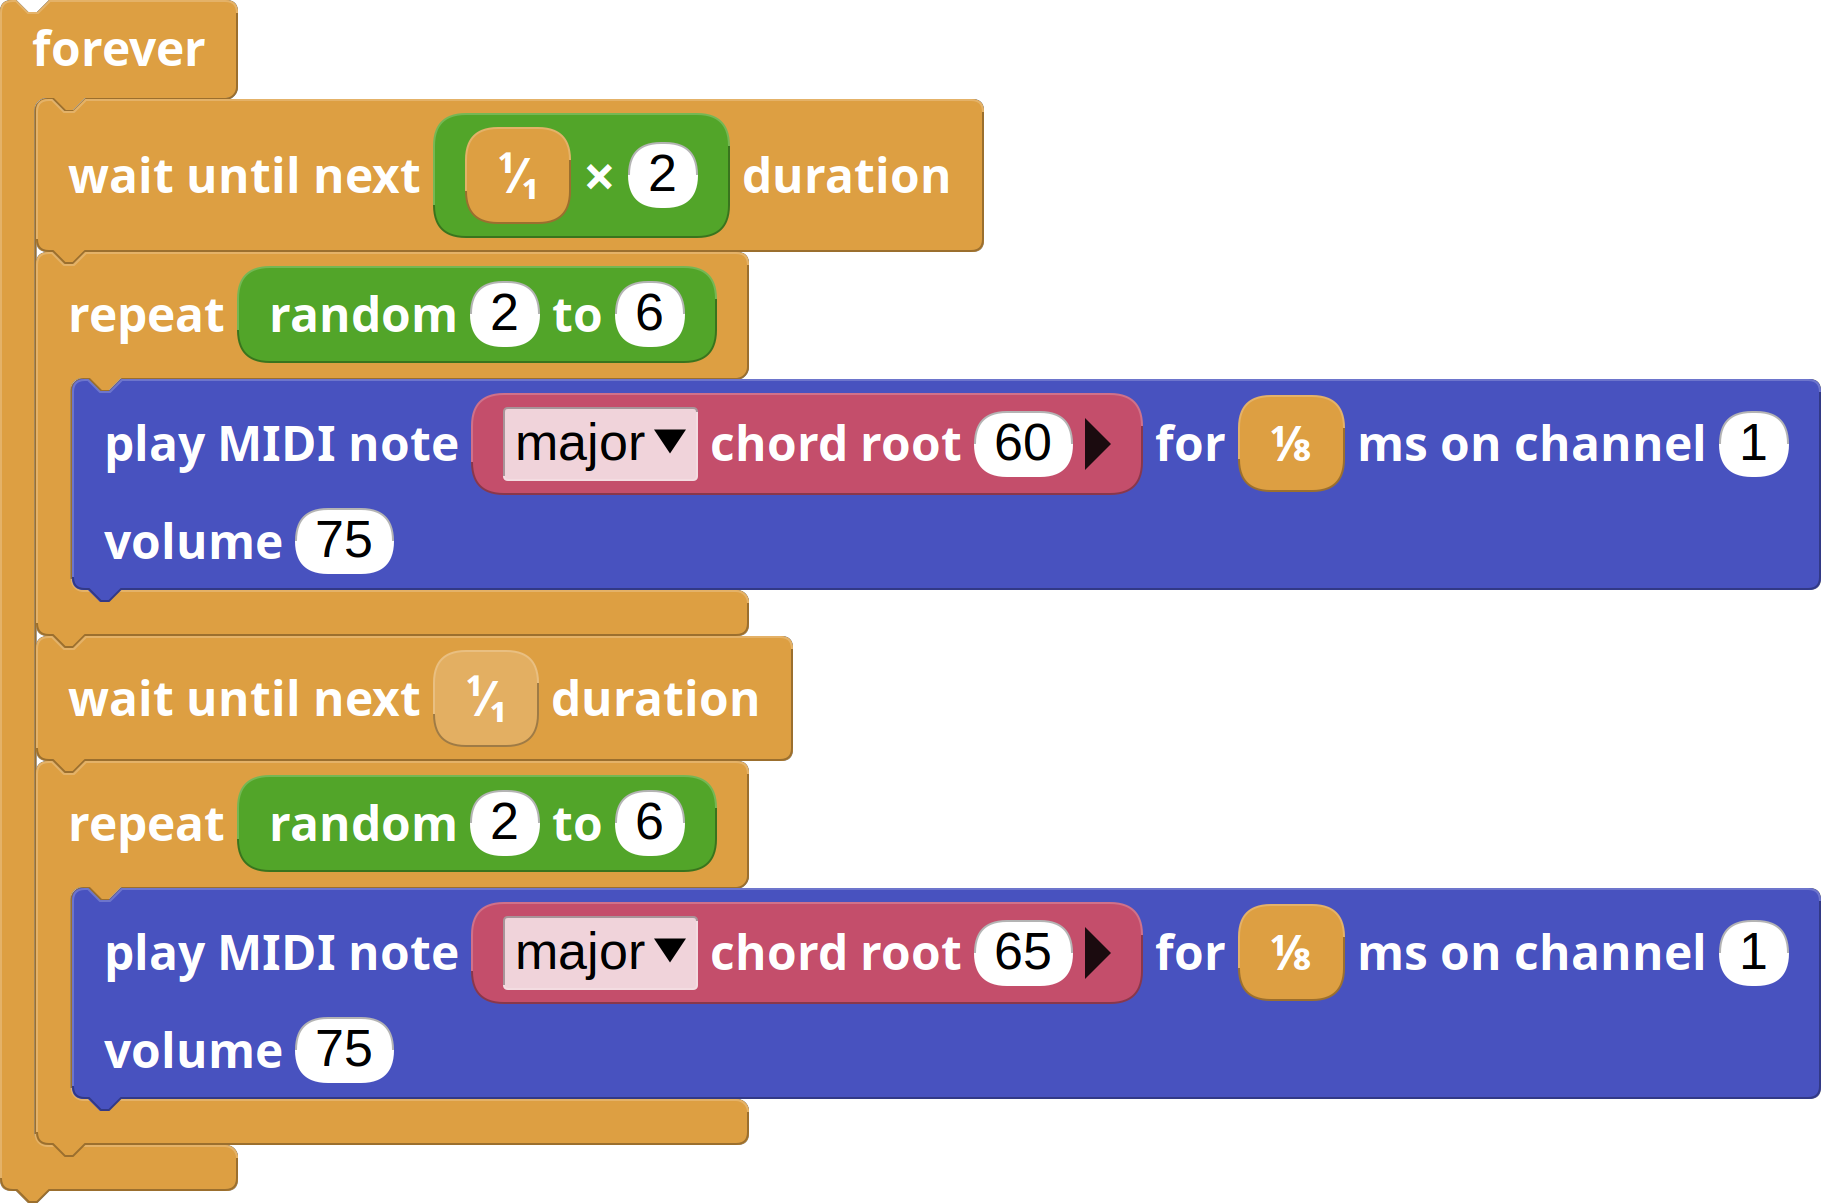
Here's an easy two-chord piano pattern that we can play along with the drum pattern we had already built in the last section:
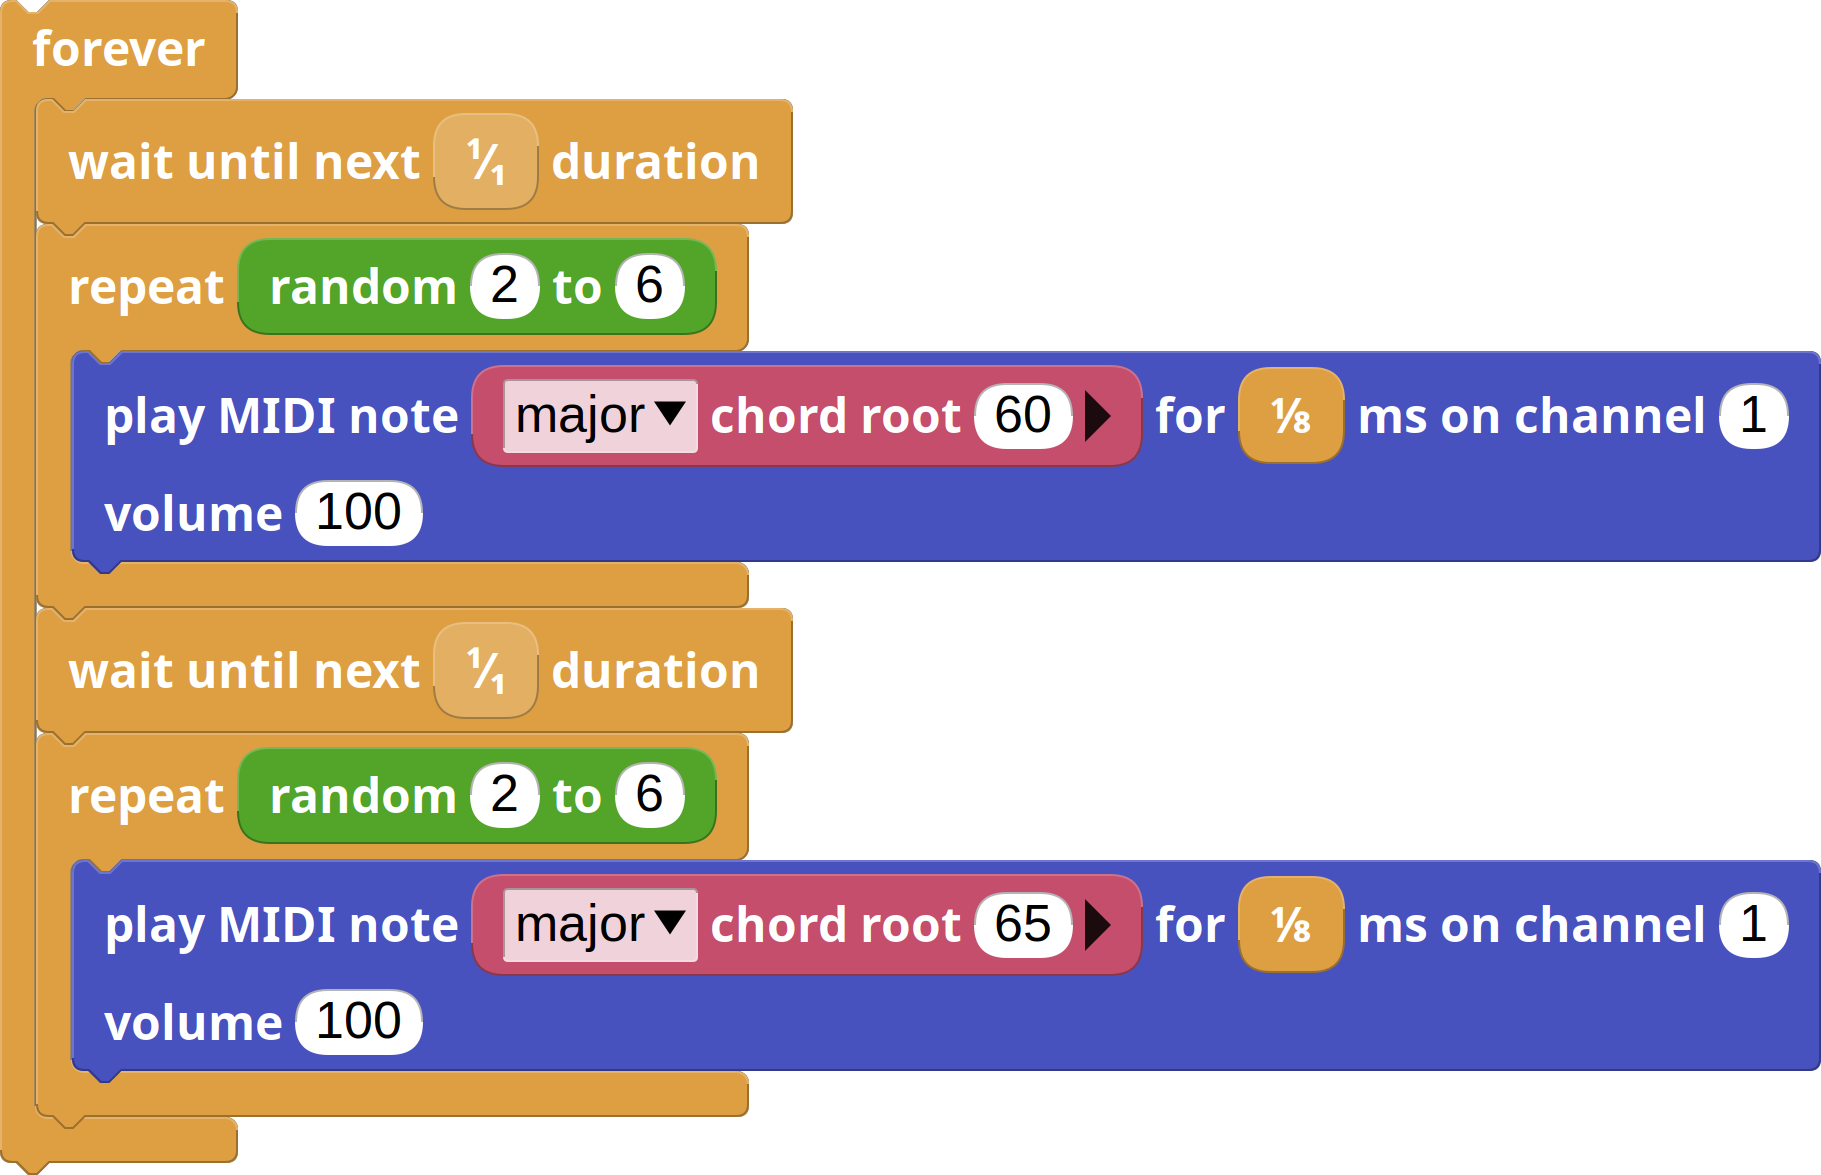
However, adding a little bit a randomness to the pattern goes a long way at making it more interesting
Arpeggios
Reload the MIDI library first!
The Scales & Chords library can play arpeggios for several different sound output systems, but for it to work we need to load the sound output library after the Scales & Chords one. Since we had already loaded the MIDI library first, we'll have to reload it before we can use the arpeggiator.
You can quickly do so by right-clicking on the library name (MIDI) in the library selector and clicking on reload library.
When we play the notes that form chords in succession, instead of all at the same time, we call them arpeggios. Since we're not playing them all at once, in arpeggios we can also decide the order in which we play each of the individual notes. Different note dispositions can give out very different feelings to our arpeggios.
Similarly, we can decide on different durations for each of the notes played, and that will also radically change the way the arpeggio feels.
The Scales & Chords library provides an arpeggiate block that handles arpeggios for us:

The arpeggiate block takes a list of notes, be that a chord, a scale, or an arbitrary list of MIDI notes, and plays them in the order and note durations we tell it to.
Notice how the order can skip positions in the list, and how we can specify it with either a list or numbers or a comma-separated string, for greater immediacy.
Note durations can also be specified as a list of explicit durations (that is, a
list of blocks like ![]() ,
, ![]() , etc) or
as a comma-separated string. In the latter case, you just need to specify the
denominator of the fraction. That is,
, etc) or
as a comma-separated string. In the latter case, you just need to specify the
denominator of the fraction. That is, 4 stands for 1/4, 8 stands for
1/8, etc.
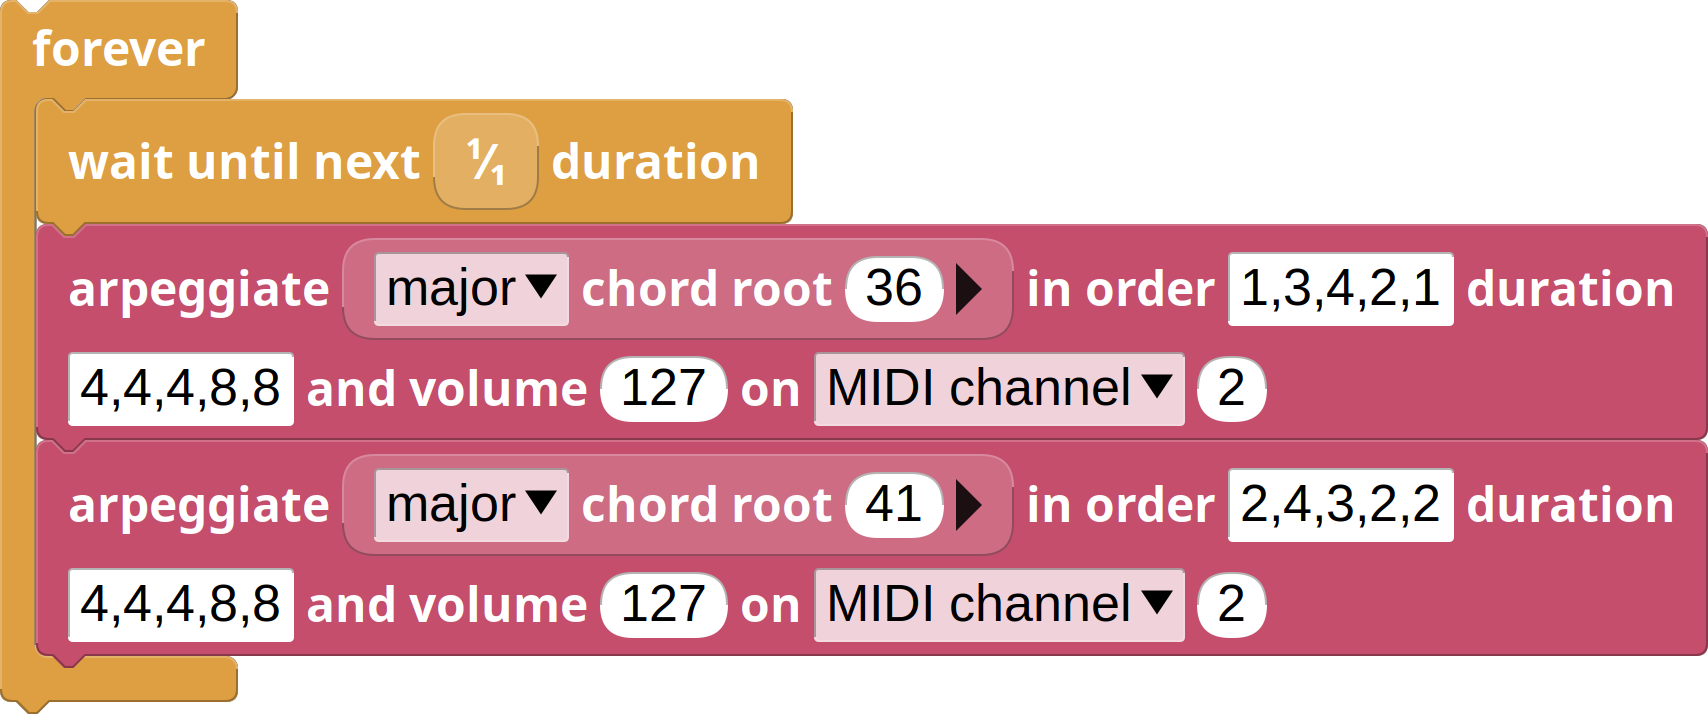
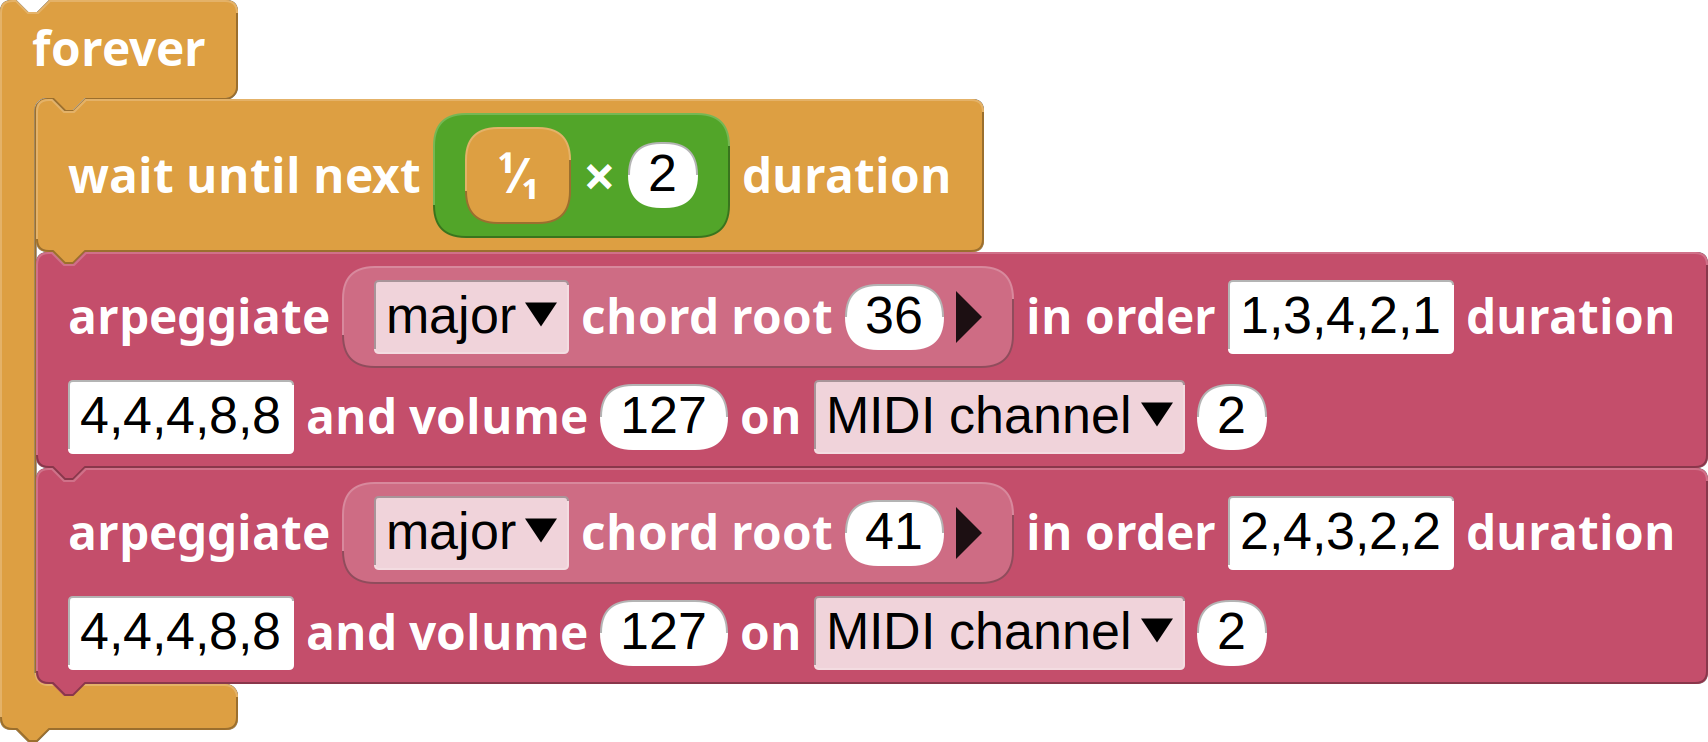
Let's hear what arpeggiating a chord sounds like:

In this example, the ![]() block returns
block returns 36, 40, 43, 48.
Those are four notes corresponding to the major C2 chord, a pretty low-pitched
one.
The specified 1,3,4,2 order means we're going to play the provided notes as
36, 43, 48, 40.
Durations will wrap around notes. That is, the four notes we're playing will
have the respective durations of 1/4, 1/8, 1/4 and 1/8.
With that in mind, let's select a bass sound for channel 2, and write a simple bass line to play on top of everything else:
Writing arpeggio orders and durations as comma-separated strings will help get the music playing quicker, but it can be a little bit less versatile. If you use an actual list, you can shuffle it, reverse it, and apply other sorts of list manipulation operations to it while the music plays, thus giving you a bit more musical freedom.
Simple improvisation
What we've done so far is already quite enough to produce live music, but you can add a little bit of extra variation with a little improvisation.
The improvise block from the Scales & Chords library follows a very simple and naive method that mimics what a beginner music student may play when learning a new scale and trying to improvise over it. If you have it play long improvised lines, it will show that the method is rather simple, but if you use it for short bits hear and there it can spice up your music and can actually sound quite human-like.
Here's what the improvise block looks like:

The improvise block also takes a list of notes. You can have it improvise over a chord, but that will sound rather dull as chords are made up of very few notes. Usually, you'll want to improvise over a scale, which usually requires a little bit of music theory to know which scales play well with which chords and chord progressions.
As always in MicroBlocks, you can just experiment with different scales and chords to see what sounds good to you. The human ear is the best music theory test there is!
Here's a hint for this activity, though: the ionian scale with root at note 60 (C4) will work for the two-chord progression we've been using.
The second parameter in the improvise block is the amount of bars that we
want the improvisation to last. Since we have stayed on a 4/4 time signature
-and it would make this activity too long to delve into time signatures-, we can
just equate a bar to a ![]() duration. That is, 2 bars will
equal the duration of two whole notes.
duration. That is, 2 bars will
equal the duration of two whole notes.
The next parameter specifies the possible durations for the improvised notes.
These aren't going to be played in order, but randomized. That means that, in
the 4, 4, 8 default value, a quarter note is going to be played with twice the
probability of an eighth note.
With all that in mind, let's select a vibraphone sound for channel 3, and improvise over the base we set up before during two bars every four bars:
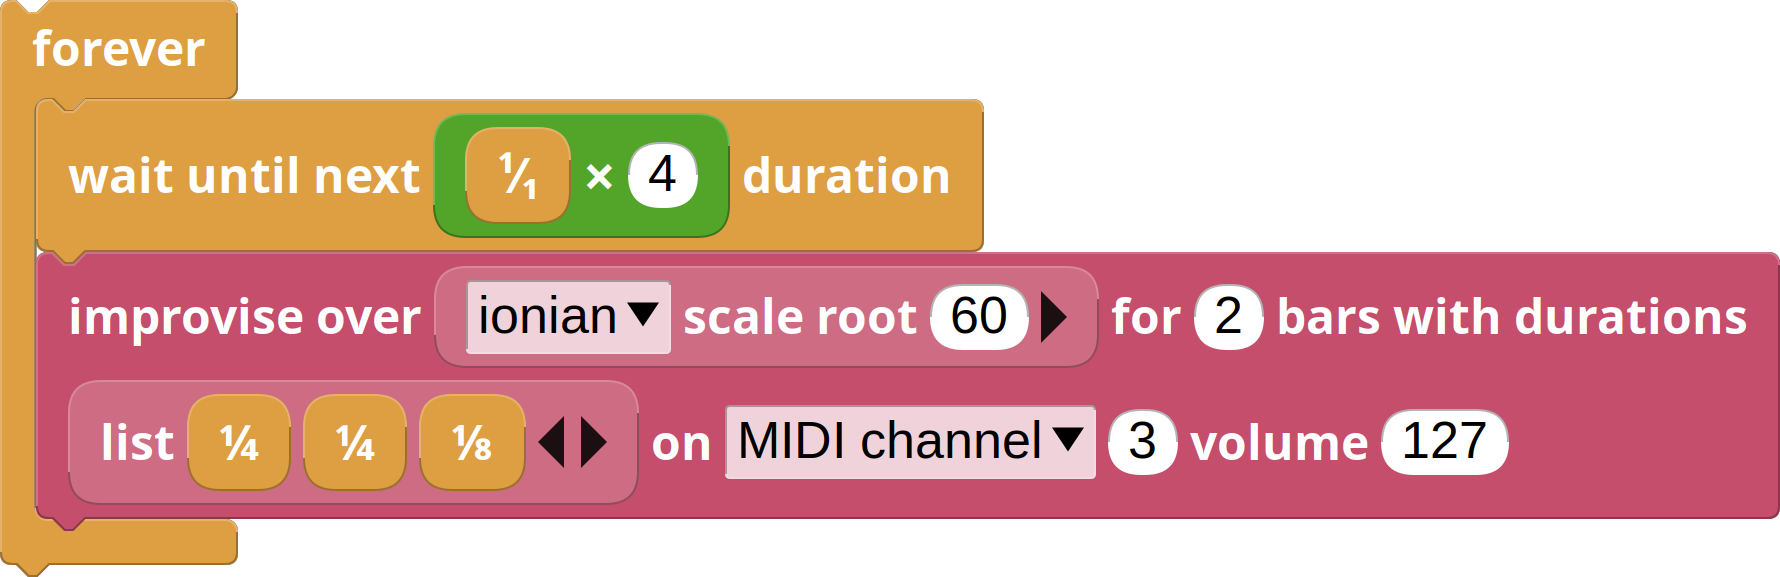
Notice how we're waiting until ![]() this time. This makes
sure the improvisation will start only every four whole notes.
this time. This makes
sure the improvisation will start only every four whole notes.
Closing remarks and a few tricks
Along the process you may have come across a couple of issues that are easier to understand now that you've gone through the whole activity.
Let us finish by describing why they happen, and how to fix them.
Loop iterations skipped sometimes
Even though these libraries do their best to keep times tight and consistent, different things can lead to notes playing for slightly longer than we want them to. MIDI commands travel over a serial connection, and that takes a few milliseconds. When we play a chord, for example, we're sending several of these commands in a burst, which can lead to the chord ending slightly later than expected.
When that happens, the next ![]() may have to
wait for a full extra period until it can give way to the next iteration.
may have to
wait for a full extra period until it can give way to the next iteration.
For example, let's try to play eight 1/8 notes in the chord progression
script:
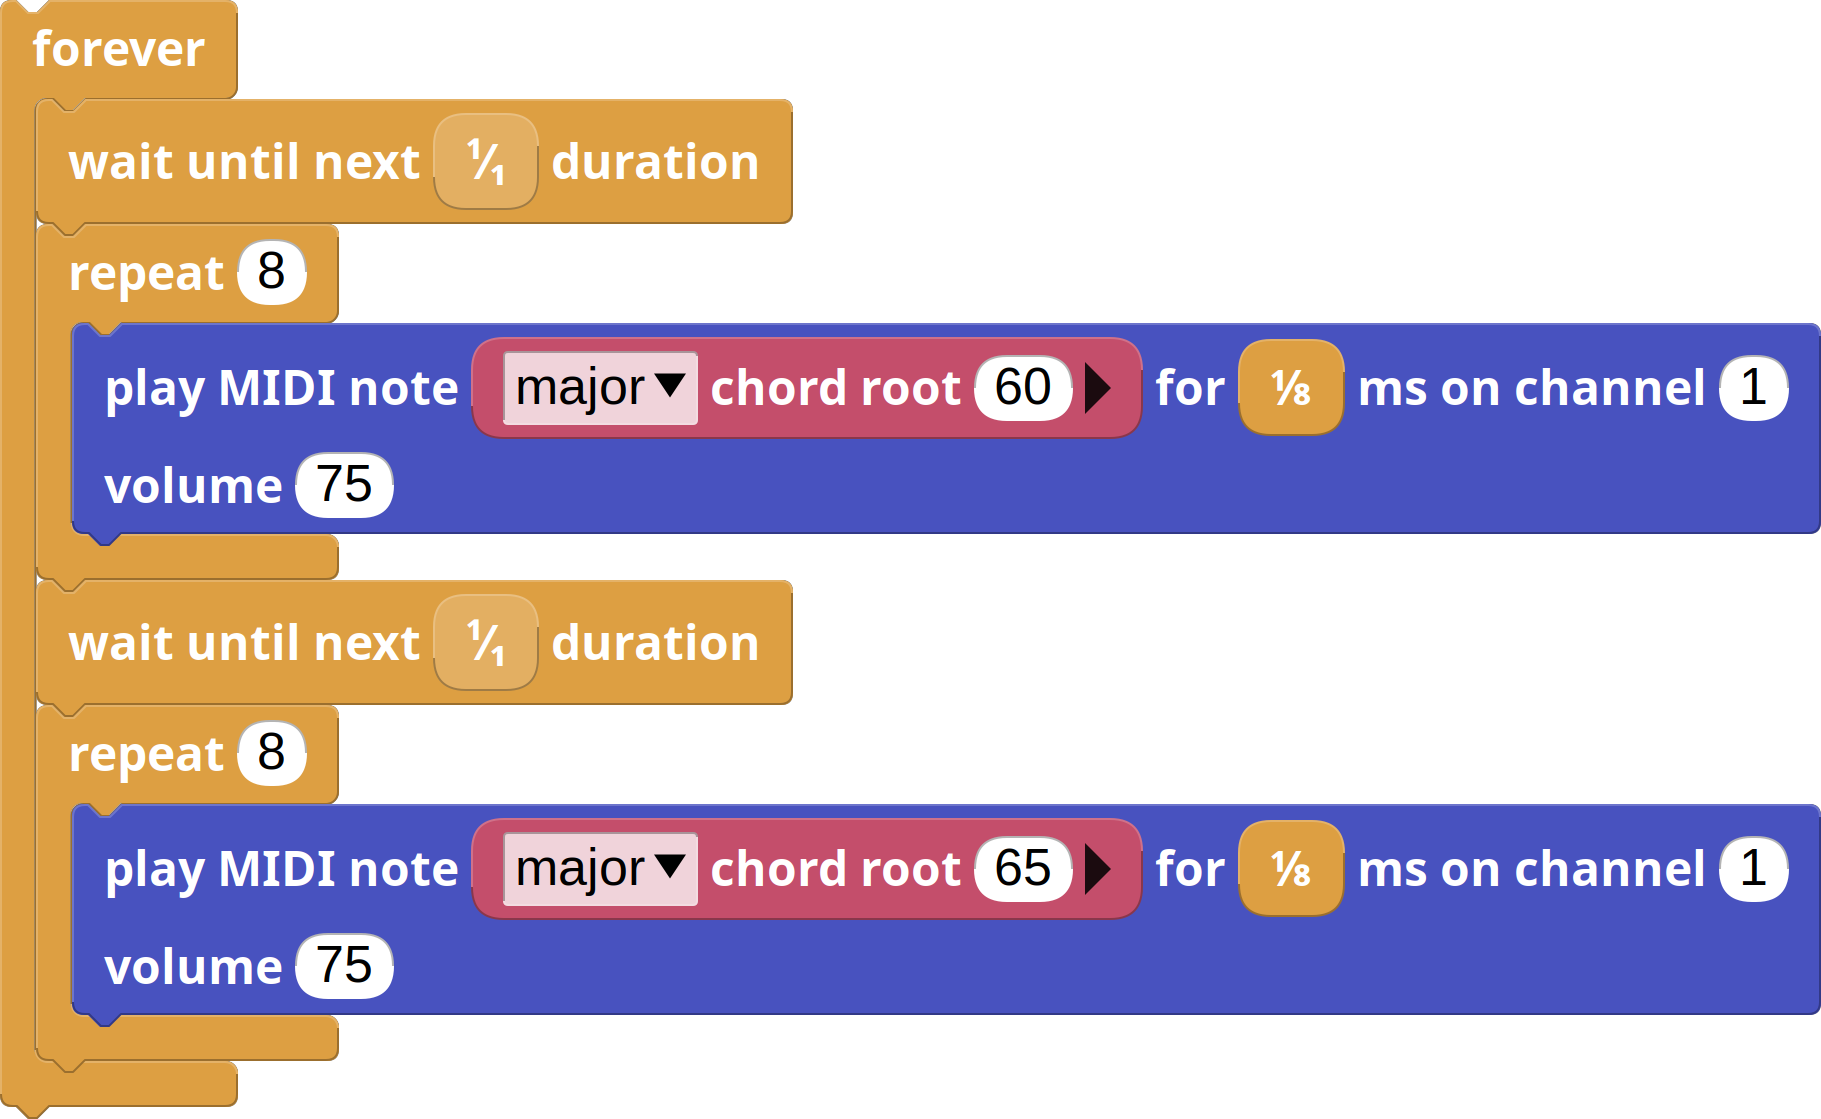
Notice how, from time to time, one of the repeat loops ends a little late and causes the following wait to not fall right at the next whole note.
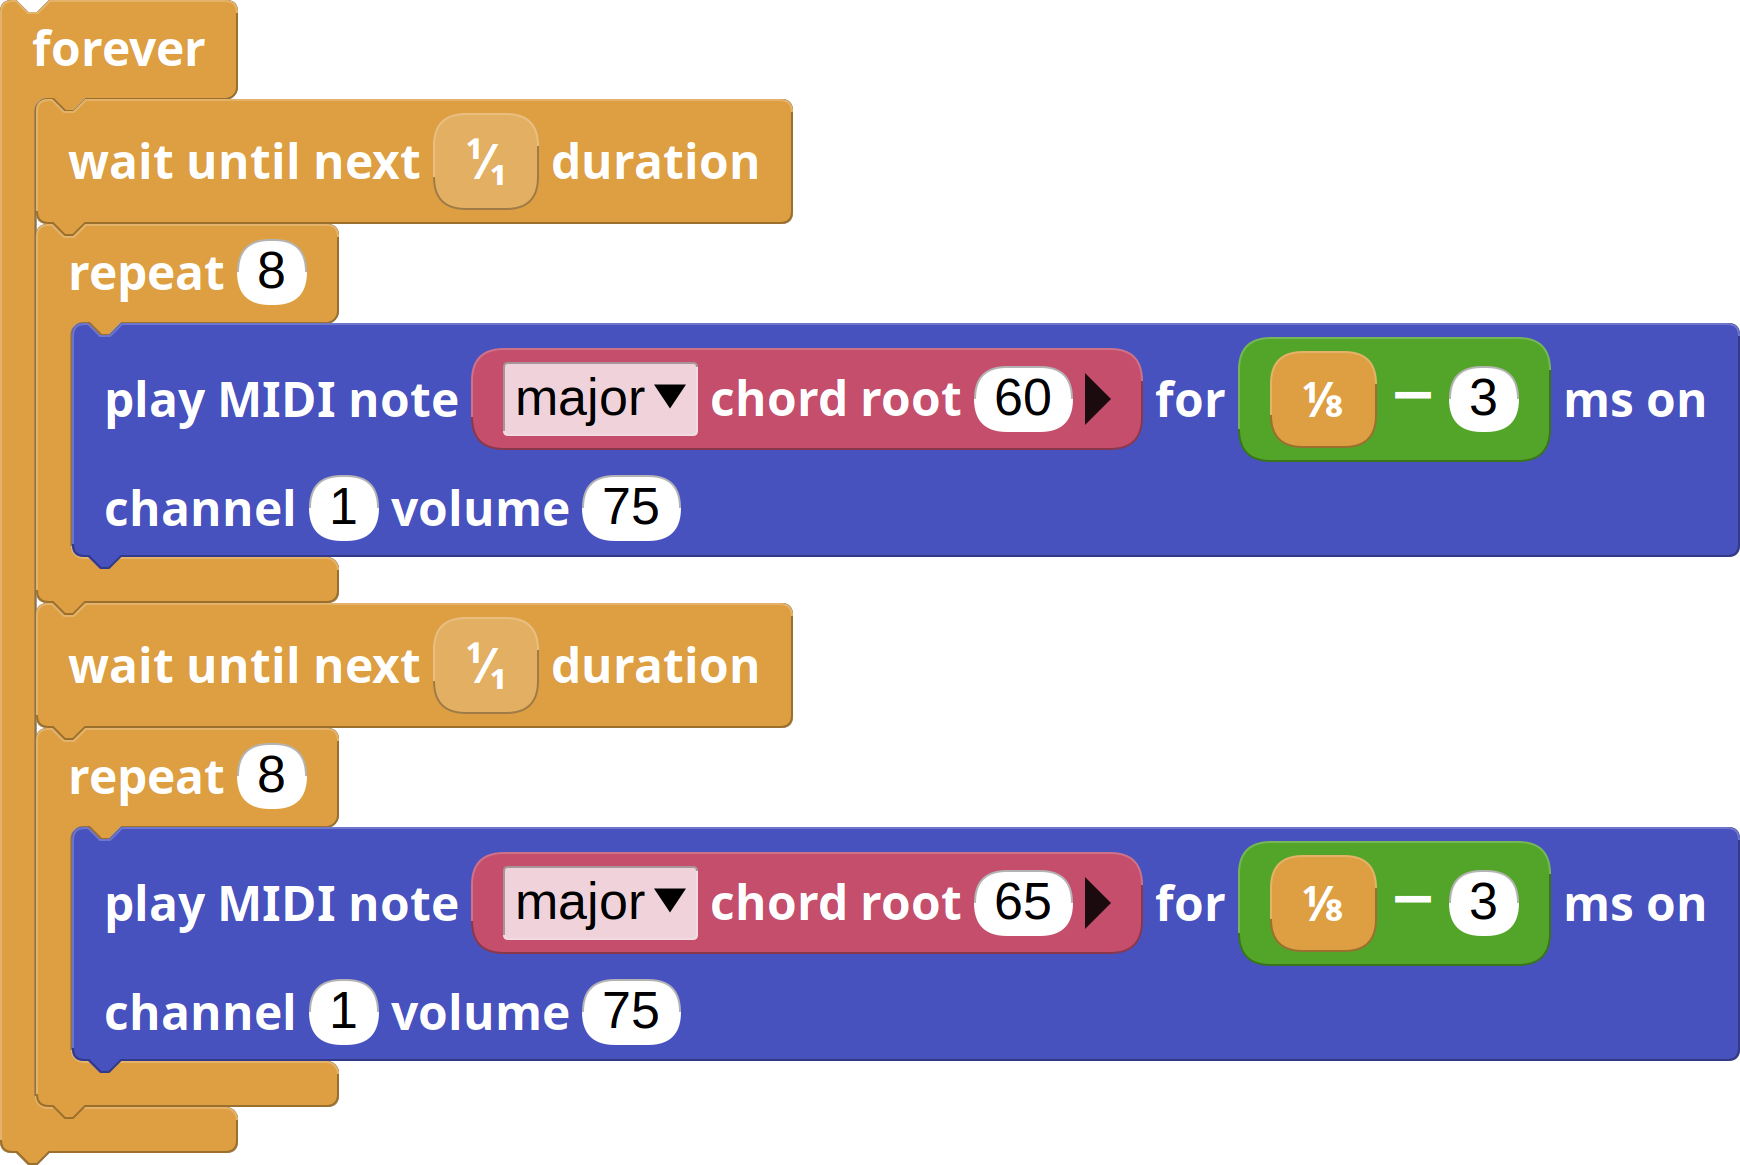
An easy fix is to take in account that extra time that chords need, and subtract a little bit from their duration:
Chords getting out of sync
The previous issue will sometimes lead to a situation where chords get out of
sync, because, for instance, one of the arpeggios may have played for a bit over
the time it was supposed to, and thus ![]() had
to wait until the next time period, skipping one iteration.
had
to wait until the next time period, skipping one iteration.
That can cause, in our case, the bass line and chord progressions to not match, making the music sound rather unpleasant and dissonant:
This has a rather easy fix. Since each of these loops is supposed to last two
whole notes, we can ask ![]() to wait until,
well, the next
to wait until,
well, the next ![]() time period.
time period.
Go make your music!
This is but just a tiny glimpse at the sort of music you can produce with MicroBlocks and MIDI devices. The three libraries we have introduced in this activity can go way beyond what we've seen here.
We invite you to explore all the blocks they provide and share your music with the world!