
Introduction
This advanced activity uses the microphone, speaker, and radio of the micro:bit v2 to make a simple walkie-talkie. It requires two micro:bit v2's.
Pressing the A button records a short message. When the button is released, that message is sent via radio to any listening micro:bit v2 within range (10-15 meters). Incoming messages are played through the micro:bit speaker.
This activity builds on the digital sound recording and playback ideas from the Recording Sound with the micro:bit v2 activity.
How it works
This program does not stream sound continuously. Instead, it records a short message such as "Let's meet for lunch". When the recording is finished, the recorded sound data is sent to the other micro:bit via the micro:bit radio system.
To minimize transmission time, this program uses low-level radio packets. Each packet has room for 30 8-bit sound samples. In contrast, using the radio send number block would send each sound sample in a separate packet. Using low-level packets makes transmitting the sound data about 30 times faster.
The receiving part of the program waits until a walkie-talkie data packet arrives, indicating the start of an incoming message. It then reads a sequence of data packets, appending the incoming bytes to the received data buffer. When the data packets stop arriving -- or when the received data buffer is full -- it plays the received sound data through the speaker.
This activity has a lot of code. You may want to skip to the What to do section to try the Walkie Talkies, then go back and study each part of the code to see how it works.
Talking
This script records sound when the A button is pressed.
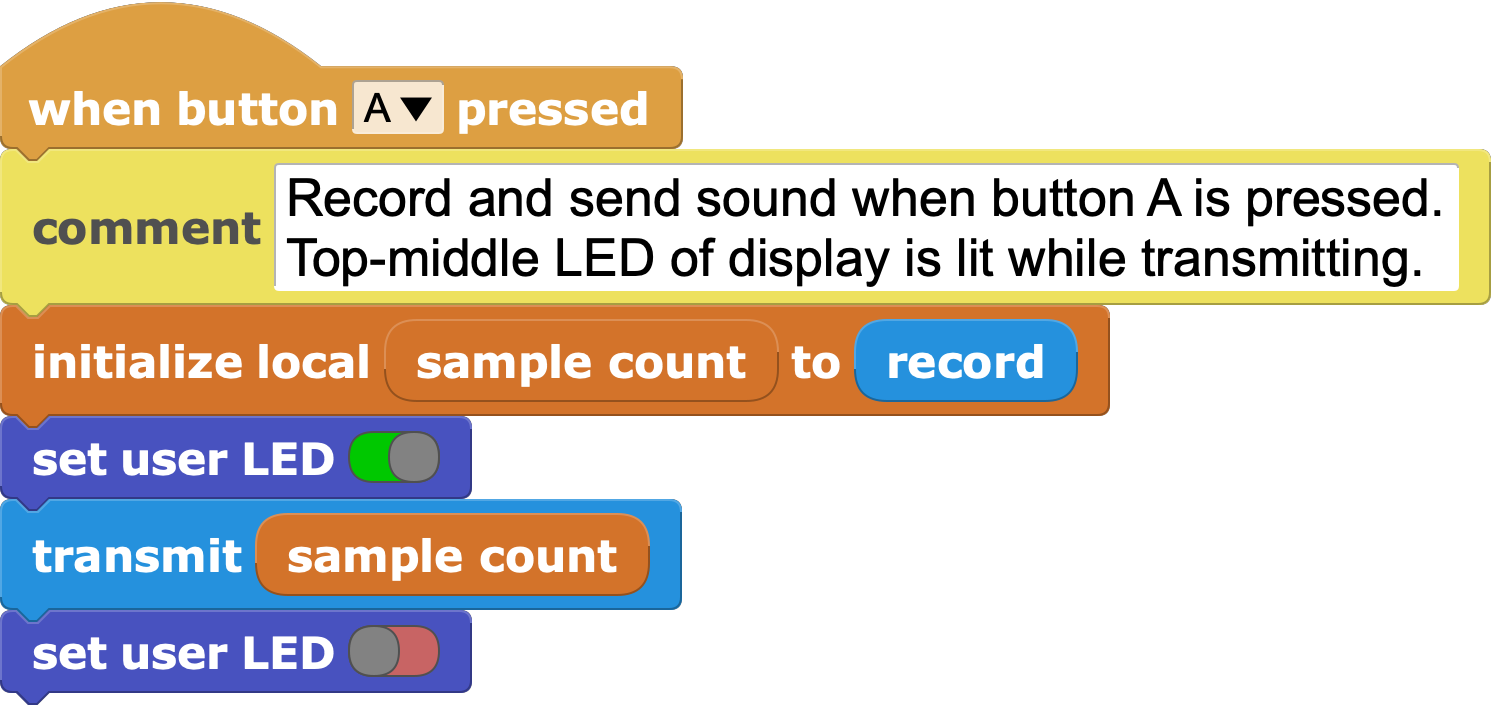
The record function returns the number of sound samples recorded, then passes that number to transmit so it knows how many samples to send. That makes it quicker to send short messages.
Recording
This function records sound into send buffer for as long as the A button is held down or until there is no more room.
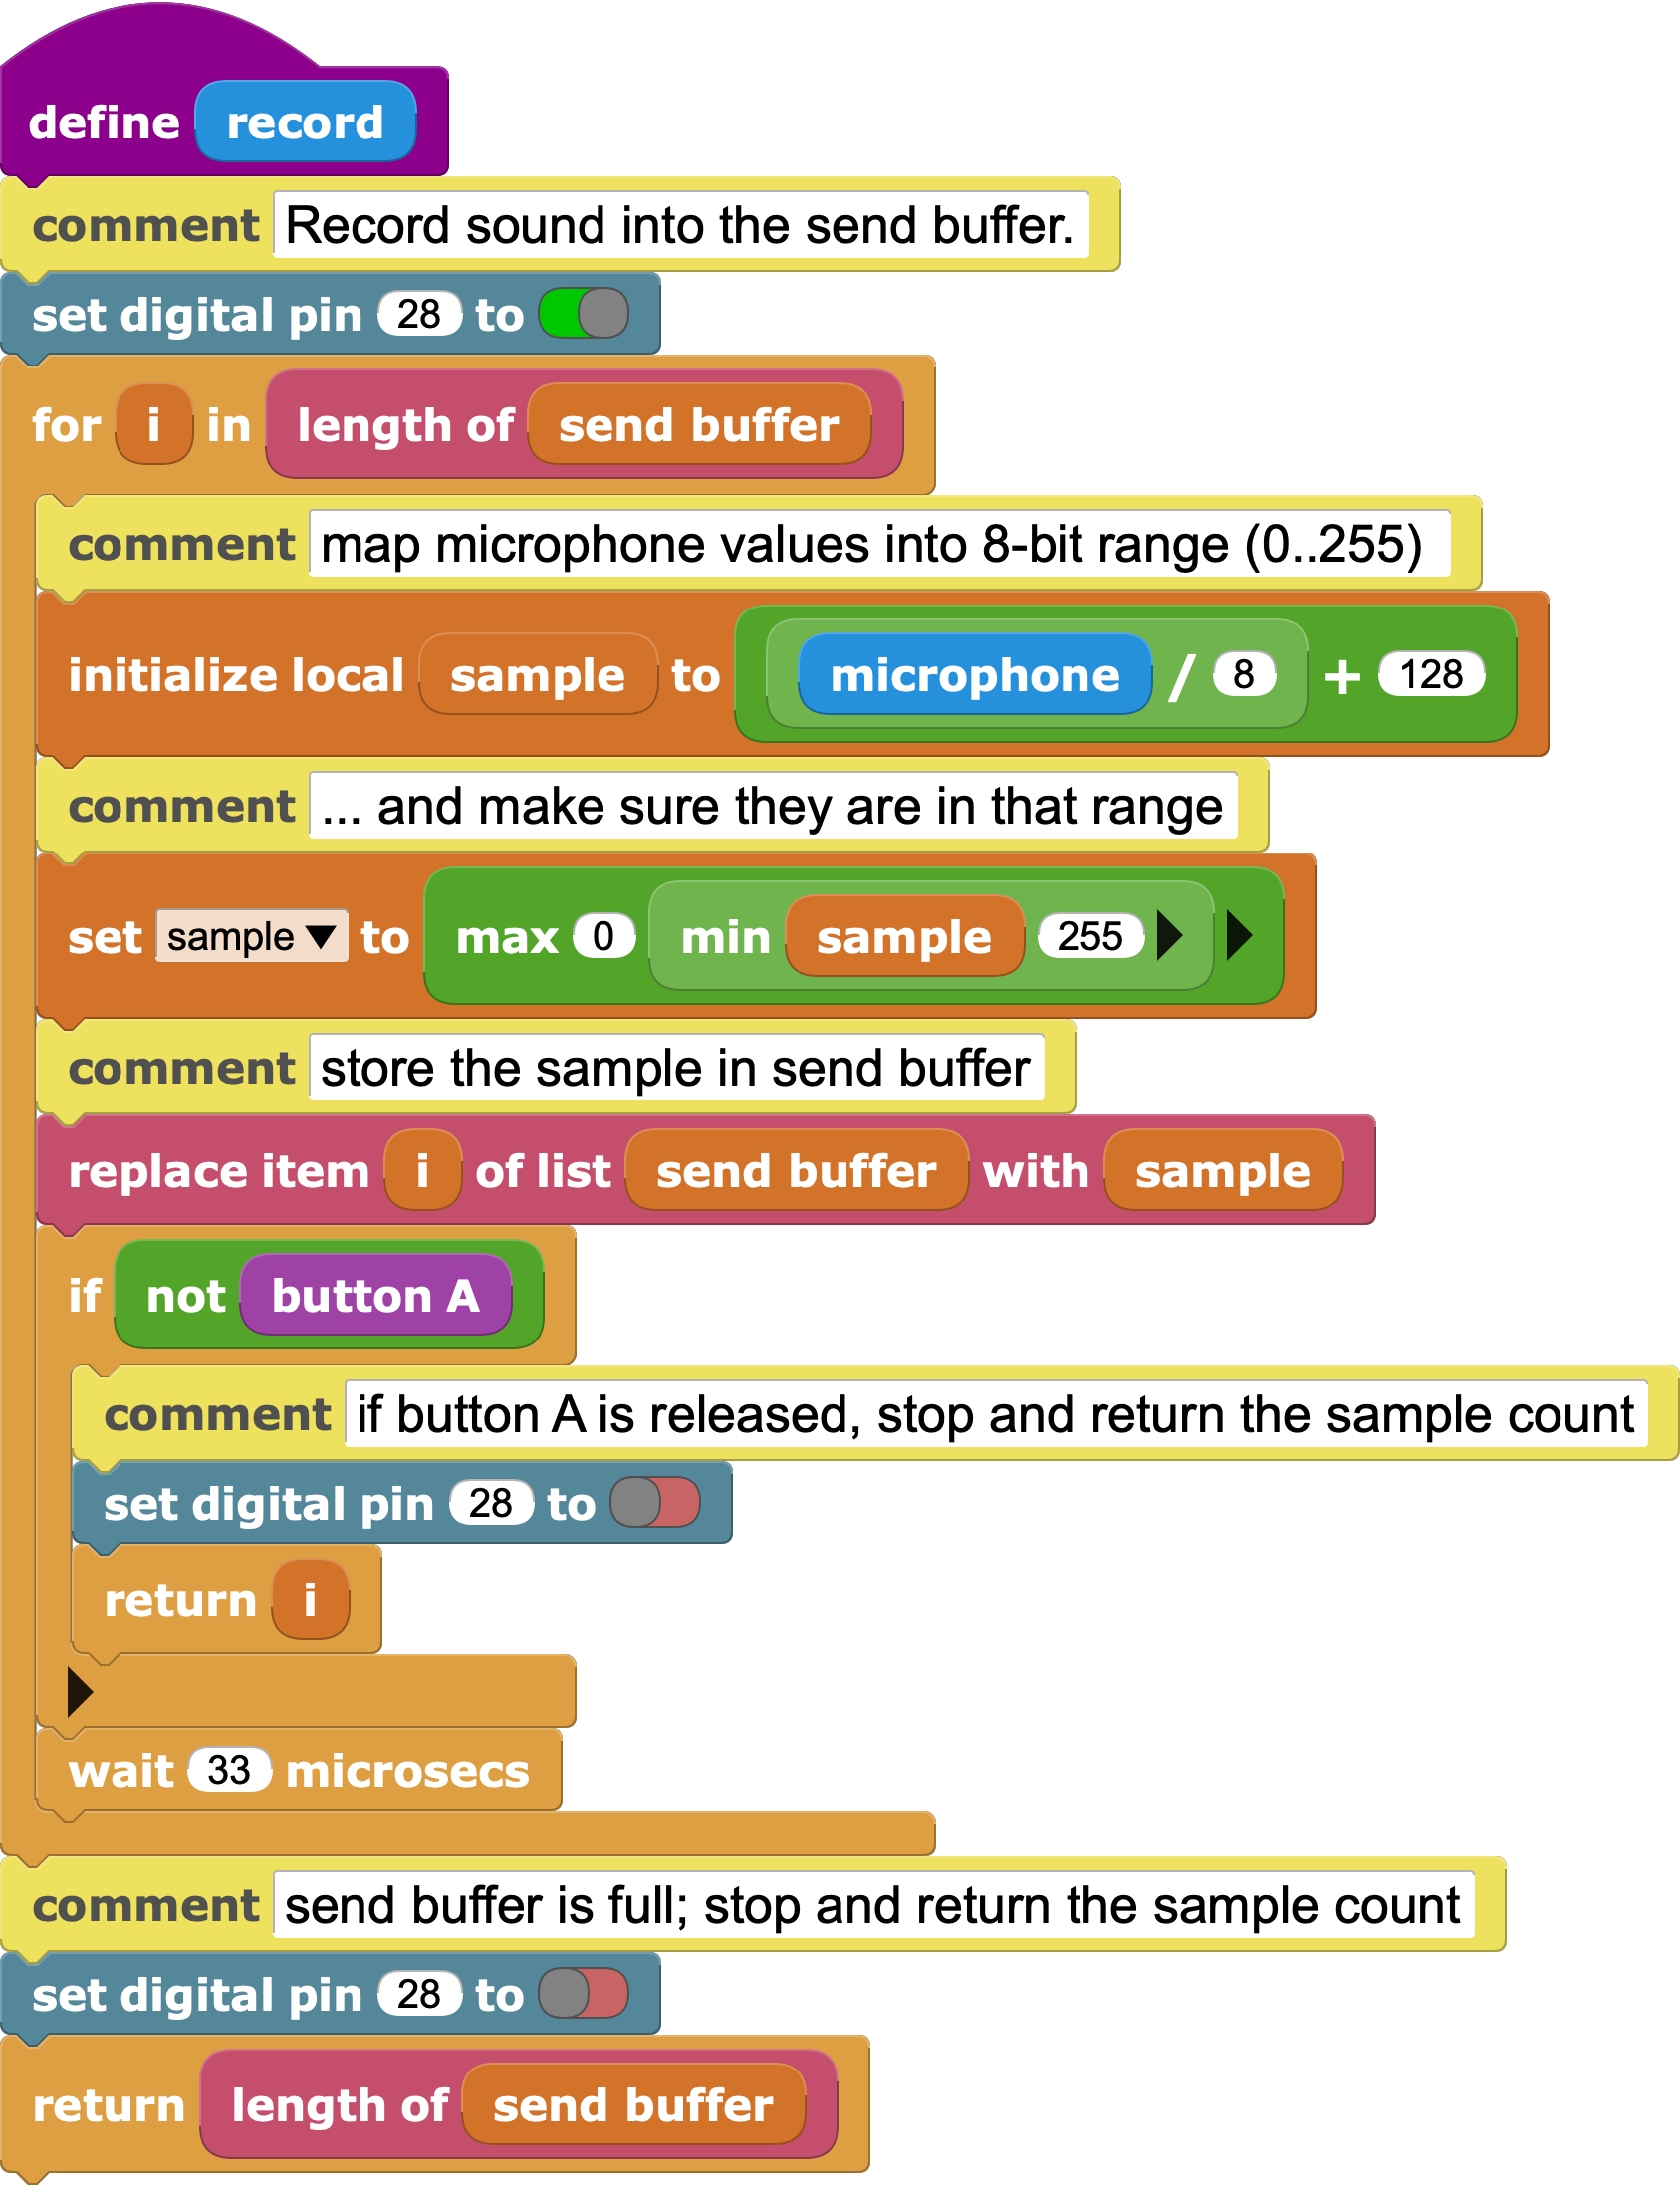
Digital pin 28 turns turns the microphone on and off. The microphone symbol on the micro:bit v2 lights up when recording is in progress.
The script divides the microphone value by eight, then adds 128 to make resulting sample range be [0..255]. The script makes sure sample is in that range so it will fit into a byte. The byte is stored in send buffer.
Transmitting
This script sends the sound data in send buffer as a sequence of low-level radio packets.
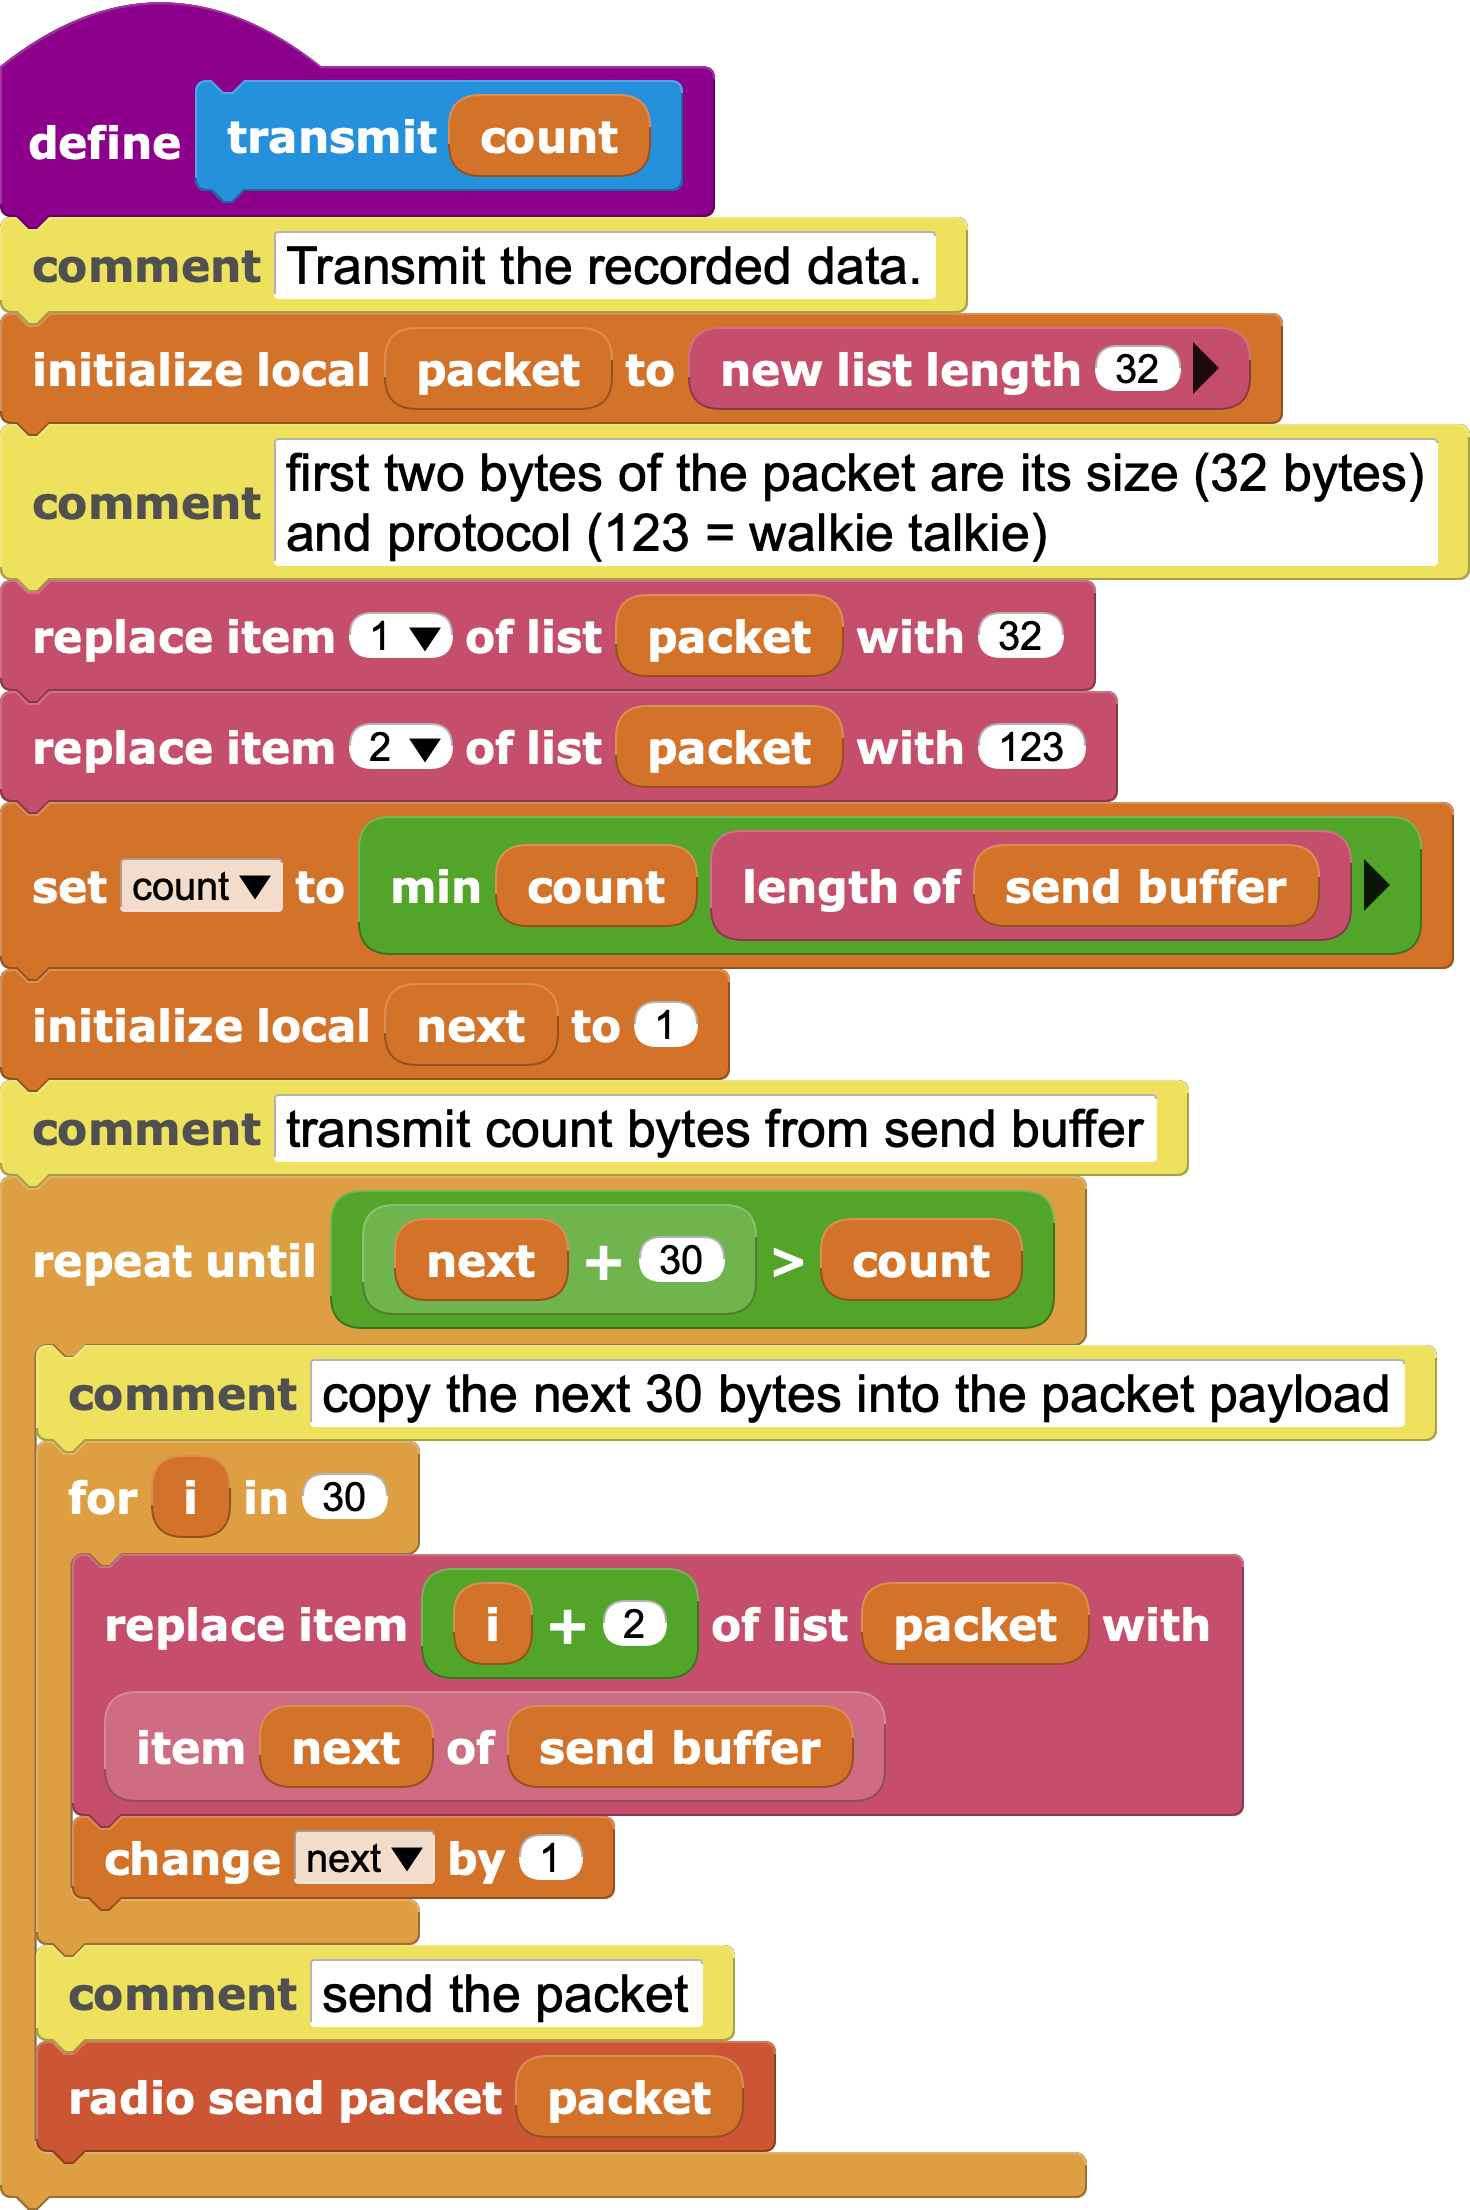
The first byte of each packet must be the number of bytes in the packet. In this case, it is always the maximum, 32 bytes.
Protocol
The second byte of each packet is the protocol which defines the layout of the rest of of the packet. Protocol 1 is the protocol used by Makecode and the MicroBlocks Radio blocks (packet details here). To avoid interferring with Makecode communictions, we need to pick some other number. This project uses 123 as the protocol number.
The repeat until loop transmits send buffer in 30 byte chunks. To keep the code simple, this script doesn't send the final few bytes if send buffer is not an exact multiple of 30. That's only a tiny fraction of a second of sound; it won't be missed.
Listening
The top-level script for receiving starts when the micro:bit powers up or, if the micro:bit is connected the MicroBlocks editor, when the green arrow is pressed.
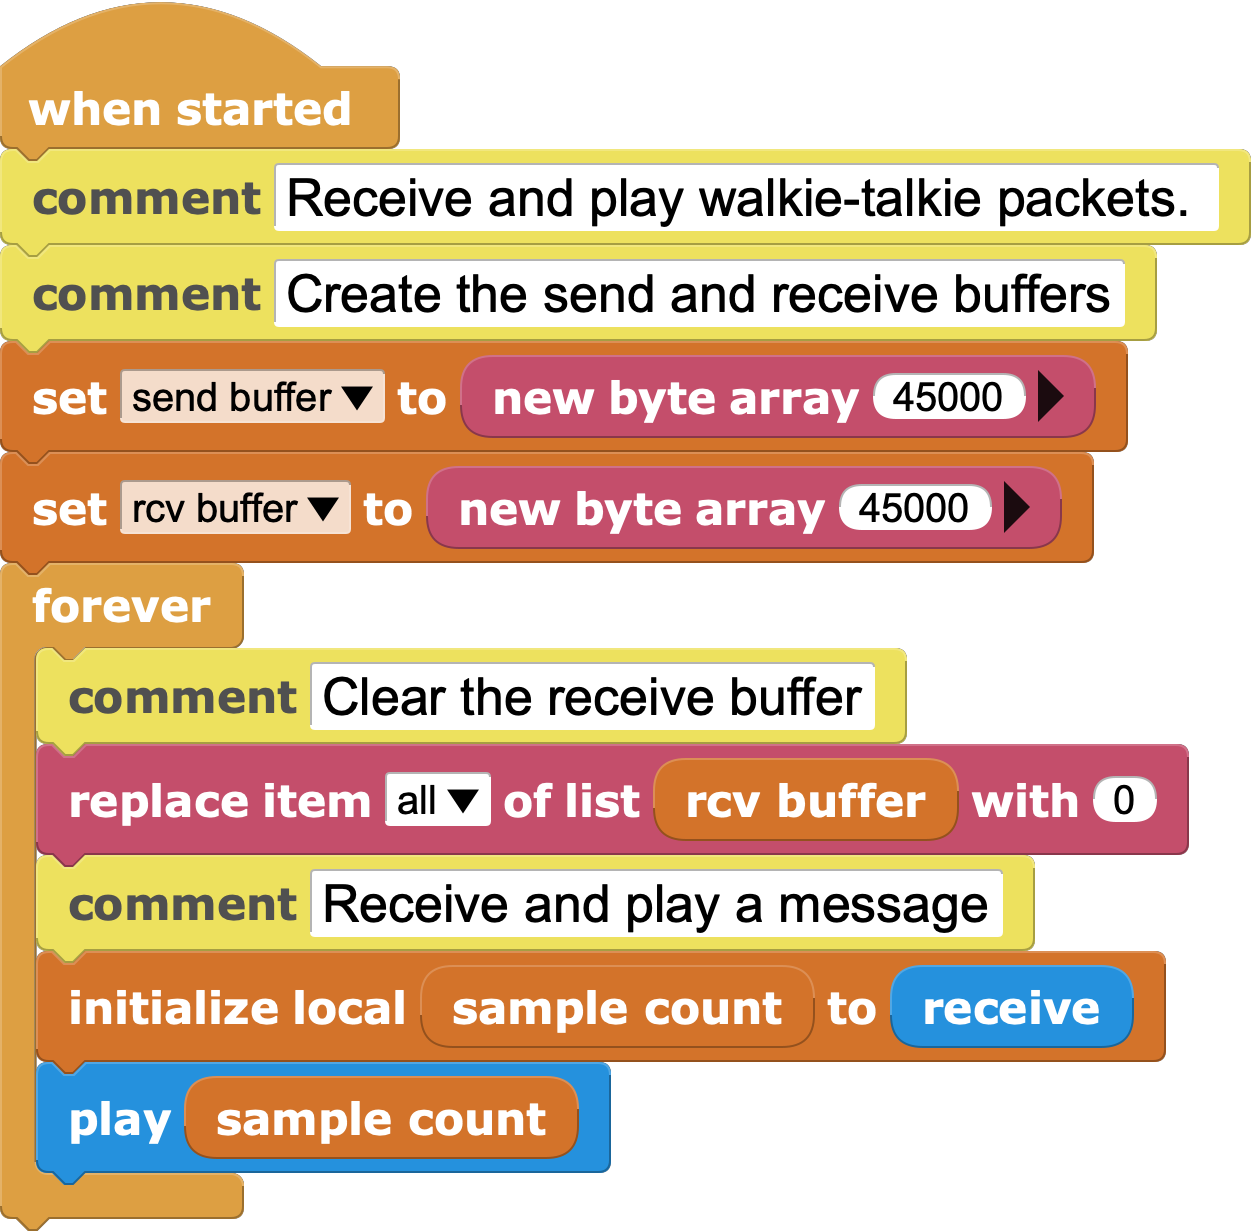
This script starts by creating buffers to hold outgoing and incoming bytes. A byte array is a fixed-size array of bytes. A byte is an 8-bit quantity that can represent an integer between 0 and 255.
These two buffers use most of the available micro:bit memory. They provide storage for a bit over five seconds of outgoing and incoming sound data.
The script then loops, calling receive to receive a message and then play to play it through the speaker. The receive function returns the number of samples received. That number is passed to play so it knows how many samples to output to the speaker.
Receiving
The receive function stores incoming sound data into rcv buffer and returns the number of sound samples received.
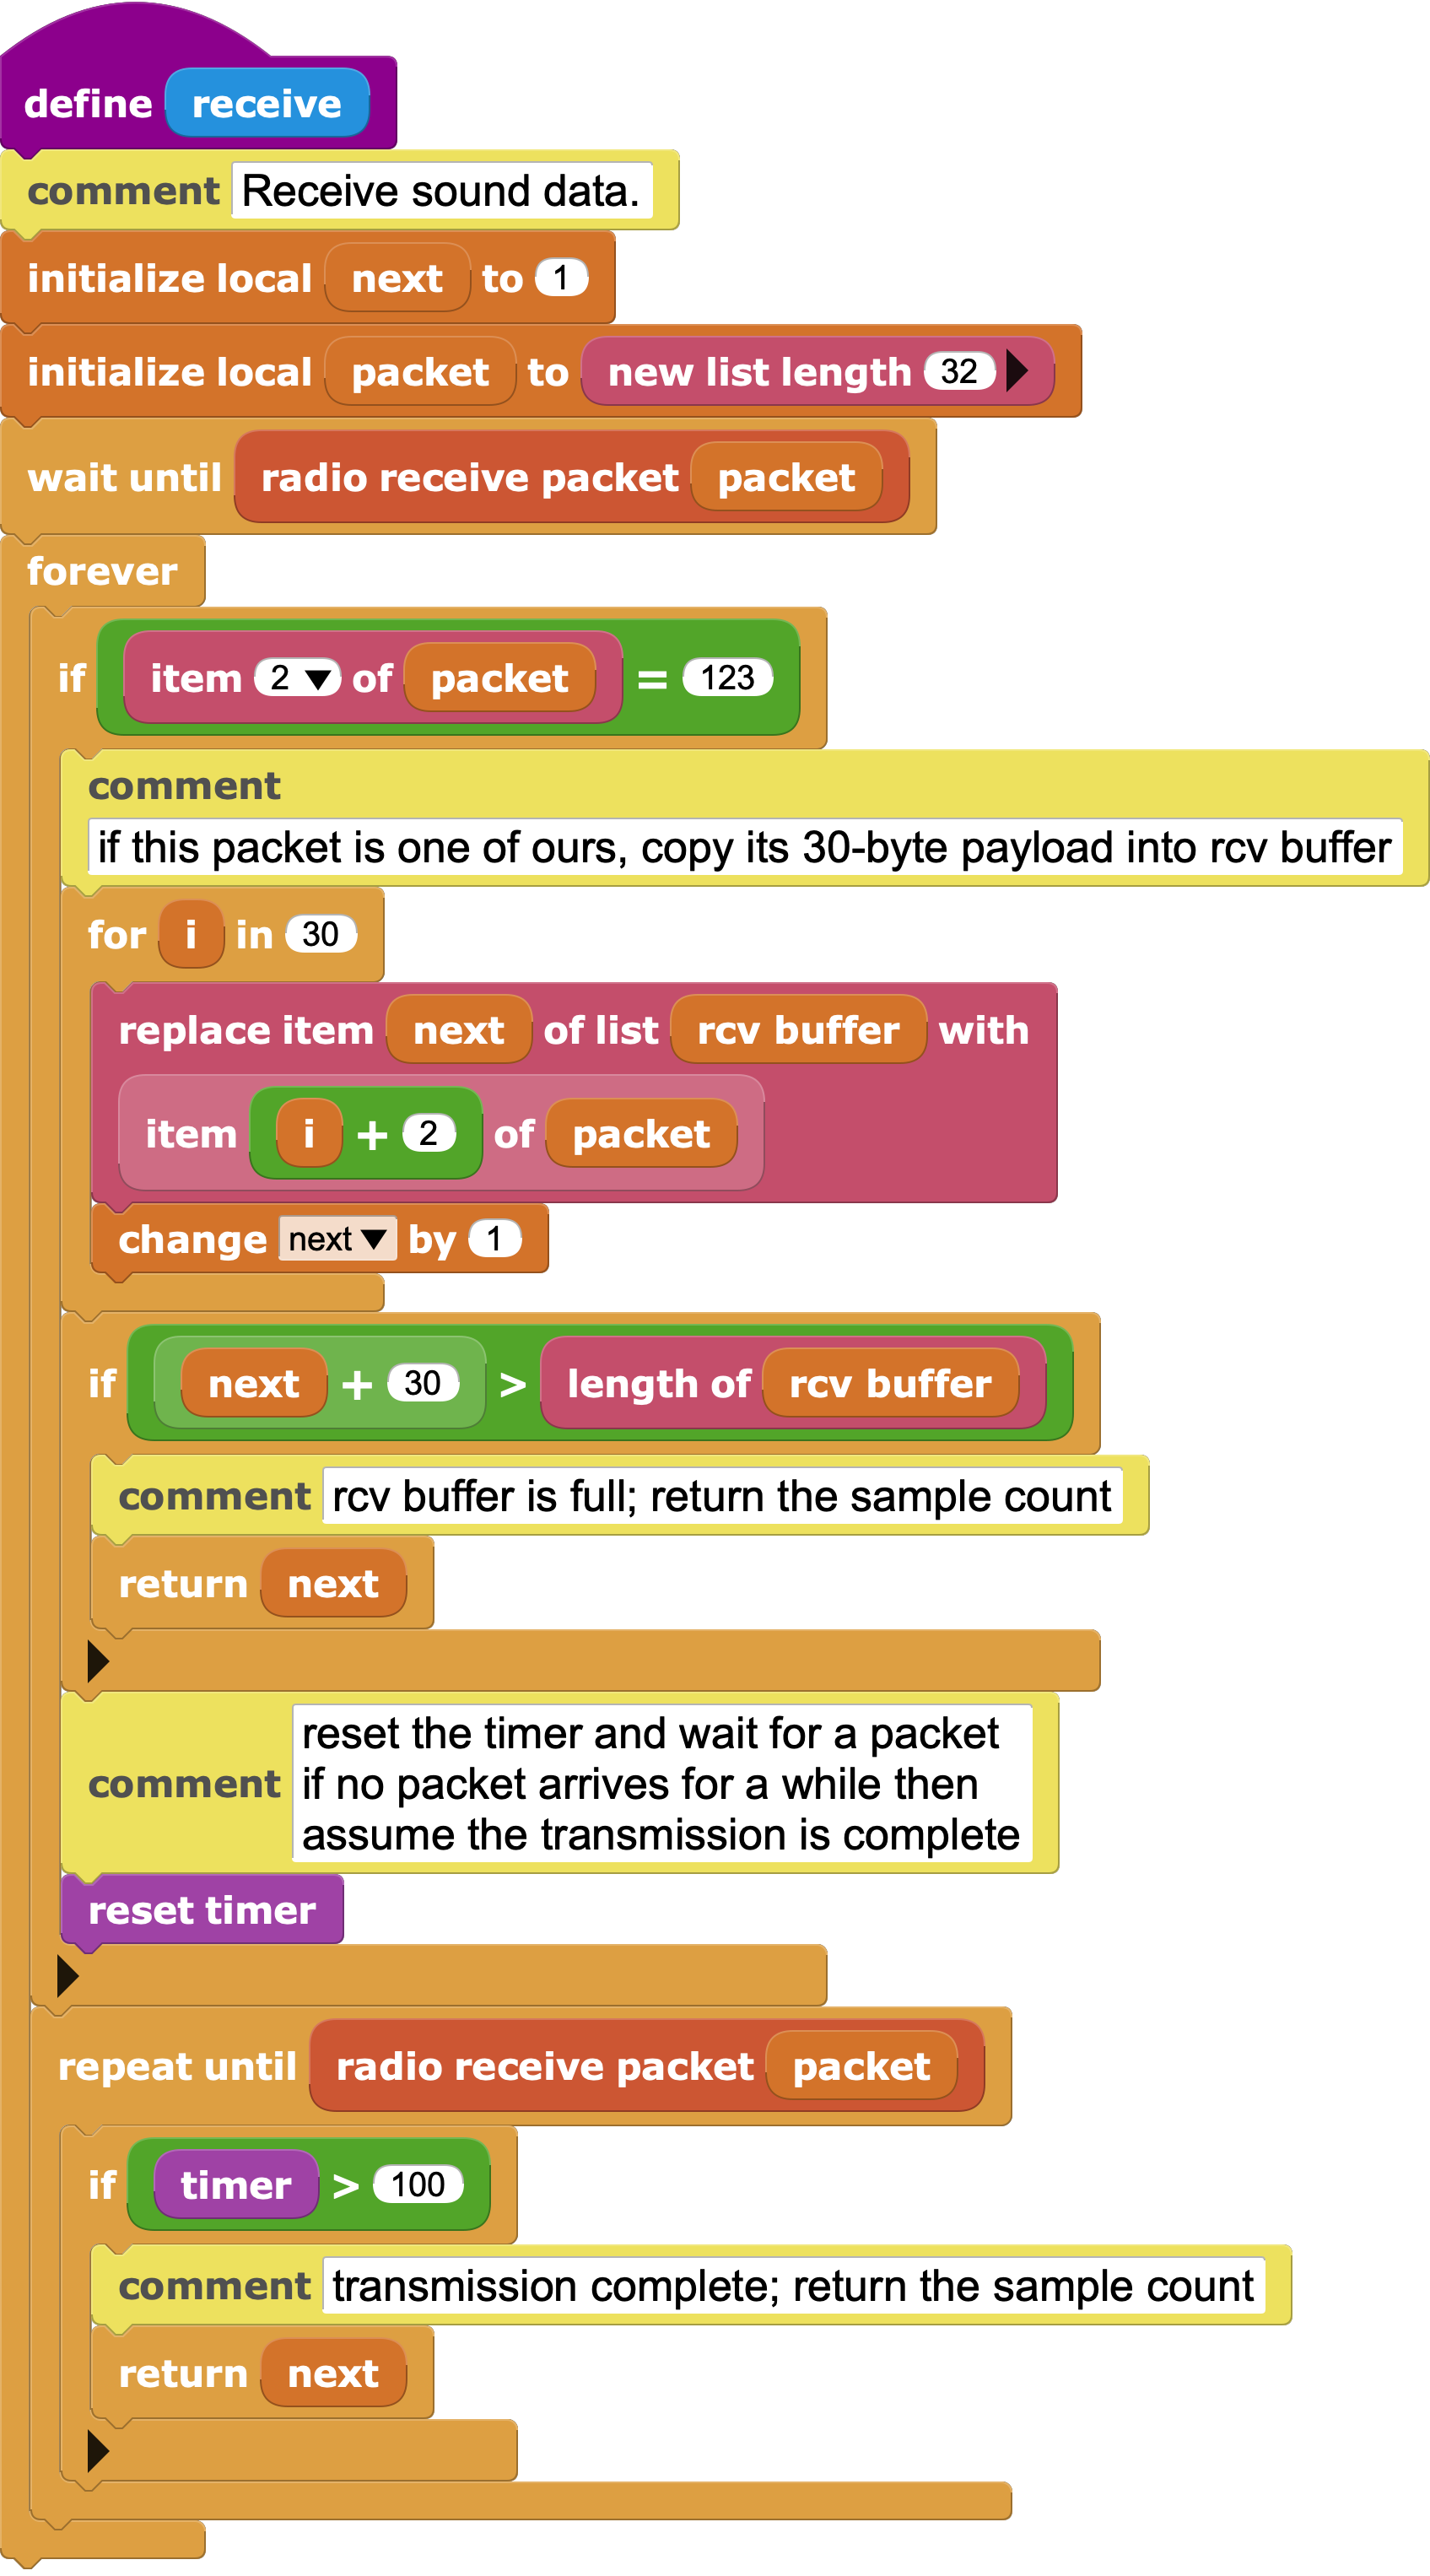
This script assumes that sound is transmitted in bursts. A recorded message is sent out as sequence of back-to-back radio packets, followed by a pause while the sender is listening or recording another message.
The script waits for a packet with the same protocol number used by the transmit script. That indicates the start of a new message.
It then loops, gathering incoming sound samples in rcv buffer until there is a pause in the incoming packet stream, signaling the end of the current message. The pause terminates the loop, returning the number of bytes received.
The script also returns if there is no space in rcv buffer for more sound samples.
Playing
The play script outputs the samples to the micro:bit's built-in speaker, pin 27.
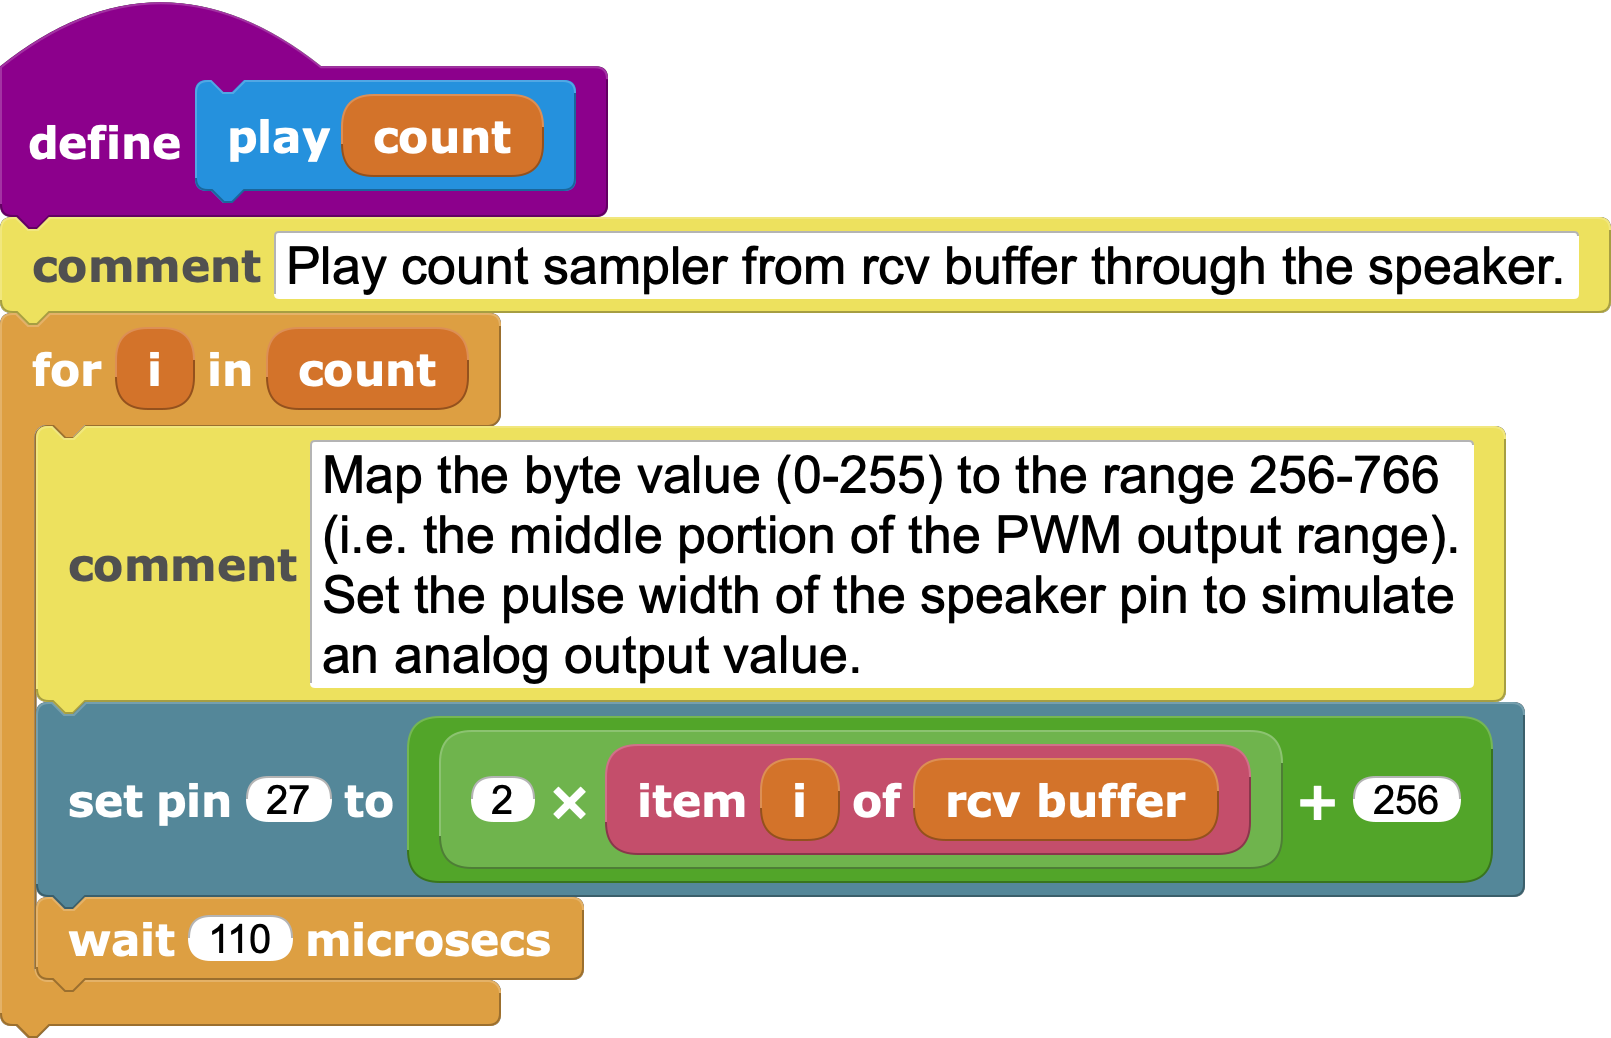
The set pin to block has a range of 0 to 1023, while the incoming sound samples have the range 0 to 255. This script doubles the the sound sample and adds 256 to result in a speaker output range of 256 to 767, a good range for driving the speaker.
Speaker Output
The micro:bit does not have a digital to analog converter (DAC). The set pin to approximates a changing output voltage using pulse width modulation (PWM). When driving a speaker with PWM, it seems to work better to avoid the extremes of the PWM output range (i.e. very short or very long pulses).
What to Do
You'll need two micro:bit v2s.
Load the project into the MicroBlocks editor. Plug in the first micro:bit and connect to it.
Test the code by clicking the green flag, then clicking the A button. The microphone icon should light up. When you release the A button, the top-middle LED on the 5x5 LED array will light as the sound is being transmitted, then go out.
Unplug that micro:bit from the computer and attach a battery pack.
Now repeat those steps for the second micro:bit. If you don't have a second battery pack, you can leave the second micro:bit attached to the computer as its power source.
Click the green arrow to start the receive loop. If you get an Insufficient memory error, just click the stop button to clear memory and click the green arrow again.
Hold one micro:bit close to your ear. Click the A button on the other microbit and speak into its microphone. Release the A button. After a brief pause, you'll hear the sound through the second micro:bit.
The maximum message length is a bit over five seconds.
Things to Try
What is the maximum range of the micro:bit radio?
Using two battery-powered micro:bits, gradually increase the distance until transmission becomes unreliable. Does the radio signal go through doors? Around corners?
How many people can communicate?
Try adding additional micro:bit walkie-talkies. Can everyone hear everyone else's transmissions? What happens if three or more walkie-talkies form a line longer than the range of a single micro:bit (e.g. down a hallway)? Can you work together to pass a message down the line?
Can you create separate channels?
Right now, a walkie-talkie micro:bit receives transmissions from all other walkie-talkies within range. Is there a way to create independent channels to keep conversations separate? (Hint: Consider how the protocol number is used by receive and transmit.)